


17
Section 4 - REPAIR & ADJUSTMENTS
WARNING
DO NOT attempt any adjustments, maintenance or
service with the engine or blade running. STOP
blade. STOP engine. Remove spark plug wire from
spark plug and secure wire away from spark plug.
Engine and components can be extremely hot. Avoid
burns by allowing engine and components sufficient
time to cool.
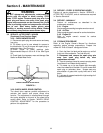
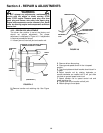
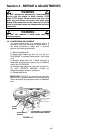
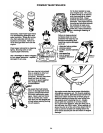
4.4.3. Transmission Poly-V Belt Replacement
1. Remove the driven disc. Refer to Section
“REPLACING DRIVEN DISC RUBBER RING” for
procedure.
2. Note the routing of the old belt around the three
pulleys before removing it. See Figure 4.11.
FIGURE 4.11
3. Remove poly-v belt from transmission pulley by
turning belt sideways and slipping between nut and
differential bracket.
4. Slip belt off of belt idler.
5. Remove belt from hex shaft pulley.
6. Place new Poly-V Belt over end of hex shaft and
onto driven pulley.
7. Work belt onto top of idler pulley.
8. Twist belt sideways and pull it upward between
the differential bracket and drive pulley and then
down into the pulley groove. Make sure the Poly-V
Belt is above belt guide.
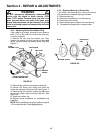
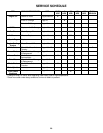
4.5 Engine To Deck Belt Service
4.5.1. Engine To Deck Belt Tension Adjustment
The engine to deck belt transmits power from the
engine to blade. This belt during normal service will
require periodic tension adjustment.
1. Remove spindle cover.
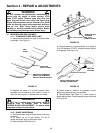
2. Locate blade control spring. See Figure 4.12.
3. With engine off, engage blade control. The length
of the spring should increase by 1/4" to 3/8" for
proper belt tension.
4. To obtain proper tension, turn the thumb screw
located on the upper left handle until the spring
extension is 1/4" to 3/8".
5. Install spindle cover.
4.5.2. Engine to Deck Belt Replacement
1. Remove the engine to drive disc belt as
described in Section on Wheel Drive Belt Service.
2. Remove spindle cover.
3. Remove belt from spindle pulley.
4. Loosen idler pulley and remove belt from
between guide and idler pulley.
5. Remove drive disc belt from engine pulley.
6. Remove deck belt from engine pulley.
7. Reverse to install new belt.
NOTE: Check to make sure belt is routed inside the
belt guides. Verify proper belt tension by engaging
blade control. Adjust thumb screw until spring is
extended 1/4” to 3/8”.
FIGURE 4.12
TRANSMISSION
POLY-V BELT
HEX SHAFT PULLEY
DIFFERENTIAL
BRACKET
BLADE CONTROL
ADJUSTING WHEEL
BLADE CONTROL
SPRING
1/4” TO 3/8” EXTENDED