


10
Section 3 - MAINTENANCE
3.1 INTRODUCTION
To retain the quality of the mower, use genuine
SNAPPER replacement parts only. Contact a local
SNAPPER dealer for parts and service assistance.
For the correct part or information for a particular
mower, always mention model and serial number.
WARNING
DO NOT attempt any adjustments, maintenance or
service with the engine or blade running. STOP
blade. STOP engine. Remove spark plug wire from
spark plug and secure wire away from spark plug.
Engine and components can be extremely hot. Avoid
burns by allowing engine and components sufficient
time to cool.
3.2 SERVICE - AFTER FIRST 5 HOURS
3.2.1. CHANGE ENGINE OIL
1. The items needed to perform oil change are:
cloth rags, (1) Two quart shallow pan, (1) 8mm Allen
wrench.
2. Move machine to level ground.
3. Remove spark plug wire from spark plug and
secure away from spark plug.
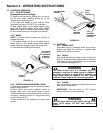
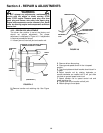
4. Use 8mm Allen wrench to loosen drain plug. The
plug is located directly below oil filler tube on the
bottom side of engine. LOOSEN only, finger tight.
5. Raise front of mower until handles are in contact
with ground. Block mower securely in this position
(or get help to hold the handles down).
6. Insert shallow 2 quart oil drain pan from the rear
of the machine.
7. Remove the oil drain plug and allow oil to drain
into pan.
8. Lower front of mower. Remove pan. Reinstall oil
drain plug. Tighten securely.
9. Fill engine crankcase to proper level. Refer to
Engine Operator's Manual for proper oil
specifications and oil filter change intervals.
10. Dispose of drained oil properly.
11. Attach spark plug wire to spark plug.
NOTE: Wipe up any spilled oil off machine before
operating.
3.2.2. SERVICE ENGINE
Service engine air cleaner. Refer to engine owner’s
manual for proper air filter specification.
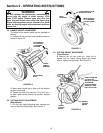
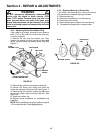
3.2.3. GREASE FRONT CASTER BUSHINGS
Grease front caster bushing with three shots of general
purpose grease from a grease gun.
3.2.4. GREASE DECK/BLADE SPINDLE
Grease deck/blade spindle with three shots of general
purpose grease from a grease gun.
WARNING
The blade should come to a complete stop in 3
seconds or less after the blade control is released. If
the blade continues to rotate after 3 seconds, the
blade brake must be adjusted. DO NOT operate
machine if blade brake is not functioning properly.
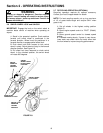
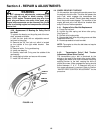
3.2.5. CHECK BLADE BRAKE
Check blade brake for proper function. Blade should
stop in 3 seconds or less after releasing blade control.
Refer to Section “BLADE BRAKE ADJUSTMENT” in
this manual for adjustment procedure.
3.2.6. CHECK ENGINE to DECK BELT
Visually check engine to deck belt for cracking,
fraying, severed or belt strands exposed. Replace belt
before operating mower. Verify proper belt tension.
Refer to Section "ENGINE TO DECK BELT SERVICE"
in this manual for belt tension adjustment and engine to
deck belt replacement.
3.2.7. CHECK WHEEL DRIVE BELTS
Visually check belts for cracking, fraying, severed or
belt strands exposed. Replace belts before operating
mower. Verify proper belt tension. Refer to Section
“WHEEL DRIVE BELT SERVICE" for belt tension
adjustment and wheel drive belt replacement
instructions.
(Continued on Next Page)