


6
SECTION 2 - SET-UP INSTRUCTIONS FOR SNAPPER 73” FINISHING MOWER
Set-Up Instructions
The following instructions cover the initial set up of the
SNAPPER 73” Finishing Mower. Read and follow each
step carefully.
WARNING
Read entire manual before attempting to set up or
operate this mower.
This mower is designed for a Category 1 hitch and
540 rpm Power Take Off (PTO). Only attach this
mower to tractors compatible with Category 1 hitch
requirements.
DO NOT modify mower attachment in any way.
STOP tractor. STOP engine. SET Brake. REMOVE key.
Allow all moving parts to stop before attempting any
adjustments, maintenance or service to the mower.
STEP 1: Remove the mower and components from the
shipping carton.
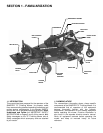
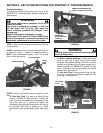
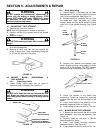
STEP 2: Assemble front & rear hitch bars and hitch link
as shown in Figure 1. Tighten all hardware securely.
NOTE: When assembled properly, hitch link should
pivot on hitch bolt sleeve.
FIGURE 1
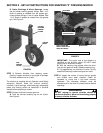
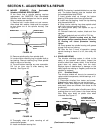
STEP 3: Check all lubrication points and gear box fluid
level.
A. Gear Box Fluid. The gear box holds 20 fluid
ounces of SAE 90 EP gear lubricant. To check the
level, remove the breather/filler plug located on the
top of the gear box. If lubricant is needed, the
driveshaft guard covering the gear box will have to
be removed. Add fluid as needed to fill. Install
breather/filler plug and driveshaft guard. See Figure
2.
FIGURE 2
WARNING
Driveshaft guard must be down and securely attached
before operating mower.
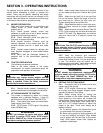
B. Mower Spindle Housings. Locate the grease
fitting on the front of each of the three spindle
housings. Add grease (Kendall NLGI No. 2 Lithium
grease) using grease gun until grease purges out of
spindle housing vent. NOTE: The spindle housing
vent is located on the housing below the mower
deck surface. See Figure 3.
C. Idler Arm Pivot. Locate grease fitting on idler
arm. Add 1 to 3 shots of grease as needed from the
grease gun. See Figure 3.
FIGURE 3
GREASE
FITTING
IDLER ARM
PIVOT
IDLER
ARM
SPINDLE
HOUSING
DRIVESHAFT
GUARD (SERVICE
POSITION)
GEAR BOX
RE
MOVE BREATHER/FILLER
PLUG TO CHECK FLUID LEVEL
TOP HITCH LINKS
FRONT
HITCH
BARS
REAR HITCH BARS