


11
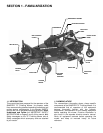
SECTION 5 - ADJUSTMENTS & REPAIR
WARNING
DO NOT attempt any maintenance, adjustments, or
service with the engine or blades running. STOP
engine. STOP blades. SET brake. REMOVE key. Allow
all machinery to stop before leaving operators
position or approaching mower.
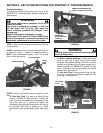
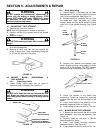
4.1 MOWER BELT REPLACEMENT
1. Remove belt cover from mower.
NOTE: Belt routing diagram is located on the deck.
2. Carefully roll belt out of groove and off left spindle
pulley.
3. Remove old belt.
WARNING
Use CAUTION removing old belt. Belt is under spring
tension.
4. Route new belt as shown in Figure 4.1, leaving belt
off of left spindle pulley.
5. Remove all slack from belt and pull towards left
pulley. At same time, rotate clockwise allowing belt
to roll onto the groove on the pulley.
FIGURE 4.1
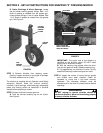
4.2 MOWER BLADE SHARPENING &
REPLACEMENT
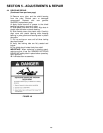
4.2.1. Blade Wear Limits
1. Inspect blades before each use for signs of
excessive wear or damage. See Figure 4.2.
WARNING
DO NOT use a blade that has worn beyond the wear
limit. Blades are sharp and can cause severe injury.
Wear heavy gloves when handling or working around
blades.
FIGURE 4.2
4.2.2 Blade Sharpening.
1. Inspect blades. If the blade has not been
damaged and it has not worn beyond the wear
limit it may be sharpened. See Figure 4.2.
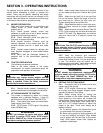
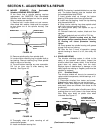
2. Remove blade by removing the nut from
the blade bolt. Allow the blade bolt, blade
washer, blade and four blade spacers to drop
down out of the spindle housing. See Figure
4.3.
FIGURE 4.3
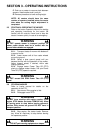
3. Remove bolt, washer and spacers from
blade. Sharpen existing cutting edge only at an
angle of 22 to 28 degrees. DO NOT sharpen
beyond existing cutting edge. See Figure 4.4.
FIGURE 4.4
4. Check the balance of the blade after
sharpening. Correct as required by removing
material from the end (not cutting edge) of the
blade.
5. Install blade paying close attention to the
assembly sequence shown in Figure 4.3.
6. Torque blade bolt and nut to 60 to 75 ft. lbs.
4.2.3. MOWER BLADE REPLACEMENT
1. If blades are worn beyond the limit or have
been damaged, they must be replaced. See
Figure 4.2.
2. Remove blade as instructed in “Mower
Blade Sharpening” above.
3. Install new blade following assembly
sequence carefully. See Figure 4.3.
4. Torque blade bolt and nut to 60 to 75 ft. lbs.
FOUR
BLADE
SPACERS
BLADE
BOLT
BLADE
WASHER
DANGEROUS CONDITION!
DO NOT USE ON MOWER!
REPLACE WITH NEW BLADE.
NEW BLADE
WEAR LIMIT
(NOTCH STARTS)
22º - 28º
ORIGINAL CUTTING EDGE