


43
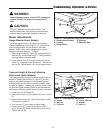
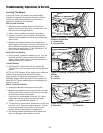
Troubleshooting, Adjustment, & Service
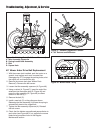
38” Mower Drive Belt Replacement
NOTE: Be sure to use only genuine Simplicity
replacement parts. Check the back of this manual or the
decal under the hood for common replacement part
numbers.
Note: It is not necessary to remove the mower to install a
new belt. However, for easier access mower can be
removed. See Mower Removal in the Operation section.
1. Park the tractor on a smooth, level surface such as a
concrete floor. Disengage the PTO, turn off the
engine and lock the parking brake. Remove the key.
2. If mower is not removed, lower the mower lift and
place the mower in the lowest cutting position.
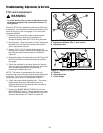
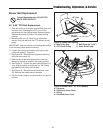
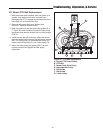
3. Push the idler arm (A, Figure 49) away from you to
relieve belt tension. Drop the belt from the PTO
(electric clutch) pulley.
IMPORTANT: Note the position of all belt guides relative
to the belt and pulleys before loosening.
4. Loosen the two belt stop brackets (C) and idler pulley
belt guide (D).
5. Remove the old belt and replace with a new belt.
Make sure V-side of belt runs in arbor pulley grooves
and the flat backside runs against the idler pulley.
6. Position the belt stop brackets (C) in their original
positions. There must be 1/8” clearance between the
belt stop and the pulleys.
7. Position the idler pulley belt guide (D) in its original
position up against arm (A) so that there is a 1/8" gap
between the pulley and belt guide.
8. Install mower on tractor if it was removed. See
Operation section.
9. Run the mower under no-load condition for about 5
minutes.
Figure 49. Mower Belt Routing - 38" Mower Deck
A. Idler Pulley Arm C. Belt Stop Bracket
B. PTO Pulley D. Idler Pulley Belt Guide
Left Side of Mower
1/8” Gap
1/8” Gap
1/8” Gap