


14
Every 135 hours of operation, remove
and clean the muffler.
WARNING!
Never operate the machine with a
damaged or missing mufer or spark
arrester! Operating with missing or
damaged exhaust components is a re
hazard and could also damage your
hearing.
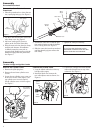
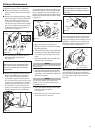
1. Remove the spark plug boot.
2. Remove the two 4 mm engine cover
screws (located at the top of the recoil
housing).
3. Loosen the 5 mm engine top cover
screw (the screw is captive) and lift the
cover from the engine.
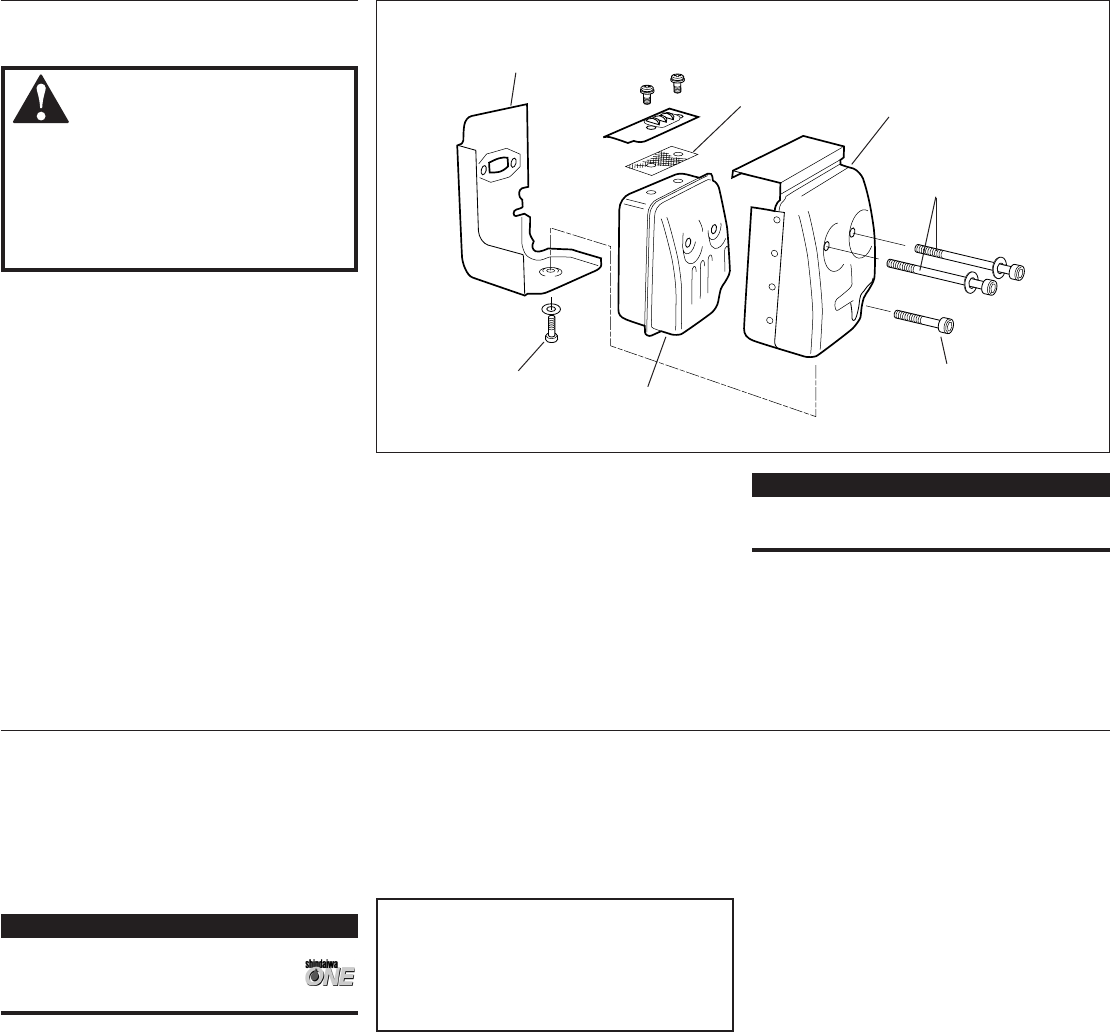
4.
Remove the two 5 mm muffler screws.
Remove the lower muffler screw, then lift
the muffler assembly from the engine.
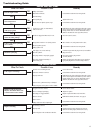
5. Remove the rear muffler shield socket
head screw and, while noting the ori-
entation of parts, separate the muffler
shield. See Figure 30.
23139
135-Hour Maintenance
Forward
Muffler
Shield
Lower Muffler
Screw
Muffler
5 mm Muffler
Screws
Rear Muffler
Shield
Spark
Arrester
Screen
Rear Muffler
Shield Screw
Figure 30
6. Remove the spark arrester screen and
clean with a stiff bristle brush.
7. Gently tap the muffler on a wood surface
to dislodge any loose carbon.
8. Inspect the cylinder exhaust port for
carbon buildup.
IMPORTANT!
If you note excessive carbon buildup, con-
sult with an authorized servicing dealer.
9. Reassemble the muffler in the reverse
order of disassembly.
Long Term Storage
Whenever the unit will not be used for 30
days or longer, use the following proce-
dures to prepare it for storage:
Clean external parts thoroughly and
apply a light coating of oil to all metal
surfaces.
Drain all the fuel from the fuel tank.
IMPORTANT!
All stored fuels should be stabilized with
a fuel stabilizer such as STA-BIL™, if
oil with fuel stabilizer is not used.
To remove the remaining fuel from the
fuel lines and carburetor and with the fuel
drained from the fuel tank.
Remove the spark plug and pour about
1/4 ounce of 2-cycle mixing oil into the
cylinder through the spark plug hole.
Slowly pull the recoil starter 2 or 3 times
so oil will evenly coat the interior of the
engine. Reinstall the spark plug.
Before storing the unit, repair or replace
any worn or damaged parts.
Remove the air cleaner element from the
carburetor and clean it thoroughly with
soap and water. Let dry and reassemble
the element.
Store the unit in a clean, dust-free area.
CAUTION!
Gasoline stored in the carburetor for
extended periods can cause hard start-
ing, and could also lead to increased
service and maintenance costs.
1. Prime the primer bulb until no more fuel
is passing through.
2. Start and run the engine until stops
running.
3. Repeat steps 1 and 2 until the engine will
no longer start.