


13
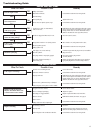
50-Hour Maintenance
Every 50 hours of operation (more
frequently in dusty or dirty conditions):
Remove the cylinder cover and clean
grass and dirt from the cover and cylin-
der fins.
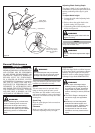
Remove the cutting attachment, cutting
attachment holder and gear shaft collar.
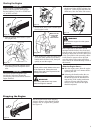
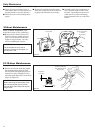
Remove the filler plug from the side
of the gearcase and press new grease
into the gearcase until grease is pushed
out. Use only lithium-base grease such
as Shindaiwa Gear Case Lubricant or
equivalent. See Figure 25.
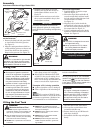
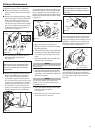
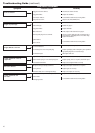
Use a hooked wire to extract the fuel
filter from inside the fuel tank.
See Figure 23.
Remove and replace the filter element.
Before reinstalling the new filter ele-
ment, inspect the condition of all the
fuel system components (fuel pick-up
line, fuel return line, tank vent line, tank
vent, fuel cap and fuel tank). If damage,
splitting or deterioration is noted, the
unit should be removed from service
until it can be inspected or repaired by a
Shindaiwa-trained service technician.
CAUTION!
Make sure you do not pierce the fuel
line with the end of the hooked wire.
The line is delicate and can be dam-
aged easily.
26047
Filter Element
Hooked
Wire
Figure 26
26024
23052
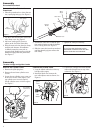
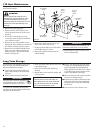
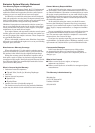
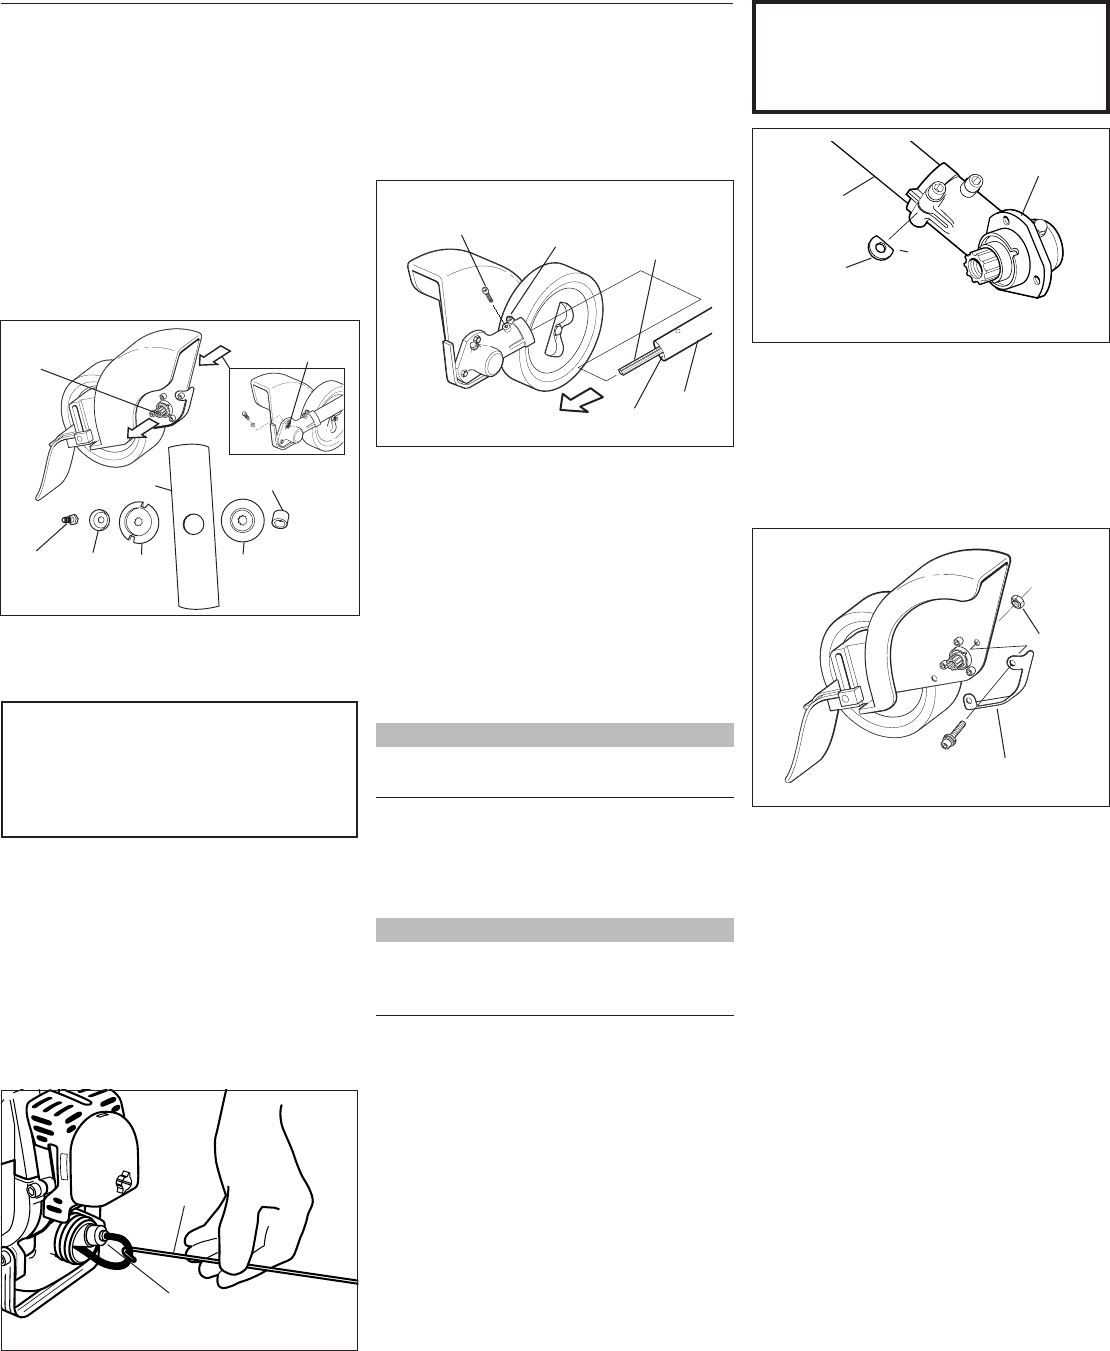
1. Loosen the gearcase clamp screw.
2. Remove the gearcase index screw.
3. Slide the gearcase and shield assembly
from the shaft tube.
4. Pull the flexible shaft from the shaft tube
assembly, and clean the shaft thorough-
ly in solvent and dry with a clean shop
towel.
5. Inspect the flexible shaft carefully, and
replace if worn or damaged.
Gearcase Index
Screw
Shaft
Tube
Flexible
Shaft
Flat
(toward
tube)
Shaft
Tube
Gearcase
Figure 27
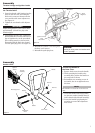
Figure 28
D-shaped Shim
Washer
Liner
Gearcase
Clamp
Screw
Lubricate the Flexible Shaft.
Lack of lubrication will cause rapid wear to
the flexible shaft and also to the shaft tube
liner, resulting in increased vibration and
greatly decreased service life. Remove and
lubricate the flexible shaft as follows: Refer
to Figure 27:
NOTE:
Always replace the liner if the flexible shaft is
being replaced.
6. Coat the entire length of the shaft with
Shindaiwa Premium Gearcase Lube (or
equivalent), and reinstall the shaft in the
shaft tube assembly.
NOTE:
For extended shaft life, the flexible cable
should be reversed end-for-end during the
reinstallation process.
7. Insert the flexible shaft into the female
end of the gearcase pinion.
See Figure 27.
8. Install the gearcase on the shaft tube in
the reverse order of removal.
New
Grease
Figure 25
Old
Grease
Shaft
Bolt
Bolt
Guard
Holder
A
Holder
B
Output
Shaft Collar
Blade
23054
Inspect the Gearcase Protector.
The metal gearcase protector (P/N 72958-
16210) is installed to protect the gearcase
flange from damage when working close to
sidewalks or other abrasive surfaces, and
should be routinely inspected for damage
or excessive wear. See Figure 29.
Gearcase Protector
(P/N 72958-16210)
When replacing the protector, inspect to be
sure that both of the protector mounting
screws are firmly tightened and each screw
is locked in place with a nut as shown in
Figure 29.
Nut
Figure 29
CAUTION!
The D-shaped shim washer must be
positioned with its at edge toward the
shaft tube.