68
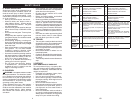
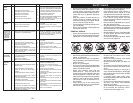
PROBLEMA
CAUSA CORRECCIÓN
Pérdida de
fuerza
(sigue)
9.
Agua en el combustible.
9.
Vaciar el estanque de combustible y el carbu-
rador, vuelva a llenar el estanque con gaso-
lina nueva y cambie el filtro de combustible.
10.
Alambrado de la bujía suelto.
10.
Conecte y apriete el alambre de la bujía.
11.
Rejilla/aletas de aire del motor sucias.
11.
Limpie las rejilla/aletas de aire del motor.
12.
Silenciador sucio/taponado.
12.
Limpie/cambie el silenciador.
13.
Alambrado suelto o dañado.
13.
Revise todo el alambrado.
14.
Carburador desajustado.
14.
Vea “PARA AJUSTAR EL CARBURADOR”
en la sección de Servicio y Ajustes.
15.
Válvulas del motor desajustadas.
15.
Pongase en contacto con un centro de
servicio cualificado "SEARS".
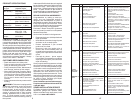
Vibración
excesiva
1.
Cuchilla desgastada, doblada o suelta.
1.
Cambie la cuchilla. Apriete el perno de
la cuchilla.
2.
Mandril de la cuchilla doblado.
2.
Cambie la mandril de la cuchilla.
3.
Parte(s) suelta(s)/dañada(s).
3.
Apriete la(s) parte(s). Cambie las partes
dañadas.
El motor conti-
núa funcionando
cuando el op-
erador se baja
del asiento con
el embrague
del accesorio
enganchado
1.
Sistema de control que exige la presencia
del operador –seguridad fallado.
1.
Revise el alambrado, los interruptores
y la conexiones.Si no están correctas,
Pongase en contacto con un centro de
servicio cualificado "SEARS".
El corte
disparejo
1.
Cuchilla desgastada, doblada o suelta.
1.
Cambie la cuchilla. Apriete el perno de
la cuchilla.
2.
El conjunto segador no estánivelado.
2.
Nivele el conjunto segador.
3.
Acumulación de césped, hojas y basura
debajo de la segadora.
3.
Limpie la parte inferior de la cajade la
segadora.
4.
Mandril de la cuchilla doblado.
4.
Cambie la mandril de la cuchilla.
5.
Los agujeros de ventilación del conjunto
segador taponadosdebido a la acumu-
lación de
cé-sped, hojas y basura
alred-
edorde los mandriles.
5.
Limpie alrededor de los mandriles para
abrir los de ventilación.
Las cuchil-
las segado-
ras no rotan
1.
Obstrucción en el mecanismo del embrague.
1.
Remueva la obstrucción.
2.
La correa de impulsión de la segadora está
desgastada/dañada.
2.
Cambie la correa de impulsión de la
segadora.
3.
Polea de guía atascada.
3.
Cambie la polea de guía.
4.
Mandril de la cuchilla atascado.
4.
Cambie la mandril de la cuchilla.
Mala des-
carga del
césped
1.
Velocidad del motor muy lenta.
1.
Ponga el control de la aceleración en la
posición de “RÁPIDO” (fast).
2.
Velocidad de recorrido demasiado rápida.
2.
Cambie a una velocidad más lenta.
3.
Césped mojado.
3.
Permita que se seque el céspedantes
de segar.
4.
El conjunto segador no estánivelado.
4.
Nivele el conjunto segador.
5.
Presión de aire de las llantas baja o
dispareja.
5.
Revise las llantas para verificarque tienen
la presión de aire.
6.
Cuchilla desgastada, doblada o suelta.
6.
Cambie/afile la cuchilla. Apriete el perno
de la cuchilla.
7.
Acumulación de césped, hojas y basura
debajo de la segadora.
7.
Limpie la parte inferior de la cajade la
segadora.
8.
La correa de impulsión de la segadora está
desgastada o desajustada.
8.
Cambie/ajuste la correa de impulsión de
la segadora.
9.
Las cuchillas están mal coninstaladas.
9.
Vuelva a instalar las cuchillas elborde afilado
hacia abajo.
10.
Cuchillas inadecuadas en uso.
10.
Cambie por las cuchillas enumeradas en
este manual.
11.
Los agujeros de ventilación del conjunto
agujeros segador taponados debido a la
acumulación de césped, hojas y basura
alrededor de los mandriles.
11.
Limpie alrededor de los mandriles para
abrir los de ventilación.
5
• Remove gas-powered equipment from
the truck or trailer and refuel it on the
ground. If this is not possible, then refuel
such equipment with a portable container,
rather than from a gasoline dispenser
nozzle.
• Keep the nozzle in contact with the rim
of the fuel tank or container opening at
all times until fueling is complete. Do not
use a nozzle lock-open device.
• If fuel is spilled on clothing, change cloth-
ing immediately.
• Never overfill fuel tank. Replace gas cap
and tighten securely.
GENERAL SERVICE
• Never operate machine in a closed area.
• Keep all nuts and bolts tight to be sure the
equipment is in safe working condition.
• Maintain or replace safety and instruction
labels, as necessary.
• Be sure the area is clear of bystanders
before operating. Stop machine if anyone
enters the area.
• Never carry passengers.
• Do not mow in reverse unless absolutely
necessary. Always look down and behind
before and while backing.
• Never carry children, even with the
blades shut off. They may fall off and
be seriously injured or interfere with safe
machine operation. Children who have
been given rides in the past may suddenly
appear in the mowing area for another
ride and be run over or backed over by
the machine.
• Keep children out of the mowing area
and in the watchful care of a responsible
adult other than the operator.
• Never tamper with safety devices. Check
their proper operation regularly.
• Keep machine free of grass, leaves, or
other debris build-up. Clean oil or fuel
spillage and remove any fuel-soaked de-
bris. Allow machine to cool before storing.
• If you strike a foreign object, stop and
inspect the machine. Repair, if necessary,
before restarting.
• Never make any adjustments or repairs
with the engine running.
• Check grass catcher components and the
discharge chute frequently and replace
with manufacturer’s recommended parts,
when necessary.
• Mower blades are sharp. Wrap the blade
or wear gloves, and use extra caution
when servicing them.
• Check brake operation frequently. Adjust
and service as required.
• Be alert and turn machine off if a child
enters the area.
• Before and while backing, look behind
and down for small children.
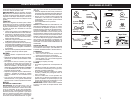
• Mow up and down slopes (15° Max), not
across.
• Choose a low ground speed so that you
will not have to stop or shift while on the
slope.
• Avoid starting, stopping, or turning on a
slope. If the tires lose traction, disengage
the blades and proceed slowly straight
down the slope.
• If machine stops while going uphill,
disengage blades, shift into reverse and
back down slowly.
• Do not turn on slopes unless necessary,
and then, turn slowly and gradually
downhill, if possible.
• When loading or unloading this machine,
do not exceed the maximum recom-
mended operation angle of 15°.
SAFETY RULES


