


50
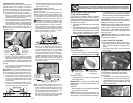
LIMPIEZA DE LA REJILLA DE AIRE
La rejilla de aire debe mantenerse sin mugre y
paja para evitar el daño al motor debido al sobre-
calentamiento. Límpiela con un cepillo de alambre
o con aire comprimido para re mov er la mugre y
las fibras de goma secas, pegadas.
0
06
6
7
Filtro de
combustible
Abrazadera
Abrazadera
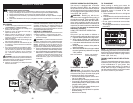
SILENCIADOR
Inspeccione y cambie el silenciador corroído y el
amortiguador de chispas (si viene equipado) pues
pueden crear un peligro de incendio y/o daños.
BUJÍA(S)
Cambie las bujía(s) al comienzo de cada tem-
porada de siega o después de cada 100 horas
de operación, lo que suceda pri me ro. El tipo de
bujía y el ajuste de la abertura aparecen en “ES-
PE CI FI CA CIO NES DEL PRODUCTO” sección
de este manual.
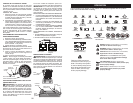
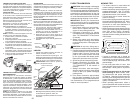
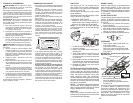
FILTRO DE COMBUSTIBLE EN LINEA
El filtro de combustible debe cambiarse una vez
cada temporada. Si el filtro de combustible se
tapona, obstruyendo el flujo del combustible hacia
el carburador, es necesario cambiarlo.
1. Con el motor frío, remueva el filtro y tapone
las secciones de la línea de combustible.
2. Ponga el filtro de combustible nuevo en su
posición en la línea de combustible con la
flecha señalando hacia el car bu ra dor.
3. Asegúrese de que no hayan fugas en la
línea del combustible y que las grapas estén
colocadas en forma adecuada.
4. Inmediatamente limpie toda la gasolina der-
ramada.
LIMPIEZA DE LA ENTRADA DE AIRE/AR EAS
DE ENFRIAMIENTO
Para asegurar un enfriamiento adecuado,
asegúrese que la rejilla del césped, las aletas
de enfriamiento, y otras superficies ex ter nas del
motor se mantengan limpias en todo momento.
Cada 100 horas de operación (más a menudo
bajo condiciones extremadamente polvorosas
o sucias), remueva la caja del ven ti la dor y otras
tapas de enfriamiento. Limpie las aletas de en-
fria mien to y las superficies externas, según sea
necesario. Ase gú re se que se vuelvan a instalar
las tapas de enfriamiento.
AVISO: Si se opera la máquina con una rejilla
del césped bloqueada, sucia, o con las aletas de
enfriamiento taponadas, y/o las tapas de enfria-
miento removidas se producirá daño en el motor
debido al calentamiento excesivo.
FILTRO DE AIRE
Su mo tor no va a funcionar en for ma adecuada
si usa un filtro sucio. Inspeccione el cartucho de
papel cada dos meses o después de 25 horas de
operación, el cuál suceda primero.
Déle servicio al filtro de aire más a menudo si se
usa en condiciones polvorosas.
Reemplace el cartucho de papel cada año, o
después de cada 100 horas de operación.
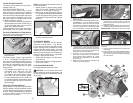
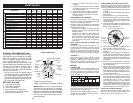
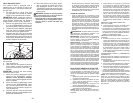
PARA DAR SERVICIO AL CARTUCHO
• Cambie un cartucho que esté sucio, doblado
o dañado. Maneje el cartucho nuevo cui-
dadosamente; no lo utilice si el sello de goma
esta dañado
AVISO: No lave el cartucho de papel o use aire
a presión, pues esto dañará el cartucho.
1. Suelte el botón y remueva la cubierta.
2. Remueva el cartucho.
3. Golpee ligeramente el lado plisado del car-
tucho para desprender la suciedad.
4. Limpie todos los elementos del filtro de aire
de cualquier acumulación de materia o suc-
iedad. Evite que cualquier suciedad entre en
el carburador.
5. Instale el cartucho limpiado o nuevo con el
lado plisado “fuera” y asiente el sello de goma
sobre los bordes de la base del filtro de aire.
6. Vuelva a montar la cubierta del filtro de aire
y asegúrela al apretar el botón.
0
2
7
2
4
Cartucho
Botón
02
723
• Mantenga las superficies pulidas y las ruedas
sin de rra mes de gasolina, aceite, etc.
• Proteja las superficies pintadas con cera tipo
automotriz.
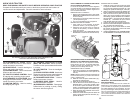
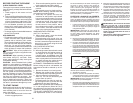
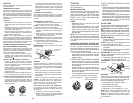
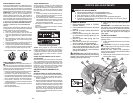
LIMPIEZA
• Limpie todo material extraño del motor, la
batería, el asiento, el pulido, etc.
• Limpie los desechos de la placa guía. Los
desechos pueden limitar el movimiento del eje
del pedal del freno/embrague, lo que hará que
patine la correa y que se pierda la tracción.
PRECAUCIÓN: Evite todos los puntos de
enganche y las piezas móviles.
SISTEMA DE DIRECCIÓN, SALPICADERO,
GUARDABARROS Y SEGADORA NO MOSTRADOS
Pedal Del Embrague/
Freno
Placa
De
Dirección
Limpiar Parte
Superior
PRECAUCIÓN:
PUNTOS DE
ENGANCHE
15
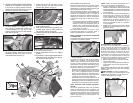
PURGE TRANSMISSION
CAUTION: Never engage or dis en gage
freewheel lever while the engine is run ning.
To ensure proper operation and per for mance,
it is rec om mend ed that the trans mis sion be
purged before operating trac tor for the first
time. This procedure will remove any trapped
air inside the trans mis sion which may have
de vel oped dur ing shipping of your tractor.
IMPORTANT: Should your transmission
require removal for service or re place ment,
it should be purged after re in stal la tion before
operating the tractor.
1. Place tractor safely on a level surface -
that is clear of objects and open - with
engine off and parking brake set.
2. Disengage transmission by placing
freewheel control in disengaged position
(See “TO TRANS PORT” in this section
of manual).
3. Sitting in the tractor seat, start en gine.
After the engine is running, move throttle
control to slow position. Disengage park-
ing brake.
CAUTION: At any time, during step 4,
there may be movement of the drive wheels.
4. Depress forward drive pedal to full for ward
position and hold for five (5) seconds and
release pedal. Depress reverse drive
pedal to full reverse position and hold
for five (5) seconds and release pedal.
Repeat this pro ce dure three (3) times.
5. Shutoff engine and set parking brake.
6. Engage transmission by placing free-
wheel control in engaged position (See
“TO TRANSPORT” in this sec tion of
manual).
7. Sitting in the tractor seat, start en gine.
After the engine is running, move throttle
control to half (1/2) speed. Disengage
parking brake.
8. Drive tractor forward for approximately
five feet then backwards for five feet.
Repeat this driving procedure three times.
Your transmission is now purged and now
ready for normal operation.
MOWING TIPS
• Tire chains cannot be used when the
mower hous ing is attached to trac tor.
• Mower should be properly leveled for best
mowing performance. See “TO LEVEL
MOWER HOUSING” in the Service and
Adjustments section of this manual.
• The left hand side of mower should be
used for trim ming.
• Drive so that clippings are dis charged onto
the area that has already been cut. Have
the cut area to the right of the tractor. This
will result in a more even dis tri bu tion of
clippings and more uniform cutting.
• When mowing large areas, start by turning
to the right so that clippings will discharge
away from shrubs, fences, driveways,
etc. After one or two rounds, mow in the
opposite direction making left hand turns
until finished .
• If grass is extremely tall, it should be
mowed twice to reduce load and possible
fire hazard from dried clip pings. Make
first cut relatively high; the second to the
desired height.
• Do not mow grass when it is wet. Wet
grass will plug mower and leave undesir-
able clumps. Allow grass to dry before
mowing.
• Always operate engine at full throt tle
when mowing to assure better mow-
ing performance and prop er dis charge
of material. Reg u late ground speed by
se lect ing a low enough speed to give the
mower cut ting per for mance as well as the
quality of cut desired.
• When operating attachments, se lect a
ground speed that will suit the terrain and
give best performance of the at tach ment
being used.