


52
SERVICIO Y AJUSTES
ADVERTENCIA:PARA EVITAR LESIÓNES SERIAS, ANTES DE DAR CUALQUIER
SERVICIO O DE HACER AJUSTES:
1. Presione el pedal de freno completamente y aplique el freno de estacionamiento.
2. Ponga el embrague del accesorio en la posición desenganchado (DISENGAGED).
3. Ponga la llave de ignición en la posición de apagado (STOP) y remuévala.
4. Asegúrese que las cuchillas y que todas las partes movibles se hayan detenido comple-
tamente.
5. Desconecte el alambre de la bujía y póngalo en donde no pueda entrar en contacto con
ésta.
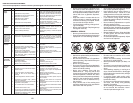
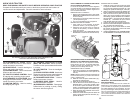
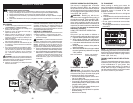
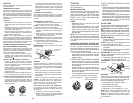
E
F
C
G
Q
R
D
K
G
P
B
L
M
A
IMPORTANTE: Si se monta un accesorio dife-
rente del cortacésped al tractor, hay que quitar
el estribo frontal (E) y los estribos traseros de
elevación (C) del tractor y enganchar el resorte
de embrague (Q) en la guía del cable en el borde
frontal del salpicadero más bajo.
INSTALE LA SEGADORA
Asegúrese de que el tractor se encuentre en una
superficie nivelada, y ponga el freno de mano.
1. Haga descender la palanca elevadora a su
posición más baja.
CUIDADO: La palanca elevadora funciona
a resorte. Sujétela con fuerza, hágala descender
lentamente y tránquela en la posición más baja.
NOTA: Cerciórese de que los brazos de sus-
pensión de los lados de la segadora (A) estén
dirigidos hacia adelante antes de deslizarla por
2. Deslice la SEGADORA por debajo del tractor
hasta que quede bien centrada debajo de éste.
3. FIJE LOS BRAZOS DE SUSPENSIÓN LATE-
RALES DE LA CORTADORA (A) AL CHASIS
- Ubique el orificio del brazo encima de la
clavija (B) que hay en la parte exterior del
chasis del tractor, y fíjelo con una resorte de
contención.
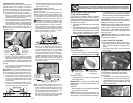
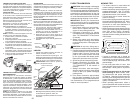
PARA DESMONTAR LA CORTADORA
DE CÉSPED
1. Suelte el embrague poniéndolo en la posición
“DISENGAGED” (“DESACTIVADO”).
2. Baje la palanca elevadora de montaje a la
posición de más abajo.
3. Ruede la correa de polea del motor (M) y
fijadors de la correa (G).
4. Retire el resorte de sujeción (K), deslice la
abrazadera (L) hasta quitarla, y saque a
presión la guía de la caja (P) hasta que se
salga del soporte.
5. Retire el resorte del cable del embrague (Q)
del brazo del engranaje (R).
6. Desconecte la pieza de unión anterior (E) de
la cortadora – retire el resorte de contención
y la arandela.
7. Por uno de los lados de la cortadora, desco-
necte el brazo de suspensión de la cortadora
(A) del chasis y la pieza de unión posterior
(C) de la barra posterior de la cortadora
(D) – retire los resortes de contención y las
arandelas.
CUIDADO: Una vez que se desconecten las
piezas de unión posteriores, la palanca elevadora
funcionará a resorte. Sujete con fuerza la palanca
elevadora al cambiarla de posición.
8. Deslice la cortadora por debajo del lado
derecho del tractor.
13
0
2
8
2
8
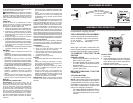
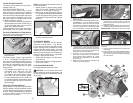
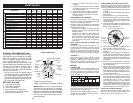
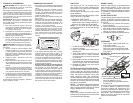
ROS "ON" Position Engine "ON" Position
(Normal Operating)
TO TRANSPORT
When pushing or towing your tractor, be
sure to disengage transmission by placing
freewheel control in free wheel ing po si tion.
Freewheel control is located at the rear
drawbar of tractor.
1. Raise attachment lift lever to its highest
position.
2. Pull freewheel control out and into the slot
and release so it is held in the disengaged
position.
• Do not push or tow tractor at more than
two (2) MPH.
• To re-engage transmission, reverse above
procedure.
Transmission Engaged
Transmission Disengaged
NOTE: To protect hood from damage when
transporting your tractor on a truck or a trailer,
be sure hood is closed and secured to tractor.
Use an appropriate means of tying hood to
tractor (rope, cord, etc.).
REVERSE OPERATION SYSTEM (ROS)
Your tractor is equipped with a Reverse
Operation System (ROS). Any attempt by
the operator to travel in the reverse direction
with the attachment clutch engaged will shut
off the engine unless ignition key is placed
in the ROS "ON" position.
WARNING: Backing up with the at-
tachment clutch engaged while mowing is
strongly discouraged. Turning the ROS "ON",
to allow reverse operation with the attach-
ment clutch engaged, should only be done
when the operator decides it is necessary to
reposition the machine with the attachment
engaged. Do not mow in reverse unless
absolutely necessary.
USING THE REVERSE OPERATION
SYSTEM -
Only use if you are certain no children or
other bystanders will enter the mowing area.
1. Depress brake pedal all the way down.
2. With engine running, turn ignition key
counterclockwise to ROS "ON" position.
3. Look down and behind before and while
backing.
4. Slowly depress reverse drive pedal to
start movement.
5. When use of the ROS is no longer needed,
turn the ignition key clockwise to engine
"ON" position.
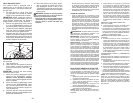
TO OPERATE ON HILLS
WARNING: Do not drive up or down
hills with slopes greater than 15° and do not
drive across any slope. Use the slope guide
provided at the back of this manual.
• Choose the slowest speed before start-
ing up or down hills.
• Avoid stopping or changing speed on hills.
• If stopping is absolutely necessary, push
brake pedal quickly to brake position and
engage parking brake.
• To restart movement, slowly re lease park-
ing brake and brake ped al.
• Slowly depress appropriate drive pedal to
slowest setting.
• Make all turns slowly.
003
TOWING CARTS AND OTHER AT TACH-
MENTS
Tow only the attachments that are rec om-
mend ed by and comply with spec i fi ca tions
of the manufacturer of your tractor. Use
common sense when tow ing. Too heavy of
a load, while on a slope, is dangerous. Tires
can lose traction with the ground and cause
you to lose control of your tractor.