


ASSEMBLY
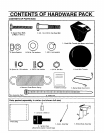
TOOLS REQUIRED FOR ASSEMBLY
1 - Knife (to cut carton and plastic ties/
2 - 1/2 inch wrenches (or adjustable wrenches)
2 - 9/16 inch wrenches (or adjustable wrenches}
2- 3/4 inch wrenches (or adjustable wrenchesl
1 - Pliers (to spread cotter pin)
1- Screwdriver
1 - Measuring tape or ruLer
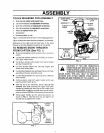
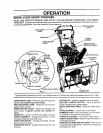
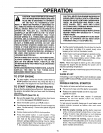
Figure 1 shows the snow thrower inthe shipping position
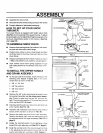
Figure 2 shows the snow thrower completely assembled.
Reference to the right and left hand side of the snow
thrower is from the operator's position at the handle.
TO REMOVE SNOW THROWER
FROM CARTON (See FIG. 1)
• Remove packaging inserts located at lour corners of
carton.
• Locate and remove container o! 5W30 oil found in
rear, right, carton insert.
• Cut all four corners of the carton from top to bottom
and lay the panels llat.
• Cut and discard plastic ties securing augers and
wheel axles to the pallet.
• Cutand discard plasticties and bagsthat secure crank
assembly and place assembly aside
• Cut and discard plastic ties securing clutch cables to
lower handle.
• Remove plastic wrap from upper handle which was
used to protect clutch levers
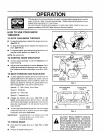
• With the two 9/16" wrenches, loosen (but do not
remove) both bolts securing the upper and lower
handles by holding the inner nut on the inside ot the
handle while turning the outside boll counter-clock-
wise as shown in FIG. 4A, in this section of the manual.
• Swing upper handle up into operating position as
shown in FIG. 2. Hold the inner nut and tighten [ne
outside bolt up against the handle
LEVER LEVER
CABLE
SHIFTER
LEVER
CABLE
MBLY
DEFLECTOR
FIG. 2
CAUTION: IF YOU ARE REMOVING
SNOW FROM ANY GRAVELED OR UN-
EVEN SURFACE, RAISE THE FRONT OF
THE SNOW THROWER BY MOVING THE
SKIDS DOWN. THIS WILL HELP TO PREVENT
STONES AND OTHER DEBRIS FROM BEING
PICKED UP AND THROWN BY THE AUGER.
LOWEr HANDLE
CONTROL
PANEL
CLUTCH
UPPER
HANDLE
ASSEMBLY
FIG. 1
7