


ASSEMBLY & ADJUSTMENTS cont.
16
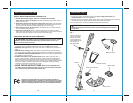
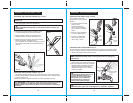
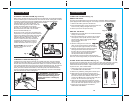
INSTALLING THE LITHIUM-ION BATTERY PACK (Fig. 4)
Insert the battery pack into grass trimmer’s battery port. A simple
push and slight pressure will be sufficient.
CAUTION:
When inserting batteries into this product, the proper
polarity or direction must be observed. Reverse insertion of batteries can
result in leakage or explosion. (Applies to product employing more than
one separately replaceable primary battery.)
!
WARNING:
This Cordless Trimmer is always in operating condition
when the battery pack is installed. Therefore, the Safety On Button should
always be in the released position locking the power off, when the tool is
not in use or you are carrying it at your side. The trigger switch will not
turn the trimmer ON until the Safety On Button is depressed.
!
WARNING:
To avoid injury, ALWAYS remove the battery from the
trimmer BEFORE installing parts, cleaning the trimmer, making any
adjustments or storing the trimmer
!
Fig. 4
ASSEMBLY & ADJUSTMENTS cont.
17
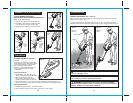
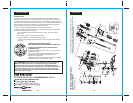
INSTALLING THE SAFETY GUARD (Figs. 5 and 5a)
INSTALLING THE EDGE GUIDE
WHEELS (Fig. 6)
1. Remove the battery pack from the trimmer.
2. Turn the trimmer’s motor housing head over to provide access to underside base
of the head by the cutting line spool.
3. Locate the single screw in the base of the head and remove the screw.
4. Insert the edge of the safety guard into the slot along the back of the trimmer’s
head,
carefullly lining the screw hole in the guard up with the screw hole in the
trimmer head.
5. Insert screw and securely attach the safety guard (see Figs. 5 and 5a).
Your trimmer comes with a set of Edge
Guide Wheels that is handy for use as a
cutting guide. It can be used to help keep
the cutting line away from items you
don’t want cut, such as flowers, or
damaged, such as fences or screens.
Each end of the wheel assembly guide
is secured in its position on the motor
housing with two screws, included, see
Fig. 6. Check Edge Guide Wheels to
make sure they are properly located
and secure.
NOTE: THE SAFETY GUARD MUST BE ATTACHED to the trimmer head
before use.
NOTE:
Safety Guard will only fit one way.
Fig. 5a
Line
Cutter
Fig. 5
Fig. 6