


OPERATION cont.
22
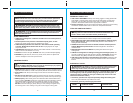
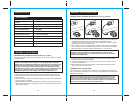
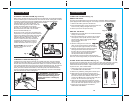
When turning the trimmer ON for the first time a small length of line will automatically
be fed out of the spool. To extend the line out to the full 12-inch cutting path, it will be
necessary to start the trimmer and completely stop the trimmer approximately
4 to 5 times. Each time during this operation the line will be
extended approx. ¼ to ½-inch (See Fig. 15).
Continue extending the line until it comes into
contact with the line cutter on the guard
(See Fig. 16). A “clattering” noise will be heard
when the line hits the cutter. This is normal.
The line will automatically cut.
During use, the tip of the nylon line will become
frayed and worn. Cutting line will wear faster and
require more feeding if the cutting, trimming and
edging is done by abrasive surfaces such as
concrete sidewalks, driveways or heavier
weeds. To feed more line, stop the trimmer
completely and restart it (4 to 5 times as
explained above), until the line comes in
contact with the line cutter on the guard.
DO NOT BUMP unit on ground in
attempt to feed line or for any
other purposes.
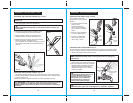
If required, line can be fed out manually. To manually feed line, press and release
manual line feed button (See Fig. 17) and gently pull out the line until line reaches
the line cutter. If the line extends past the line cutter, too much line has been fed out.
If too much line has been fed out, remove spool cap (See Page 23, Fig. 18) and with
one hand rotate the spool counterclockwise until it is stopped. Hold the spool in
place, press the manual line feed button, rotate the spool, then release the button.
The line should be shorter. Repeat these steps until the line is at the correct length,
and even with the line cutter on the guard.
AUTOMATIC LINE FEED SYSTEM (Fig. 15 and 16)
TO MANUALLY FEED THE LINE (Fig. 17)
Fig. 17
Fig. 16
Line
Cutter
Fig. 15
WARNING:
To avoid injury,
ALWAYS remove the battery from the
trimmer BEFORE installing parts or
cleaning the trimmer or making any
adjustments.
!
OPERATION cont.
23
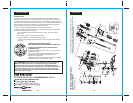
For easy spool replacement we recommend using Craftsman 85937 replacement
spool equipped with 0.065 cutting line. It is factory wound for maximum reliability.
1. Remove the battery pack from the trimmer.
2. Press the release tabs on the spool head cover and
remove cover, pulling it straight off of spool.
3. Lift the spool out of the spool housing.
1. Replace the spool with with a new Craftsman 85937
factory pre-wound spool.
2. Place the replacement spool into the cut-out areas
of the spool, to line up with the one eyelet on the
spool housing. Press it down gently until you
feel it snap into place in the
spool housing.
3. Take the cutting line out of the rail
notch on the spool and feed a small length
through the eyelet (approximately 1½ inches).
4. Snap the spool head cover back on the spool
housing and at the same time make sure
that the 1 ½ inch of line is released from the
spool rail notch and is through the eyelet
and exposed outside the spool head.
The Automatic Line Feed System will advance the
line to the correct length when you operate the trimmer.
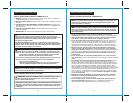
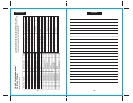
You may wind new cutting line onto the empty spool. Only use 0.065 inch (1.65 mm)
twisted (helical or spiral) shaped, not round, line for auto feed. We recommend
Craftsman Professional 0.065-in. replacement trimmer line, Extra Quiet spiral,
in packs of 40 ft., item number 85760.
1.
Remove the empty spool from the tool as described
in “TO REPLACE CUTTING LINE”.
2. Remove any remaining cutting line from the spool.
3. Wind new line onto the spool; Feed 3/4 inch of
cutting line into the anchoring slot. Wind the cutting
line onto the spool in the direction of the arrow
on the spool. Make sure to wind the line neatly and
in layers. Do not crisscross (see Fig. 19).
4. When the wound cutting line reaches the recess,
cut the line. Temporarily park the line in the holding
slot on the side of the spool as shown in Fig. 19.
5. Fit the spool onto the tool as described in
“REPLACE THE SPOOL”.
TO REPLACE CUTTING LINE (Fig. 18)
REMOVE THE SPOOL
REPLACE THE SPOOL
FILLING SPOOL WITH CUTTING LINE (Fig. 19)
Fig. 18
RIGHT WRONG
Fig. 19