


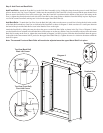

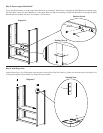
Step 2: Add Front and Back Rails
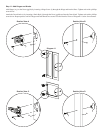
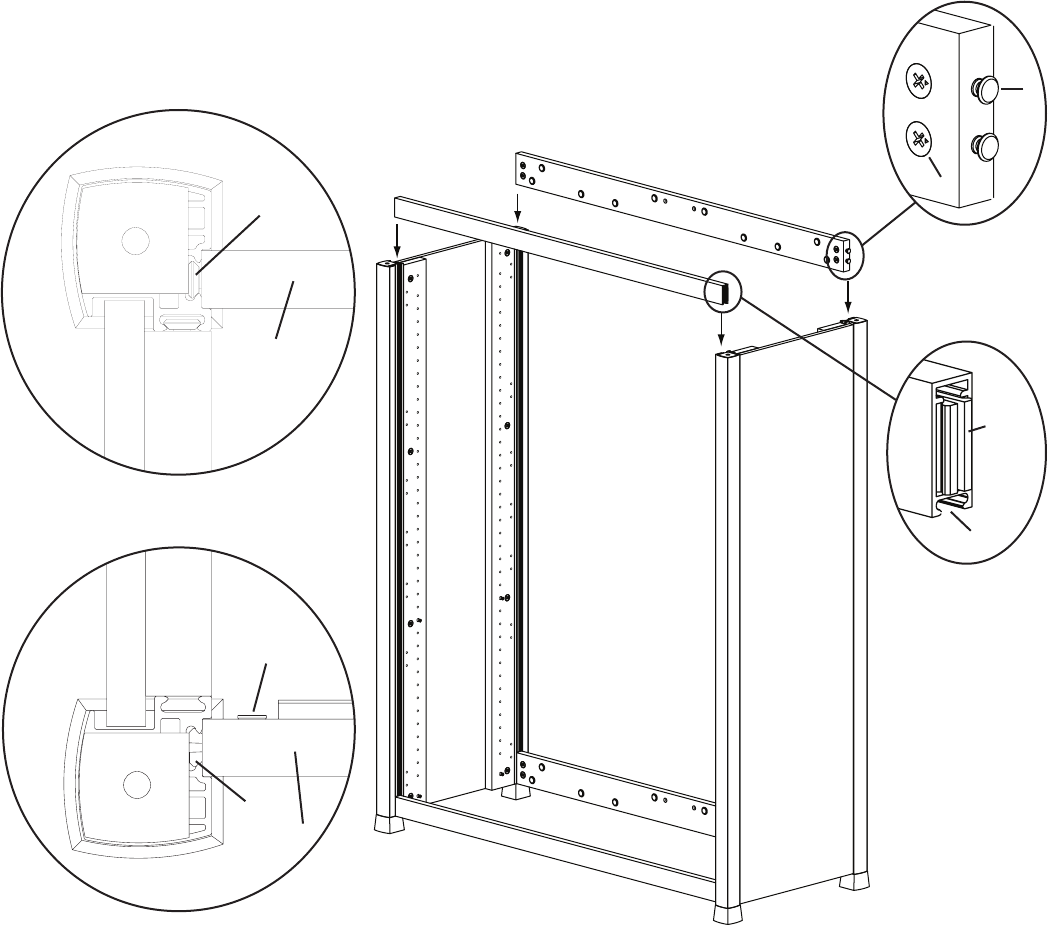
Add Front Rails - Attach the Front Rail (cc) to the Side Panel Assembly (ee) by sliding the clamp down the groove in each Side Panel
pillar as shown in the Top View of Diagram 2. Make sure the smooth side of the Front Rail is facing outward and the open channel faces
down as seen in the Detailed View below on the right. Once the Front Rail is positioned at the bottom of the groove and resting on the
Foot (s), tighten the allen bolt on the back side of the Front Rail so the clamp widens to hold the Front Rail rmly in place. Repeat pro-
cess for the second Front Rail, making sure it is below the upper Wood Shelf Pins (h).
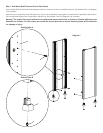
Add Back Rails - To attach the Cam Pins (b) to the Back Rail (dd), make sure the arrow on each Cam is facing the hole in the outside
of the Back Rail and add two Cam Pins to each end of the Back Rail as shown in Diagram 2. Make sure there is a small space between
the head of the pin and the Back Rail as seen in the Detailed View on the right.
Attach the Back Rail by sliding the cam pins down the groove on the Side Panel pillar as shown in the Top View of Diagram 2. Make
sure the Back Rails are oriented so the threaded holes in the center are on the top, and the Cams face inside the cabinet. Once the bottom
Back Rail is resting on the Foot (s), tighten the cams labeled in Diagram 2 to hold it in place. Slide the other Back Rail down the groove
in the pillar in the same manner until it just below the upper Wood Shelf Pins (h). Tighten the cams in a clockwise direction to hold the
back rail in place.
Note: The second Front and Back Rails will need to be adjusted once the upper Wood Shelf is in place.
Detailed View
Top View (Back Rail)
Back Left Corner b
Diagram 2
cams
b
Detailed View
dd
clamp
Top View (Front Rail) open
Front Left Corner channel
allen bolt
clamp
cc