


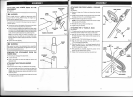


REMOVING
THE STRAIGHT
SHAFT
GRASS
DEFLECTOR
AND STRING
HEAD
See
Figures
10
-
13.
I
Align
the slot in the flanged washer
with the
slot in the
gear
neao.
r
Place
the
gear
head locking
tool
through
the
slot in the
flanged
washer and
gear
head.
I
Remove
the
string head
assembly
by turning
clockwise,
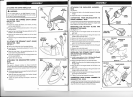
I
Remove
the flanged washer
and
retain
it for the
blade
installation.
I
Remove
the wing screw
securing
the
grass
deflector.
r
Remove
the
grass
deflector.
NOTE: Store the string
head
parts
together
for later
use.
INSTALLING THE TRI-ARC@
BLADE AND
BRUSHCUTTER
GUARD
See
Figures 10
-
14.
r
Install the
brushcutter
guard.
Refer to Attaching
the
Brushcutter Guard
earlier in this
manual.
r
Place the flanged
washer
over the
gear
head
shaft with
the hollow
side
toward
the brushcutter
guard.
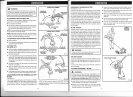
I
Center the blade on the flanged
washer, making
sure the
blade fits flat
and the raised hub
of the flanged washer
goes
through the hole
rn the blade.
I
Install the
cupped washer with the raised
center away
from
the blade.
r
Place the
blade nut onto the
gear
head
shaft.
r
Place
the
gear
head locking tool
through the
slot
in the
flanged washer
and
gear
head.
r
Install
the blade nut
by turning it counterclockwise
(left
handed
threads).
r
Tighien the
blade nut securely
and
torque to 120
in.lbs.
mrnlmum.
A
mnHrnc,
Do not allow familiarity
with tools
to make
you
care-
less. Remember that
a careless fractlon
of a second is
suffrcient
to inflict serious lnjury.
FUELING
AND REFUELING THE
TRIMMER
FUEL
MIXTURE
This
product
is
powered
by a 2-cycle engine and
requires
pre-mixing
gasoline
and 2-cycle oil. Pre-mix unleaded
gaso-
line and 2-cycle engine
oil in a clean 1
gallon
container
ap-
proved
for
gasoline.
Recommended
fuel: This engine is certified to
operate on
unleaded
gasoline
intended for automotive use.
Mix a high
quality
2-cycle engine oil at2.6 oz.
per gallon
rus).
Do
not
use automotjve
oil or 2-cycle outboard oil.
DO
NOT mix
quantities
larger than usable in a 30
day
period.
HIGH
QUALITY
2-CYCLE ENGINE OIL
GASOLINE
OIL
1
gallon (US)
2.6
oz.
1 liter 20 cc
(20
ml)
FILLING TANK
I
Glean
surface around fuel cap
to
prevent
contamination.
I
Loosen fuel cap slowly.
Rest the cap on a clean
surface.
Carefully
pour
fuel into the tank. Avoid spillage.
Prior to
replacing the fuel cap, clean and inspect
the
gasket.
lmmediately replace fuel cap and hand
tighten. Wipe
up
any fuel spillage.
NOTE: lt is normal for smoke to be emitted
from a new
engine
after
firsi use.
A wnnunc,
Always shut off engine
before fueling. Never
add fuel to
a
machine with a running or hot engine,
Move at least
30 ft. from refueling site before starting engine.
Do not
smoke!
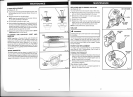
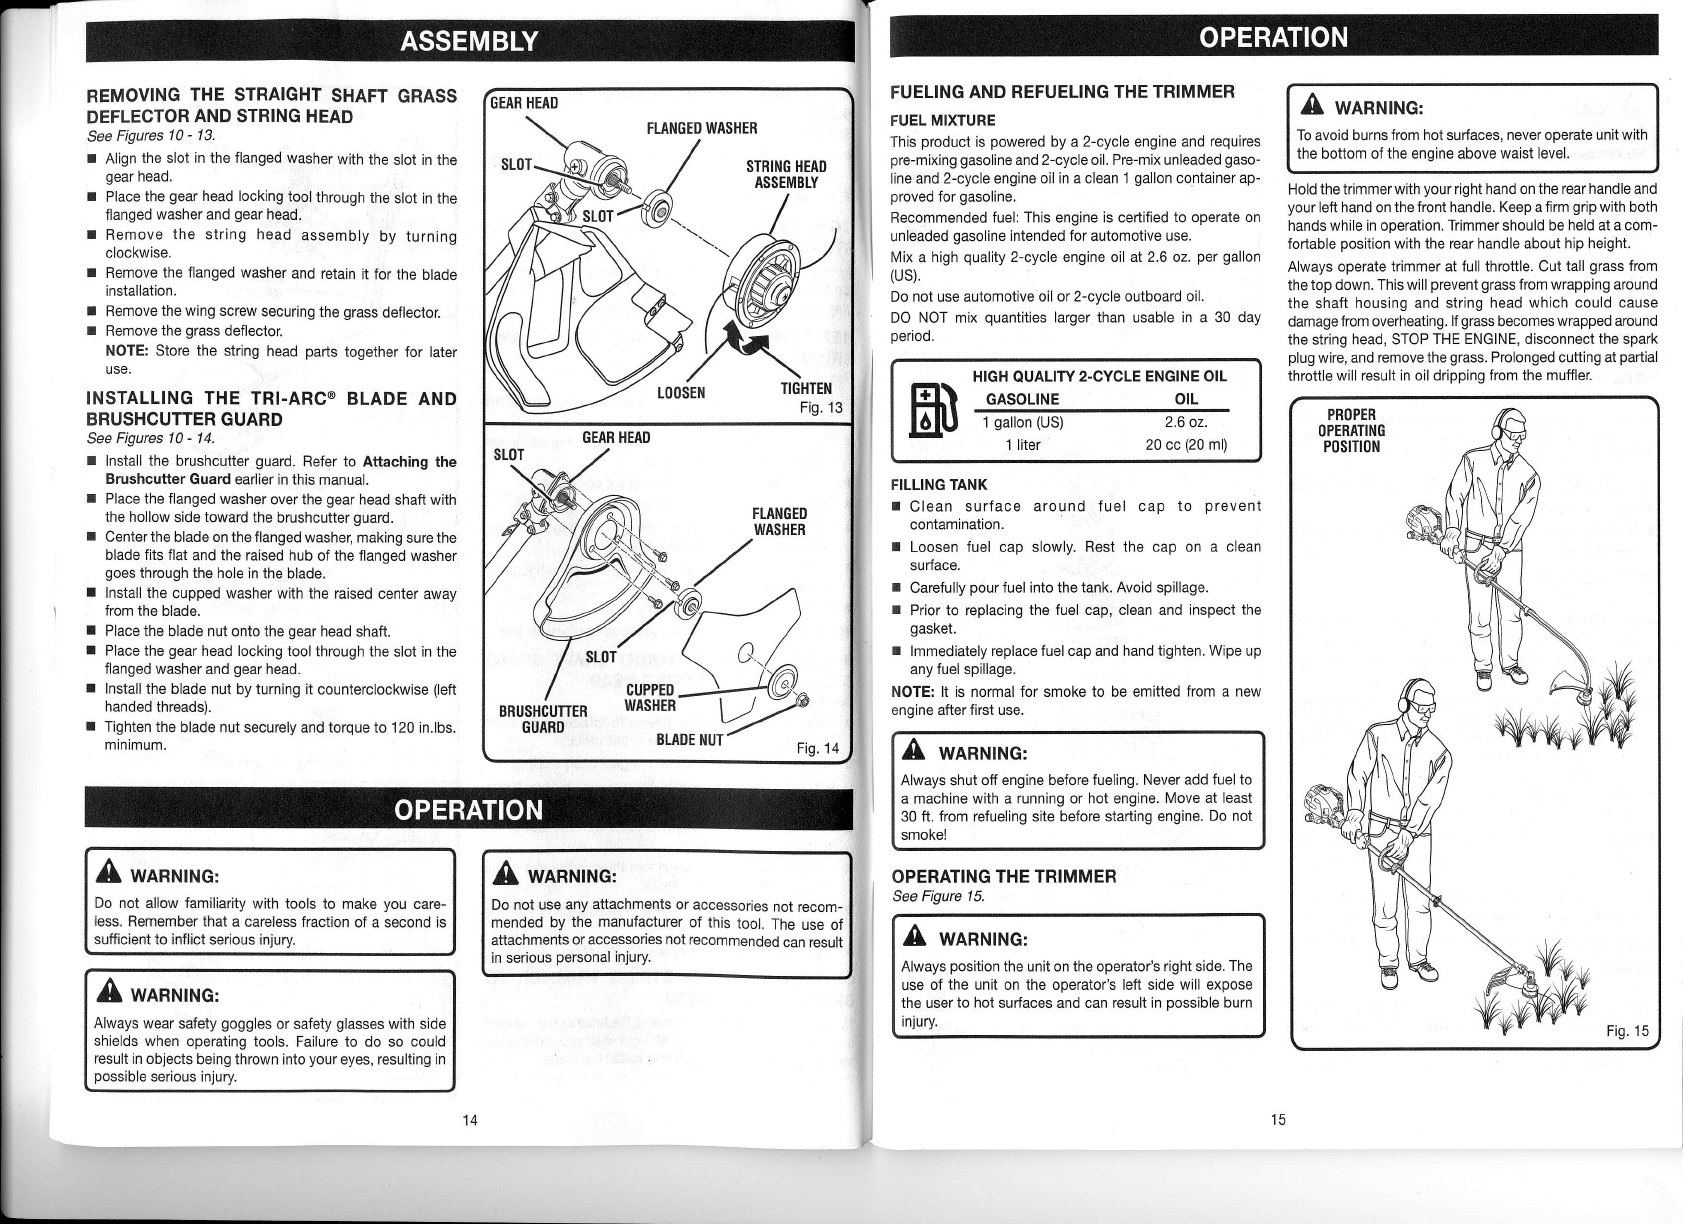
OPERATING
THE TRIMMER
See Figure
15.
A
wanrurruc,
Always
position
the unit on the operator's right side.
The
use
of
the
unit on the operator's left side will expose
the user
to hot
surfaces and can result in oossible
burn
lnturv.
A wnnnrnc'
To avoid burns
from hot
surfaces,
never operate unit with
the bottom of
the
enoine above
waist level.
Hold the trimmer with
your
right
hand on the rear handle and
your
left hand on
the front handle. Keep a firm
grip
with both
hands while
in
ooeration.
Trimmer should be held at a com-
fortable
position
with the rear handle about hip height.
Always
operate trimmer at full throttle. Cut
tall
grass
from
the
top down. This will
prevent grass
from wrapping around
the shaft
housing and string head
which could cause
damage
from overheating.
lf
grass
becomes
wrapped around
the string head, STOP
THE ENGINE, disconnect the spark
plug
wire, and
remove the
grass.
Prolonged cutting at
partial
throttle
will result in oil dripping from the muffler.
PROPER
()PERATING
P0stTt0N
Fig. 15
I
I
A
wnnntHc'
Do not
use any attachments or accessories
not
recom-
mended
by
the manufacturer
of this
tool.
The
use of
attachments
or accessories
not
recommended
can result
in serious
personal
injury.
A
wnnrutruc,
Always wear
safety
goggles
or safety
glasses
with side
shields when
operating tools. Failure io
do so
could
result
in objects
being thrown into
your
eyes, resulting in
possible
serious injury.
7'
FLANGED
WASHER
toosEN
ilunrEN
Fig. 13
cuppro--v@^
*o'1lo,r,f-
14
tc