


8
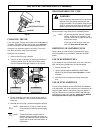
INSTALLING THE BRUSH BLADE
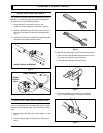
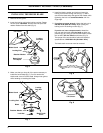
1. Remove the line guard.
2. Insert the locking rod into the locking rod slot. Rotate
the line spool clockwise. Remove the line spool and
retainer washer from the shaft (Fig. 6).
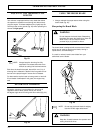
3. Make sure that you have all of the parts necessary to
install the brush blade (Fig. 7). Do not remove the
blade tooth cover off of the blade. Always wear gloves
while handling or installing the blade.
Blade Guard
Locking Rod
Line Guard
Bump Head/
Line Spool
Locking
Rod Slot
Retainer Washer
Locking Rod
Blade
Lock Nut
Blade Guard
Locking
Rod Slot
Retainer Washer
Blade Tooth
Cover
4. Install the blade, washer, and lock nut. Insert the
locking rod into the locking rod slot (Fig. 7). Make
sure that the blade stays flat against the washer while
tightening the lock nut counterclockwise until it is
finger-tight.
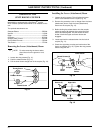
5. If you have a torque wrench, tighten the lock nut to
225-250 in•lb (25.3-28.1 N•m), while holding the
locking rod in the locking rod slot (Fig. 7).
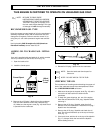
If you do not have a torque wrench, thread the
lock nut onto the brush blade by hand as tightly as
possible (Fig. 8). Using an open-ended wrench, rotate
the nut 1/2 - 3/4 of a full turn (minimum) (Fig. 9).
The torque of the nut should be within the required
specifications of 225-250 in•lb (25.3-28.1 N•m).
The blade tooth cover can now be removed.
Fig. 8
Fig. 7
Fig. 6
Fig. 9
1/2-3/4 turn
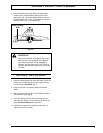
ASSEMBLY INSTRUCTIONS (Continued)