


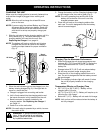

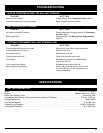
2. When the red indicator light on the charger is on, the
battery is being charged (Fig. 5). If the light fails to
come on, check that the:
a. Charger is plugged into a working wall outlet.
b. Unit is firmly seated into the charging station and
the barrel connector is fully inserted into the unit.
c. Barrel connector is properly installed in the
charging station. See Replacing the Charger if
not, page 14.
d. Power is on at the wall outlet.
NOTE: If the wall outlet is operated by a switch, be sure
the switch is ON.
WARNING: To prevent serious personal
injury, if the wall outlet is not working
properly, have the wall outlet checked
by a qualified electrician.
OPERATING INSTRUCTIONS
8
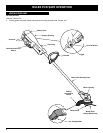
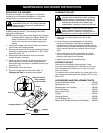
Air Vents
CHARGING THE UNIT
Make sure the charging station is securely fastened to a
wall and the charger is plugged into a working wall
outlet.
NOTE: Allow the unit to charge for at least 36 hours
prior to first use.
NOTE: If you are using the optional Battery and Charger
Accessory Kit to charge your battery. Read and
follow all instructions in the manual that comes
with the kit to set up and properly charge your
battery.
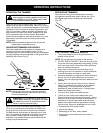
1. Slide the unit down into the charging station until it is
firmly seated (Fig. 4). The barrel connector in the
charging station will insert into the unit. See
Replacing the Charger if not, page 14.
NOTE: The battery will heat up while the unit is being
charged. Be sure the air vents on the battery
housing are kept cleared for proper ventilation
(Fig. 4).
Charging Tips for Maximum Performance
• Store and charge the unit where temperatures are
between 50˚ F (10˚ C) and 100˚ F (38˚ C). Storing the
unit or batteries above 100˚ F (38˚ C) will reduce
battery life.
• Storage below 50˚ F (10˚ C) will not reduce battery
life, but may require a longer charging time.
• Store the unit on the charging station when not in
use. The unit is designed so that the battery cannot
be overcharged.
NOTE: The charging indicator light will remain lit when
the unit is properly installed in the charging
station.
Temperature Effects on Charging Time
• 50˚ F (10˚ C) to 100˚ F (38˚ C) – Battery will be
charged within 24 hours.
• 40˚ F (4 ˚C) to 50˚ F (10˚ C) – Battery will require up to
48 hours for a full charge.
• Below 40˚ F (4 ˚C) – Battery will not reach full charge.
NOTE: Unit run time will be reduced when the battery is
not fully charged.
Fig. 4
Charging
Station
Barrel
Connector
Fig. 5
Charging
indicator light
3. Charge the battery until the Charging Indicator Light
on the charger turns from red to green (Fig. 5).
NOTE: The unit’s operating time and the life of the
battery will be shorten if the unit is not fully
charged between uses.
4. Place the unit back on the charging station after
each use. The unit is designed so that the battery
cannot be overcharged.