


THANK YOU
Thank you for buying this quality product. This modern
outdoor power tool will provide many hours of useful
service. You will find it to be a great labor-saving device.
This operator’s manual provides you with easy-to-
understand operating instructions. Read the whole
manual and follow all the instructions to keep your new
outdoor power tool in top operating condition.
PRODUCT REFERENCES, ILLUSTRATIONS AND
SPECIFICATIONS
All information, illustrations and specifications in this
manual are based on the latest product information
available at the time of printing. We reserve the right to
make changes at any time without notice.
Copyright© 1999 Ryobi Outdoor Products, Inc.
All Rights Reserved.
SERVICE INFORMATION
Service on this unit both within and after the warranty
period should be performed only by an authorized and
approved service dealer.
Dial:
• 1-800-345-8746 or www.ryobi.com on the world
wide web for authorized service dealers in the
United States.
Or
• 1-800-265-6778 in Canada to obtain the listing of the
authorized service dealer nearest you.
DO NOT RETURN THE UNIT TO THE RETAILER.
NOTE: PROOF OF PURCHASE WILL BE REQUIRED
FOR WARRANTY SERVICE.
Make sure this manual is carefully read and understood
before starting or operating this equipment.
THIS PRODUCT IS COVERED BY ONE OR MORE US
PATENTS, OTHER PATENTS PENDING.
INTRODUCTION TABLE OF CONTENTS
2
I. Rules for Safe Operation . . . . . . . . . . . . . . . . . . . . . 3-6
A. Important Safety Information . . . . . . . . . . . . . . . .3-4
B. Safety and International Symbols . . . . . . . . . . . . . .5
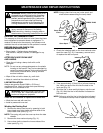
C. Know Your Unit . . . . . . . . . . . . . . . . . . . . . . . . . . . .6
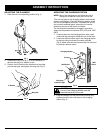
II. Assembly Instructions . . . . . . . . . . . . . . . . . . . . . . . . . 7
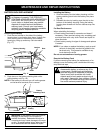
A. Mounting the Charging Station . . . . . . . . . . . . . . . 7
B. Adjusting the D-Handle . . . . . . . . . . . . . . . . . . . . 7
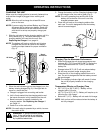
III. Operating Instructions . . . . . . . . . . . . . . . . . . . . . . 8-10
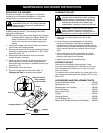
A. Charging the Unit . . . . . . . . . . . . . . . . . . . . . . . . . . .8
B.To Start Unit . . . . . . . . . . . . . . . . . . . . . . . . . . . . . . .9
C. To Stop Unit . . . . . . . . . . . . . . . . . . . . . . . . . . . . . . .9
D. Overload Protection Switch . . . . . . . . . . . . . . . . . . .9
E. Holding the Unit . . . . . . . . . . . . . . . . . . . . . . . . . . . .9
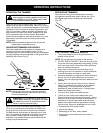
F. Operating the Trimmer . . . . . . . . . . . . . . . . . . . . . .10
G. Adjusting Trimming Line Length . . . . . . . . . . . . . .10
H. Decorative Trimming . . . . . . . . . . . . . . . . . . . . . . .10
I. Tips for Best Trimming Results . . . . . . . . . . . . . . .10
IV. Maintenance and Repair Instructions . . . . . . . . . .11-14
A. General Recommendations . . . . . . . . . . . . . . . . . 11
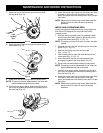
B. Line Installation . . . . . . . . . . . . . . . . . . . . . . . . . . . 11
C. Installing a Prewound Reel . . . . . . . . . . . . . . . . . . 12
D. Battery Pack Replacement . . . . . . . . . . . . . . . . . . 13
E. Replacing the Charger . . . . . . . . . . . . . . . . . . . . . .14
F. Cleaning the Unit . . . . . . . . . . . . . . . . . . . . . . . . . 14
G. Storing the Unit . . . . . . . . . . . . . . . . . . . . . . . . . . . 14
H. Accessories and Replacement parts . . . . . . . . . . 14
V. Troubleshooting Chart . . . . . . . . . . . . . . . . . . . . . . . 15
VI. Specifications . . . . . . . . . . . . . . . . . . . . . . . . . . . . . . 15
VII. Warranty . . . . . . . . . . . . . . . . . . . . . . . . . . . . . . . . . . .16
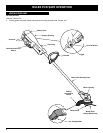
CONTENTS OF CARTON
This unit should consist of the following:
• Model 155r, Assembled with Battery, D-Handle,
and Cutting Attachment Shield
• Charging Station with Charger
• Operator's Manual
• Product Registration Card