


Frames continued.....
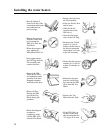
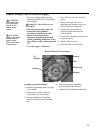
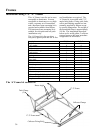
Side Pitch Installations (Tile Roof)
Assemble the ‘A’ Frame kit and loosely
bolt the baseplate to one side of the angle
frame.
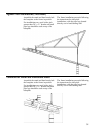
For installations on a roof with a pitch
greater than 20°, a ‘U’ bracket and small
pipe legs should be used on top of the
baseplate as shown.
Note that the baseplate is positioned
towards the rear of the frame to distribute
the weight of the tank more evenly.
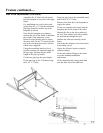
Remove several roofing tiles to expose
the outer wall. Fix the ‘U’ brackets to the
top of the wall plate and secure with the
coach screws supplied.
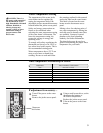
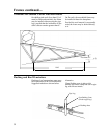
Using the assembled stand in a level
position, measure the required length for
the pipe legs, allowing for the inside
length of the pipe leg cradle.
Cut the two pipe legs the same length.
Fit the pipe legs to the ‘U’bracket using
the 5/16” x 2” bolts.
Insert the pipe legs to the assembled stand
and fit the 5/16 x 2” bolts.
Remove tiles from above the baseplate to
expose the rafters.
Fix the two stainless steel straps onto the
baseplate and fix the straps to the rafter.
Replace the tiles to the lower portion of
the roof, then weather seal and overflash
the penetrations through the roof.
Position the collectors centrally on the
frame.
Check that the collector is level across the
frame using a level.
Secure the collector in place using the
collector clamps.
Fit the tank and the fittings to the frame
as per the standard installation
instructions.
Fit the aluminum tank clamps onto both
rear and front feet of the tank base.
37