


26
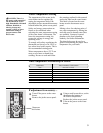
Installing the water heater.
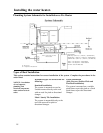
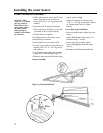
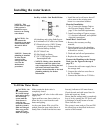
See Key to Stub - Out Details Below:
All plumbing and wiring Stub-Outs to
be a minimum of 18" above roof frame.
(E) Electrical service (240V, 20-amp
required only if using auxiliary
electrical backup in tank)
(R) 3/4" Relief Line
(H) Hot Supply to House
(C) 3/4" Cold Supply to Rheem
thermosiphon tank
•
NOTICE: Mixing valves should be
installed to reduce the point of use
water temperature by mixing hot and
cold water in branch water lines.
Contact a licensed installer or the local
plumbing authority for further
information.
• Install hot and a cold water shut-off
valves next to the existing water
heater in a convenient location.
Electrical Installation
1. See “Connect the Storage Tank to
the Electrical Supply Section” on
page 29 for electrical requirements.
2. Install according to Figures on page
15, electrical schematic, and optional
electrical connections.
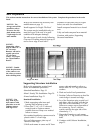
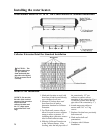
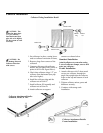
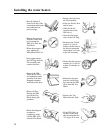
Install Roof - Jack Panel
1. Remove the necessary roofing
material,
2. Place the panel over the plumbing
and electrical stub-outs and install it
with nails or screws,
3. Flash and seal all roof penetrations.
4. Replace the roofing material.
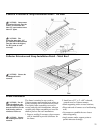
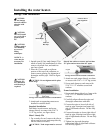
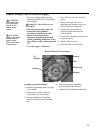
Connect the Plumbing to the Storage
Tank, (see the Figure at the top of
page 25.)
1. Connect the cold water supply line to
the storage tank.
2. Connect the solar hot water line to
the Tee Adapter.
3. Connect the drain line to T/P Valve.
NOTICE: This
section does not apply
if this system is
installed as a pre-
heater to an existing
water heater.
CAUTION: Do
not connect the
electricity to the main
circuit breaker until
the tank is full of
water.
!
NOTICE: Ensure the
plumbing is installed
to allow for the
removal of the
storage tank end
cover for the
maintenance
procedures.
CAUTION: On
new construction,
Do Not fill storage
tank and/or charge
the closed loop
system until the
water heater is
ready for use.
Cover the collectors
until the system is
filled and charged.
Place a tag on the
system if it s not
filled and charged.
!
Make certain the drain valve is
completely closed.
Open the shut-off valve in the cold water
supply line.
Open each hot water faucet slowly to
allow the air to vent from the water
heater and piping.
As the water heater fills, air will be
pushed from the open outlet faucet. A
steady flow of water from the hot water
faucet(s) indicates a full water heater.
Check the tank and cold water lines for
leaks and repair any found.
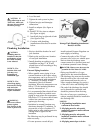
Ensure that the storage tank is completely
free of air by opening the T/P Valve until
it discharges a steady stream of water.
Then close the valve.
The system is now ready to Test and Fill
the closed loop as described in the next
section of this manual.
To Fill the Water Heater