


5
101755
OWNER’S MANUAL
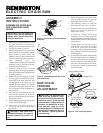
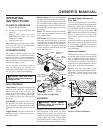
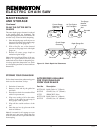
DIRECTION
CONTACT HERE
90 DEGREE
QUADRANT
Kickback Safety Devices On
Your Saw
Your saw is equipped with a low-kickback
saw chain and a reduced kickback guide bar.
Both devices reduce the possibility of rota-
tional kickback which can occur when the
tip of the bar contacts a solid object.
DO
NOT
assume that kickback will not happen
because of these devices. Contact of the
guide bar tip with any object should be
avoided.
A properly installed Front Hand Guard can
help reduce injuries from kickback. Install
by following the assembly instructions in
this manual. DO NOT remove or replace it
with a substitute.
Causes of Kickback
Kickback occurs when a chain cutter going
around the upper quadrant of the guide bar
nose is suddenly stopped (See Figure 5).
This can happen when the cutter contacts a
solid object or is pinched. The result is a
sudden reverse action which kicks the saw
tip up and/or back toward the operator.
Kickback may also occur when a chain
cutter is pinched along the length of the bar.
The result is a sudden linear reverse action
which kicks the saw straight back at the
operator.
Figure 5 - Causes of Kickback
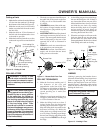
OPERATING
INSTRUCTIONS
FILLING OIL RESERVOIR
1. Remove the oil fill knob.
2. Fill the oil reservoir with SAE #30
motor oil.
3. Replace and tighten fill knob
IMMEDIATELY. This will avoid
continuous oil feed.
4. Wipe off excess oil.
Note:
When cutting in temperatures below
30°F, use SAE #10 oil. In temperatures
above 75°F, use SAE #40 oil.
EXTENSION CORDS
The proper extension cord must be used
with the chain saw. Use a HO7RN extension
cord no less than 1.5 square millimeters at
distances up to 30 meters. It is recommended
that a ground fault circuit interrupter be part
of the power supply system.
Use an extension cord heavy enough to
carry the current your saw will draw. An
undersized cord will cause a voltage drop at
the saw, loss of power and overheating.
WARNING: Read and under-
stand all instructions before op-
erating the saw.
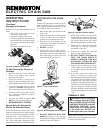
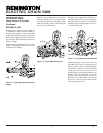
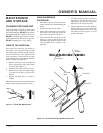
SAW CONTROLS
Front Handle The support located toward
the front of the chain saw which extends
from the left side of the chain saw. The
proper grip of this handle in the normal
cutting position gives you the greatest abil-
ity to control the chain saw in the cut (See
Figure 4).
Rear Handle The support located toward
the rear of the saw, houses the control trig-
ger. A firm grip of this handle while cutting
is necessary to control the chain saw in the
cut.
Trigger Switch The control which starts
and stops the motor. The motor only oper-
ates at full speed.
Switch Lockout The moveable button that
prevents unintentional operation of the trig-
ger. The trigger cannot be depressed to start
the saw again until the lockout is pushed in.
When the trigger is released the lockout will
automatically lock the trigger in the power
off position.
Guard The restraint in front of the handle
which prevents accidental contact of the
hand with the chain.
Oil Fill Knob By pushing the oil fill knob,
using only moderate pressure, oil will feed
on the guide bar and saw chain. To keep the
saw chain oiled, push the oil fill knob at least
once before each cut. Frequently check the
oil sight level hole located on the front left
side of the chain saw.
KICKBACK
WARNING: Guard against
kickback. Study this section be-
fore operating saw.
Kickback is the sudden upward and/or back-
ward movement of the chain saw while
cutting. If the chain saw moves toward the
operator in an uncontrolled manner, serious
or fatal injuries may result. Understanding
why kickback occurs can help you reduce
the chance of kickback and maintain control.
Figure 4 - Left and Right Sides
LEFT SIDE
RIGHT SIDE
Front Handle
Sprocket
Support
Sprocket
Guard
Power
Cord
Sprocket
Guide Bar
Guard
Switch
Trigger
Manual Oil
Control
Switch
Lockout
Rear
Handle
Saw
Chain