


4
101755
®
ELECTRIC CHAIN SAW
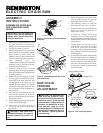
ASSEMBLY
INSTRUCTIONS
ASSEMBLING GUIDE BAR,
SAW CHAIN AND HAND
GUARD
IMPORTANT: Do not clamp in a
vise or abuse during assembly.
Always wear gloves when han-
dling the saw chain.
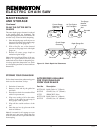
1. Remove two (2) guide bar nuts (D), two
(2) guide bar bolts (E) and one (1)
Phillips screw (N) from the plastic bag.
2. Lay the saw chain (C) out flat.
3. Install hand guard (K) by press fitting
the two bosses (L) into the hex shaped
holes in the saw body. Install the
Phillips screw (N) into the hand guard
and saw handle and tighten securely.
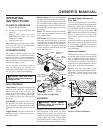
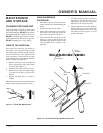
4. Turn adjusting screw (A)
counterclockwise to move the adjusting
block (B) as far as it will go to the rear
of the mount (See Figure 1).
5. Slide the guide bar (G) on to the
adjusting plate (H) aligning adjusting
block (B) with the square adjusting hole
(I) in the guide bar.
6. Rotate the sprocket support (F) back
over the guide bar so the holes line up.
7. Insert ONLY the front guide bar bolt
(E) through the body of the saw and
through sprocket support (F). Tighten
the nut (D) only finger tight. This will
allow clearance for the installation of
the saw chain.
8. Slide the saw chain between the side
cover and the sprocket (J), in the top
groove of the guide bar (G) and around
the guide bar nose.
9. Insert remaining guide bar bolt (E) and
install nut (D) finger tight.
10. Adjust the saw chain tension by
following the tension adjustment
instructions.
CAUTION: If saw chain is as-
sembled backwards, the saw will
vibrate excessively and will not
cut.
B
H
A
Figure 1 - Part Locations For Assembling
Guide Bar
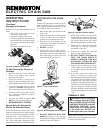
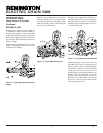
D
N
K
E
L
G
C
J
F
I
Figure 2 - Assembling Guide Bar, Chain,
and Hand Guard
SAW CHAIN
TENSION
ADJUSTMENT
CAUTION: The saw chain ten-
sion must be properly main-
tained. Failure to do so will cause
rapid saw chain, guide bar and
sprocket wear. A loose chain will
increase the possibility of kick-
back and may jump out of the
guide bar groove. This may cause
damage to the chain and injury to
the operator. Tighten guide bar
nuts securely.
1. Before adjusting the saw chain, make
sure the guide bar nuts (D) are only
finger tight (See Figure 1 and 2).
2. Turn adjusting screw (A) clockwise
until all slack is out of the saw chain.
3. Wear protective gloves and pull the saw
chain (C) around the guide bar. It
should move freely.
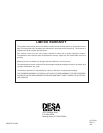
4. If necessary, readjust chain using
adjusting screw (A). There should be
no gap between the side links of the saw
chain and the bottom of the guide bar
(See Figure 3).
5. Tighten guide bar nuts (D) using a
wrench. Nuts not tightened securely
will allow guide bar movement
resulting in loose chain and increasing
the possibility of kickback and damage
to mating parts.
6. A new chain will stretch and should be
checked after the first few minutes of
operation. Disconnect saw from power
source. Adjust the chain tension after
it has had a few minutes to cool down.
Use protective gloves to protect hands
from chain teeth.
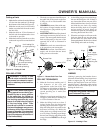
Figure 3 - Saw Chain Adjustment
Standard Chain
Cutting Edges Forward
Guide Bar
Guide Bar
Incorrect Saw
Chain Tension
Gap
Guide Bar
Correct Saw Chain
Tension