


20
6. Set up
English
SE1
SE2
SE3
SE5
(1)
SE4
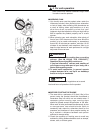
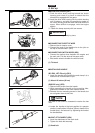
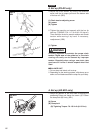
■ MOUNTING ENGINE (SE1)
1. Push the drive shaft housing toward the clutch
housing and rotate it by hand to check that the
driveshaft is engaged with the gears.
2. Insert the drive shaft housing into the clutch housing
until it bottoms, and align the positioning holes on
the clutch housing and the shaft tube and install the
screw. When difficult to engage, twist the engine
slightly.
3. Fasten the clamp securely with two screws.
Tighten the screws gradually by turns.
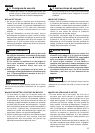
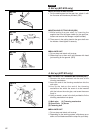
■ CONNECTING THROTTLE WIRE
1. Remove the air cleaner cover.
2. Connect the end of the throttle wire to the joint on
the top of the carburetor. (SE2)
■ CONNECTING SWITCH WIRES (SE3)
• Connect the switch wires between the engine and
the main unit. Pair the wires of the same color.
• Bind switch wires to throttle wire with tie band.
(1) Tie band
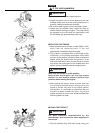
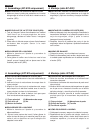
■ INSTALLING HANDLE
(BC-EX2, LRT-EX only) (SE4)
• Install the handle to the shaft tube and clamp it at a
location that is comfortable to you.
(1) About 19 inches (48 cm)
(RMS-EX only) (SE5)
1. Remove both screws from the handle.
2. While spreading the handle at the mounting hole,
position the handle on the outer tube as shown.
3. Reinstall the two mounting screws in the handle, but
do not tighten them at this time.
One side of the handle is recessed to receive the hex
nuts.
4. Locate the handle at the best position for operator
comfort (usually about 10inches (25cm) ahead of the
throttle lever), and secure it by tightening the knob at
the handle base.
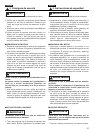
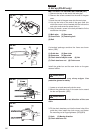
■ JOINT ATTACHMENT (SE6)
• Insert the attachment to the main shaft.
• Tighten the knob bolt securely.
(1) Knob bolt
NOTE
IMPORTANT
(1)
SE6