


9
3. While securely holding the upper shaft,
pull the attachment straight out of the
coupler.
INSTALLING OPTIONAL ATTACH-
MENTS
1. Remove the shaft cap from the attach-
ment (if present) and discard.
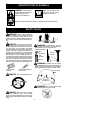
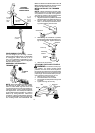
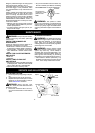
2. Position locking/release buttonof attach-
ment into guide recess of upper shaft
coupler.
Coupler
Primary Hole
Upper
Shaft
Locking/
Release
Button
Attachment
Guide Recess
3. Push theattachment intothe coupleruntil
the locking/release button snaps into the
primary hole.
4. Beforeusingtheunit,tightenthe knobse-
curely by turning clockwise.
INSTAL L ING ATTACHMENT
HANGER
An attachment hanger is provided for storage
when attachmentis notin use.Toinstallhang-
er on attachment:
1. Remove the shaft cap from the attach-
ment (if present) and discard.
2. Press and hold the locking/release but-
ton.
3. Push hanger onto the attachment until
the locking/release button snaps into the
hole.
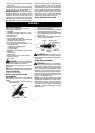
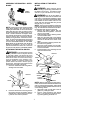
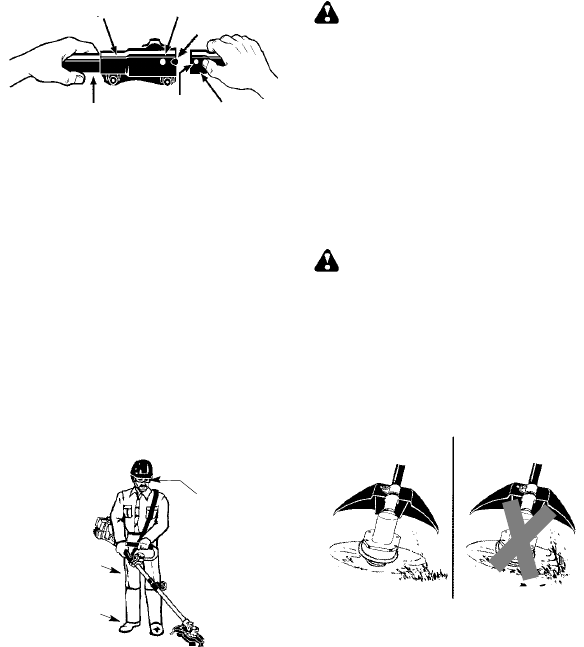
OPERA TING P OSITION
Boots
Heavy ,
Long Pants
Eye Protection
ALWAYS WEAR:
Cut from your left to your right.
NOTE: This brushcutter attachment is not
designed for use with electric pow erheads.
When operating unit with brushcutter attach-
ment, clip shoulder strap onto upper shoulder
strapclamp,standasshown andcheck forthe
following:
S W ear eye protection and heavy clothing.
S Keeparms extendedwithright handholding
the trigger handle of powerhead.
S Keep left arm extended with left hand hold-
ing the handlebar.
S Keep unit below waist level.
S Shoulder strap pad should be centered on
your left shoulder and dangersigncentered
on your back.
S Maintain full weight of tool on left shoulder .
S Without bending over , keep the blade near
and parallel to the ground and not crowded in-
to material being cut.
OPERAT ING INSTRUCTIONS FOR
USE OF BRUSHCU TT ER ATTACH-
MENT WITH TRIMMER HEAD
WARNING: Always wear eye protec-
tion. Never lean over the trimmer head.
Rocks ordebris canricochet orbe throwninto
eyes and face and cause blindness or other
serious injury.
Before trimming, bring en gine to a speed suffi-
cient to cut material to be trimmed.
Do not run the engine at a higher speed than
necessary. The cutting line will cut ef ficiently
whenthe engi neis run atless thanfullthrottle.At
lower speeds, there is less engine noise and
vi brati on. Always release the throttle trigger
and allow the engine to return to idle speed
when not cutting.
CUTTING METHODS
WARNING: Use minimum speed and
donotcrowdthelinewhencuttingaroundhard
objects (rock, gravel,fenceposts,etc.),which
candamagethetrimmerhead, becomeentan-
gledintheline,or bethrown causing aserious
hazard.
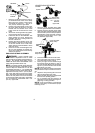
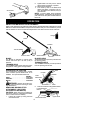
S The tip of the line does the cutting. You will
achievethebestperformance andminimum
line w ear by not crowding the line into the
cutting area. The right and wrong ways are
shown below.
Tip of the line
does the cutting.
Right Wrong
Line crowded into
work area.
S Thelinewilleasily removegrass andweeds
from around walls, fences, trees and flower
beds, but it also can cut the tender bark of
trees or shrubs and scar fences.
S For trimming or scalping, use less than full
throttle to increase line life and decrease
head wear, especially:
S During light duty cutting.
S Near objects around which the line can
wrap such as small posts, trees or fence
wire.
S For mowingor sweeping, usefull throttle for
a good clean job.
TRIMMING -- Hold the botto m of the trimmer
head about 3 i nches (8 cm) above the ground
and at an angle. Allow only the tip o f the line to
make contact. Do not force trimmer line into
work area.