


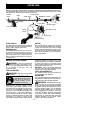

5
atepowertools o na continualand regularbasis
must monitor closely their physical condition
and the condition of this tool.
SPECIAL NOTICE: This uni t is equipped
with a temperature limiting muf flerand spark ar-
resting screenwhich meets therequirements of
CaliforniaCodes 4442and4443. All U.S.forest
land and the states of California, Idaho, Maine,
Minnesota,NewJersey,Oregon,andWashing-
ton require by law that many internal combus-
tion engines be equipped with a spark arresting
screen. If you operate in a locale where such
regulations exist, you are legally responsible for
maintaining the operating condition of these
parts.Failuretodosoisaviolationofthelaw.
For normal homeowner use, the m uffler and
spark arresting screen will not require any ser-
vice. After 5 0hoursof use,we recommendthat
your muffler be serviced or replaced by an au-
thorized service dealer .
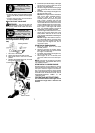
ASSEMBLY
WARNING: If received assembled,
repeatallstepstoensureyourunit isproperly
assembled and all fasteners are secure.
Examine parts for damage. Do not use dam-
aged parts.
NOTE: If you need assistance or find parts
missing or damaged, call 1-800-554-6723.
It is nor m al for the f uel filter to rattle in the
empty fuel tank.
Findingfuelor oilresidue onmufflerisnormal
due t o carburetor adjustments and t esting
done by the manufacturer.
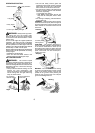
ADJUSTING THE HANDLE
WARNING: When adjustingtheassist
handle,besureitremains abovethesafety label
and below the mark or a rrow on the shaft.
1. Loosen wing nut on handle.
2. Rotate the handleon theshaft toanupright
position; retighten wing nut.
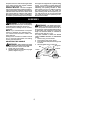
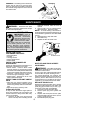
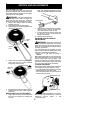
ATTACHING SHIELD
WARNING: The shield must be prop-
erly install ed.Theshieldpro vides parti alprotec-
tion to the operator and others from the risk of
thrown objects, andis equipped witha linelimit-
er blade w hich cuts e xcess line t o t he proper
length. The l ine limiter bla de (on underside of
shield) is sharp and can cut you.
For proper orientation of shield, see KNOW
YOUR TR IMMER i llustratio n in OPERA TION
section .
1. Remove wing nut from shield.
2. Insert bracket into slot as shown.
3. Pivotshielduntilboltpassesthroughhole
in bracket.
4. Securely tighten wing nut onto bolt.
Wing Nut
Bracket
Slot
Shield
Gearbox
PI
V
OT