


7
ASSEMBLY
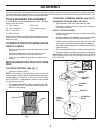
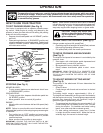
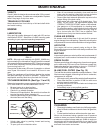
Fig. 3
INSTALL SEAT (See Fig. 3)
Adjust seat before tightening adjustment bolt.
• Remove adjustment bolt, lock washer and flat washer
se cur ing seat to cardboard packing and set aside for
as sem bly of seat to tractor.
• Pivot seat upward and remove from the cardboard pack-
ing. Remove the cardboard packing and discard.
• Place seat on seat pan so head of shoulder bolt is
positioned over large slotted hole in pan.
• Push down on seat to engage shoulder bolt in slot and
pull seat towards rear of tractor.
• Pivot seat and pan forward and assemble adjustment
bolt, lockwasher and flat washer loosely. Do not tighten
Lower seat into operating position and sit on seat.
• Slide seat until a comfortable position is reached which
allows you to press clutch/brake pedal all the way down.
• Get off seat without moving its adjusted position.
• Raise seat and tighten adjustment bolt securely.
ADJUSTMENT
BOLT
LOCK WASHER
0
2
4
6
6
02465
SEAT
PAN
SHOULDER
BOLT
FLAT WASHER
SEAT
CHECK TIRE PRESSURE
The tires on your tractor were overinflated at the factory
for shipping purposes. Correct tire pressure is important
for best cutting performance.
• Reduce tire pressure to PSI shown on tires.
CHECK DECK LEVELNESS
For best cutting results, mower housing should be properly
leveled. See “TO LEVEL MOWER HOUSING” in the Service
and Adjustments section of this manual.
CHECK FOR PROPER POSITION OF ALL
BELTS
See the figures that are shown for replacing motion and
mower blade drive belts in the Service and Adjustments sec-
tion of this manual. Verify that the belts are routed correctly.
CHECK BRAKE SYSTEM
After you learn how to operate your tractor, check to see that
the brake is operating properly. See “TO CHECK BRAKE”
in the Service and Adjustments section of this manual.
✓CHECKLIST
BEFORE YOU OPERATE YOUR NEW TRAC TOR, WE
WISH TO ASSURE THAT YOU RECEIVE THE BEST PER-
FOR MANCE AND SAT IS FAC TION FROM THIS QUALITY
PROD UCT.
PLEASE REVIEW THE FOLLOWING CHECKLIST:
✓ All assembly instructions have been completed.
✓ No remaining loose parts in carton.
✓ Battery is properly prepared and charged.
✓ Seat is adjusted comfortably and tightened securely.
✓ All tires are properly inflated. (For shipping purposes,
the tires were overinflated at the factory).
✓ Be sure mower deck is properly leveled side-to-side/
front-to-rear for best cutting results. (Tires must be
properly inflated for leveling).
✓ Check mower and drive belts. Be sure they are routed
properly around pulleys and inside all belt keepers.
✓ Check wiring. See that all con nec tions are still secure
and wires are properly clamped.
WHILE LEARNING HOW TO USE YOUR TRACTOR, PAY
EXTRA ATTENTION TO THE FOLLOWING IMPORTANT
ITEMS:
✓ Engine oil is at proper level.
✓ Fuel tank is filled with fresh, clean, regular unleaded
gasoline.
✓ Become familiar with all controls, their location and
function. Operate them before you start the engine.
✓ Be sure brake system is in safe operating condition.
✓ Be sure Operator Presence System and Reverse Op-
eration System (ROS) are working properly (See the
Operation and Maintenance sections in this manual).
NOTE: You may now roll your tractor off the skid. Follow the
instructions below to remove the tractor from the skid.
WARNING: Before start ing, read, un der stand and fol low
all in struc tions in the Op er a tion section of this man u al. Be
sure tractor is in a well-ventilated area. Be sure the area in
front of tractor is clear of other peo ple and objects.
TO ROLL TRACTOR OFF SKID (See Op er a tion
section for location and function of con trols)
• Raise attachment lift lever to its highest po si tion.
• Release parking brake by depressing clutch/brake ped al.
• Place gearshift lever in neutral (N) po si tion.
• Roll tractor forward off skid.
• Remove banding holding the deflector shield up against
tractor.
Continue with the instructions that follow.