


15
MAINTENANCE
V-BELTS
Check V-belts for deterioration and wear after 100 hours and
replace if necessary. The belts are not adjustable. Re place
belts if they begin to slip from wear.
TRANSAXLE COOLING
Keep transaxle free from build-up of dirt and chaff which
can restrict cooling.
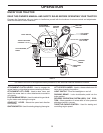
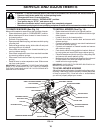
FIG. 12
FIG. 11
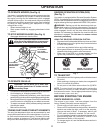
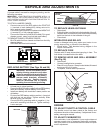
TO CHANGE ENGINE OIL (See Figs. 11 and 12)
Determine temperature range expected before oil change.
All oil must meet API service classification SG-SL.
• Be sure tractor is on level surface.
• Oil will drain more freely when warm.
• Catch oil in a suitable container.
• Remove oil fill cap/dipstick. Be careful not to allow dirt
to enter the engine when changing oil.
• Remove yellow cap from end of drain valve and install
the drain tube onto the fitting.
• Unlock drain valve by pushing inward and turning
coun ter clock wise.
• To open, pull out on the drain valve.
CLOSED
AND
LOCKED
POSITION
DRAIN
TUBE
OIL DRAIN VALVE
YEL LOW CAP
ENGINE
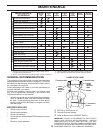
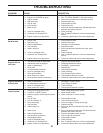
LUBRICATION
Only use high quality detergent oil rated with API service
classification SG-SL. Select the oil’s SAE viscosity grade
according to your expected operating temperature.
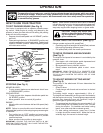
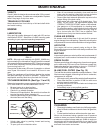
TEMPERATURE RANGE ANTICIPATED BEFORE NEXT OIL CHANGE
SAE VISCOSITY GRADES
-20 0 30 40
80
100
-30
-20 0
20 30 40
F
C
32
-10
10
60
5W-30
SAE 30
oil_visc_chart1_e
NOTE: Although multi-viscosity oils (5W30, 10W30 etc.)
improve starting in cold weather, they will result in increased
oil consumption when used above 32°F. Check your engine
oil level more frequently to avoid possible engine damage
from running low on oil.
Change the oil after every 25 hours of operation or at least
once a year if the tractor is not used for 25 hours in one
year.
Check the crankcase oil level before starting the engine
and after each eight (8) hours of operation. Tighten oil fill
cap/dipstick securely each time you check the oil level.
CLEANING
• Clean engine, battery, seat, finish, etc. of all foreign matter.
• Keep finished surfaces and wheels free of all gasoline,
oil, etc.
• Protect painted surfaces with automotive type wax.
We do not recommend using a garden hose or pressure
washer to clean your tractor unless the engine and trans-
mission are covered to keep water out. Water in engine or
transmission will shorten the useful life of your tractor. Use
compressed air or a leaf blower to remove grass, leaves
and trash from tractor and mower.
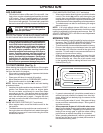
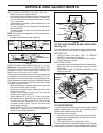
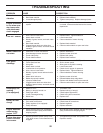
IN-LINE FUEL FILTER (See Fig. 13)
The fuel filter should be replaced once each season. If fuel
filter becomes clogged, ob struct ing fuel flow to car bu re tor,
re place ment is re quired.
• With engine cool, remove filter and plug fuel line sec tions.
• Place new fuel filter in position in fuel line with arrow
pointing towards carburetor.
• Be sure there are no fuel line leaks and clamps are
properly positioned.
• Immediately wipe up any spilled gasoline.
FIG. 13
AIR FILTER
Your engine will not run properly using a dirty air filter.
Service air cleaner more often under dusty conditions. See
Engine Manual.
MUFFLER
Inspect and replace corroded muffler and spark arrester (if
equipped) as it could create a fire hazard and/or damage.
SPARK PLUGS
Replace spark plugs at the beginning of each mowing sea-
son or after every 100 hours of use, whichever comes first.
Spark plug type and gap setting is shown in "PROD UCT
SPECIFICATIONS" section of this manual.
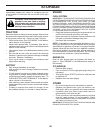
CLEAN AIR SCREEN
Air screen must be kept free of dirt and chaff to prevent
engine dam age from overheating. Clean with a wire brush or
com pressed air to re move dirt and stubborn dried gum fibers.
00667
FUEL FILTER
CLAMP
CLAMP
• After oil has drained completely, close and lock the
drain valve by pushing inward and turning clockwise
until the pin is in the locked position as shown.
• Remove the drain tube and replace the cap onto to the
bottom fitting of the drain valve.
• Refill engine with oil through oil fill dipstick tube. Pour
slowly. Do not overfill. For approximate capacity see
“PRODUCT SPECIFICATIONS” section of this man u al.
• Use gauge on oil fill cap/dipstick for checking level.
For accurate reading, insert dipstick into the tube and
push down firmly into place before removing. Keep oil
up to, but not over, the “FULL” line on dipstick. Push
dipstick down firmly into the tube when
finished.