


12
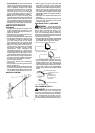
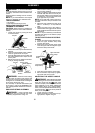
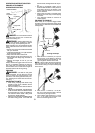
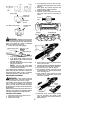
AT TACH THE EXTENSION
CORD TO YOUR UNIT
Makealoop inyourextensioncordandattach
the cord as shown. Ensure theplug andcord
are firmly and fully engaged.
Cord Retainer
Extension Cord
Recessed Plug on U nit
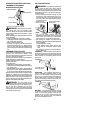
BEFORE STARTING UNIT
Be sure to read t he electrical safety i nformation
in the safety rules section of this manual before
you begin. Ifyou donot understand theelectrical
safety informati on do not attempt to use your
unit. S eek help from someone that does under-
stand the information or call the customer assis-
tance help line at 1 -800-554-6723.
GUIDE BAR AND CHAIN OIL
The bar and chainrequire lubrication. The chain
oiler provides continuous lubrication to thechain
and guide bar . Lack of oil will quickly ruin the bar
and chain. Too little oil will cause overheating
shown b y smoke coming from the chain and/or
discoloration of the bar. The oil output is auto-
matically metered during operation. Always fill
the bar oiltank beforeand duringuse asneeded
(capacity = 4.6 fl. oz.).
Genuine Poulan bar and chain oil is recom-
mended to protect your unit against exces-
sive w ear fr om heat and friction. Poulan oil
resists high t e mperature thinning.
If Poulan bar and chain oil is not available,
use a good grade SAE 30 oil.
S Never use waste oilfor bar and chain lubri-
cation.
S Always stop theunitbeforeremovingtheoil
cap.
WARNING: Always stopunit anddis-
connect f rom power source before removing
or installing atta chments.
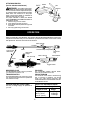
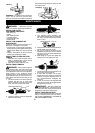
REMOVING PRUNER ATTACHMENT,
LINE TRIMME R ATTACHM EN T OR
OTHER OPTIONAL ATTACHMENTS
CAUTION:
When removing or installing at-
tachments, place the unit on a flat surface for
stability.
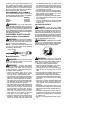
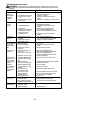
1. Loosen the coupler by turning the knob
counterclockwise.
Coupler
K
nob
LOOSEN
TIGHTEN
Upper Sha
f
t
Lower
Attachment
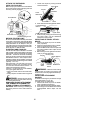
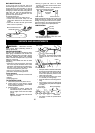
2. Press and hold the locking/release button.
Locking/Release
Button
Coupler
Upper Shaft
L
ower
A
ttachment
3. While securely holding the motor housing
and upper shaft, pull the attachment
straight out of the coupler.
INSTALLING OPTIONAL ATTACH-
MENTS
1. Remove the shaft cap from the attach-
ment (if present).
2. Position locking/release button of attach-
ment into guide recess of coupler.
3. Push the attachment intothe coupleruntil
the locking/release button snaps into the
primary hole.
4. Beforeusing theunit, tightenthe knobse-
curely by tur ning clockwise.
Coupler
Primary Hole
Upper
Shaft
Locking/
Release
Button
Attachment
Guide Recess
WARNING: Make sure the locking/
release button is locked in the primary hole
and the knob is securely tightened before op-
erating the unit.
INSTALLING ATTACHMENT
HANGER
An attachment hanger is provided for storage
when attachment is not in use.
To install hanger on attachment:
1. Remove the shaft cap from the attach-
ment (if present) and discard.
2. Press and hold the locking/release button.
3. Pushhanger ontothe attachment untilthe
locking/release button snaps into the
hole.