


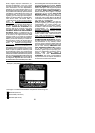

12
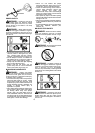
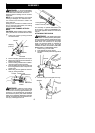
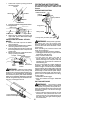
1. Loosen the coupler by turning the knob
counterclockwise.
Attachment
Coupler
Knob
LOOSEN
TIGHTEN
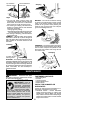
2. Press and hold the locking/release button.
Locking/Release
Button
Coupler
Upper Shaft
Attachment
3. While securely holding the engine and
upper shaft, pull the attachment straight
out of the coupler.
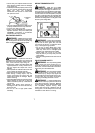
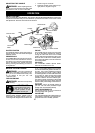
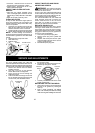
INSTALLING OPTIONAL ATTACH-
MENTS
1. Remove the shaft cap from the attach-
ment (if present).
2. Position locking/release button ofattach-
ment into guide recess of coupler.
3. Pushtheattachment intothe coupleruntil
the locking/release button snaps into t he
primary hole.
4. Beforeusing theunit,tightentheknobse-
curely by turning clockwise.
Coupler
Primary Hole
Upper
Shaft
Locking/
Release
Button
Attachment
Guide Recess
WARNING: Make sure the locking/
release button is locked in the primary hole
and theknob is securely tightened before op-
erating the unit. A ll at ta c hment s are d esigned
to be used in the primary hole unless otherwise
stated in the applicable attachment instruction
manual. Using thewrong holecouldlead toseri-
ous injury or damage to the unit.
Locking/Release
Button in Primary Hole
OPERATING INSTRUCTIONS
It is recommended that the engine not be
operated for longer than 1 minute at full
throttle.
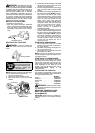
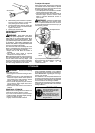
OPERATING POSITION
Cut onl
y
f
rom
y
our le
f
tto
y
our ri
g
ht.
ALWAYS WEAR:
Long pants
Heavy shoes
Eye protection
Hearing
protection
WARNING: Alwaysweareyeprotec-
tion. Never lean over the trimmer head.
Rocks ordebris canricochetorbethrowninto
eyes and face and cause blindness or other
serious injury.
When operating unit, stand as shown and
check for the following:
S Wear eye protection and heavy clothing.
S Holdtriggerhandlewithyourrighthandand
assit handle with left hand.
S Keep unit below waist level.
S Cut only from your left to your r ight to
ensure debris is thrown away from you.
Without bending over , keep line near and
parallel to the ground and not crowded into
material being cut.
Do not run the engine at a higher speed than
necessary. The cutting line will cut efficiently
when the engine is run at less than full throttle.
At lower speeds, there is less e ngine noise and
vibration. The cutting line will last longer and will
be less likely to “weld” onto the spool. Always
release the throttle trigger and allow the en-
gine to return to idle speed when not cutting.
To stop engine:
S Release the throttle trigger.
S Push and release the engine ON/STOP
switch.
CUTTING METHODS
WARNING: Use minimum speed
anddonot crowdthelinewhencuttingaround
hard objects (rock, gravel, fence posts, etc.),
whichcandamagethetrimmerhead,become
entangled in the line, or be thrown causing a
serious hazard.
S The tip of the line does the cutting. You will
achieve the best performance and mini-
mum linewear by not crowding the line into
the cutting area. The right and wrongways
are shown below.