Rev. G • Rev. G • Rév. G 10-29-07 5 P/N • Núm/Pte. • Réf. 99360000
2. To remove light assembly, remove the special pilot screw at top of face ring, remove light assembly from niche,
and place assembly on deck.
WARNING
Be sure to keep the special pilot screw from this underwater light. This screw mounts and electrically grounds the
housing securely to the mounting ring and wet niche. Failure to use the screw provided could create an electrical hazard
which could result in death or serious injury to pool users, installers or others due to electrical shock.
3. Remove Junction Box cover, disconnect the light fixture wires, and pull the cord through the conduit.
4. Feed the new light fixture cord through the conduit from the niche to the Junction Box.
NOTE:
Depending on the length of the conduit, special tools may be required to pull the cord through the conduit.
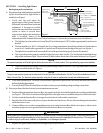
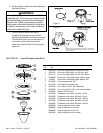
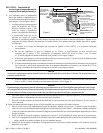
5. Leave at least 4 feet of cord to coil around the light fixture; see Figure 1. This 4 feet of cord coiled around the
light allows the light to be serviced after the pool is filled with water.
6. Cut the cord at the Junction Box, leaving at least 6 inches of cord to make connections.
7. Strip 6 inches of the outer cord jacket from the cord to expose the three insulated wires. Be careful not to
damage the insulation on the three inner wires.
8. Connect all three wires to the corresponding circuit wires in the Junction Box (black wire to power, white wire
to common, and green wire to ground) and secure the Junction Box cover in place.
WARNING
Never operate this underwater light for more than 10 seconds unless it is totally submerged in water. Without total
submersion, the light assembly will get extremely hot, which may result in serious burns or in breakage of the lamp or
lens. This may result in serious injury to pool users, installers, or bystanders, or in damage to property.
9. Replace light assembly into niche and tighten special pilot screw.
WARNING
Use only the special pilot screw provided with this underwater light. This screw mounts and electrically grounds the
housing securely to the mounting ring and wet niche. Failure to use the screw provided could create an electrical hazard
which could result in death or serious injury to pool users, installers or others due to electrical shock.
10. Fill the pool until the underwater light is completely submerged in water before operating the light for more than
10 seconds. Turn on main switch or circuit breaker, and the switch that operates the underwater light itself, to
check for proper operation.
SECTION III. Replacing a lamp only
DANGER
Always disconnect power to the pool light at the circuit breaker before servicing the light. Failure to do so could
result in death or serious injury to installer, serviceman, pool users or others due to electrical shock.
1. Turn off main electrical switch or circuit
breaker, as well as the switch which operates
the underwater light itself.
2. You will need the following items.
a. A new lens gasket (p/n 79101600).
b. A lamp, for proper type and wattage;
see Table 1.
Table 1.
Lamp Specifications: 12* volt Models 120 volt Models
120 volt - 300 watt - R-40 lamp 100 watt 300 watt
120 volt - 400 watt - R-40 lamp 300 watt 400 watt
120 volt - 500 watt - R-40 lamp 500 watt
12 volt - 300 watt - R-40 lamp *Trnsfmr. req.
12 volt - 100 watt - R-40 lamp


