


4 Pelco Installation Manual C2432M-A (12/03)
c. Compress the spring clips on the back box and push it through
the hole, until the clips spring back. Tighten the screws until
you hear a clicking noise. Insert the two 8-32 x .250-inch
screws to secure the back box to the mounting ring.
SPRING CLIP
8-32 X .250-INCH SCREW
01237
INSTALL THE BACK BOX
ATTACH SAFETY CHAIN HERE
00534
a. Attach the conduit fitting, lock nut, and safety chain bracket.
Install a safety chain/cable (not supplied) that will support up
to 16 pounds (7.3 kg).
b. Turn the thumbscrew and open the hinged door to the back
box. Pull wiring into the back box through the conduit fitting.
Refer to Tables A and B for cable requirements and wiring
distances.
INSTALLATION IN-CEILING MODEL
PREPARE CEILING
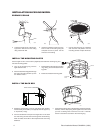
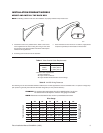
a. Locate the center point of the mount-
ing location. Drill a hole in the ceiling
using a 3/32-inch drill.
c. Use the mounting ring as a template
and mark the hole pattern onto the
mounting surface. Prepare the holes.
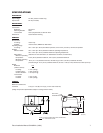
INSTALL THE MOUNTING PLATES
Use the eight 10-32 x 3-inch screws (supplied) and install the mounting ring and
two back mounting plates.
00530
00531
b. Insert the compass tool into the hole.
Draw a circle on the ceiling using the
compass tool and a pencil. Cut the
circle out of the ceiling.
00532
CEILING
MOUNTING
RING
S
00533
c. Install fasteners through the mounting
ring, ceiling, and out the back mount-
ing plate.
d. Install second back mounting plate.
a. Line up the mounting ring with the
eight fastener holes.
b. Feed one back mounting plate through
the hole in the ceiling and line up with
four fastener holes.