


~li~nrnent
SynScanT"
W~th
SynScanTM
SynScanTM
3-StarAlign
0
9
SynScan"
becp slening
SynScan'"
ESC
SynScanT"
SynScanTM
SynScanTM
SynScanrM
SynScanTM
SynScanTM
Star
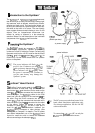
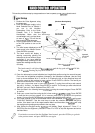
In order for the to correctly point to objects in the sky, it must first be aligned to one to three
known positions (stars) in the sky. As the Earth rotates on its axis every
24
hours, astronomical objects
appear to move through the sky following an arc.
the supplied information, the telescope can
replicate a model of the sky and the movements of astronomical objects. Star alignment can be done
anytime during the observing session by choosing Alignment under SETUP MODE, in the Main Menu.
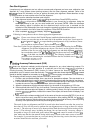
There are three ways to align the depending on your demand for accuracy. If you are using the
for the first time, we recommend that you begin with the Three Star Alignment. In most cases,
this produces the most accurate alignment among the three methods. Before performing any of the
alignment methods, be sure that your finderscope is well aligned with the telescope tube. See the next
page for tips on how to choose the alignment stars. Below describes a step
-
by
-
step procedure on how to
perform the Three Star Alignment:
Three
-
Star Alignment
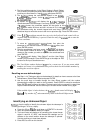
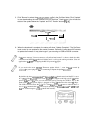
1.
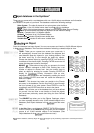
In the alignment screen, select using the scroll keys. Press
ENTER
to confirm.
2.
The SynScan
TM
will provide a list of stars available in your current sky for you to choose as the first
alignment star. Using the scroll keys, choose an appropriate star from the list provided and press
ENTER.
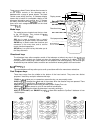
The telescope will start slewing towards it. When the telescope stops slewing, adjust its
position with the directional keys until the star is centered on the crosshairs in the finder scope.
Now look through the eyepiece and adjust the telescope so that the object is centered in the field
of view of the eyepiece. Press
ENTER
to confirm.
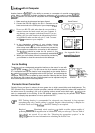
The slewing speed can be adjusted by pressing on the
RATE
button. Then choose
a
number between (slowest)
-
(fastest).
will once when it has finished to an object. Do not try to
adjust the telescope before you hear the beep.
will only respond
to
the
key while slewing.
will provide a list of objects for the second alignment star. Choose a star using the scoll
keys and press
ENTER.
Repeat the centering procedure for the second star and press
ENTER
to
confirm.
will once again provide a list of objects for the third alignment star. Choose a star from
the list and press
ENTER.
Once again, repeat the centering procedure for the third alignment star.
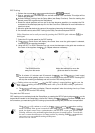
5.
If appropriate stars have been chosen and aligned to, the hand control will display
"
Alignment Successful
"
. Otherwise, the warning
"
Alignment Failed
"
will show and the alignment
will have to be done again.
Two
-
Star Alignment
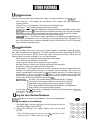
Two
-
Star Alignment requires only two alignment stars but, without Cone Error Calibration (see Appendix
A), it may produce lesser pointing accuracy than the Three
-
Star Alignment. Below describes a step
-
by
-
step procedure on how to perform the Two
-
Star Alignment:
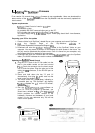
1.
In the alignment screen, select
2-Star Align
using the scroll keys. Press
ENTER
to confirm.
2.
The will provide a list of stars available in your current sky for you to choose as the first
alignment star. Using the scroll keys, choose a star you are most familiar with and press
ENTER.
The telescope will start slewing towards it. When the telescope stops slewing, adjust its position
with the directional keys until the star is centered on the crosshairs in the finder scope. Now look
through the eyepiece and adjust the telescope so that the object is centered in the field of view of
the eyepiece. Press
ENTER
to confirm.
will provide a list of objects for the second alignment star. Choose a star using the scoll
keys and press
ENTER.
Repeat the centering procedure for the second star and press
ENTER
to
confirm.
4.
If appropriate stars have been chosen and aligned to, the hand control will display
"
Alignment Successful
"
. Otherwise, the warning
"
Alignment Failed
"
will show and the alignment
will have to be done again.
3.
4.
3.