


PAGE 20 — GB113BC GLOBUG LIGHTING SYSTEM — OPERATION AND PARTS MANUAL — REV. #5 (01/16/12)
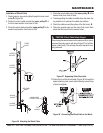
DANGER - HIGH VOLTAGE POWER LINES
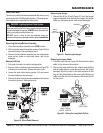
When raising mast, ALWAYS be on
the lookout for overhead obstructions
such as high voltage power lines. The
possibility exists of electrocution,
even death! if the GloBug comes in
contact with
high voltage power lines
.
Applying Power
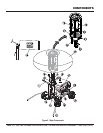
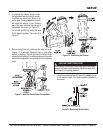
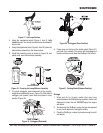
1. Make sure the power ON/OFF switch (Figure 13) located
near the bottom of the mast is in the OFF position.
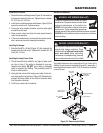
2. The GloBug has a power requirement of 120 VAC, 60 Hz
@ 9.6 amps. Connect the GloBug's AC power cord to
the 120 VAC twist-lock receptacle (Figure 14) on the the
supplied generator.
Figure 13. Power OFF/ON Switch (OFF Position)
Figure 14. 120 VAC Receptacle
CAUTION - READ GENERATOR MANUAL
Before attempting to operate the
generator, READ the entire operation
section of the manual. Failure to read
manual could cause severe damage to
the equipment and bodily harm to the
operator.
4. Notice that the balloon envelope will begin to deploy as
soon as power is applied by an active generator. This
function
is not
controlled by the power ON/OFF switch.
5. Wait until the balloon is fully deployed before attempting
to turn on the lamp. The possibility exists of the balloon
getting burned (touching the lamp).
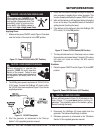
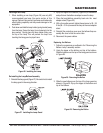
6. If the balloon is fully deployed, place the GloBug's ON/
OFF switch (15) in the ON position.
Figure 15. Power OFF/ON Switch (ON Position)
7. The lamp should now be on. If the lamp is not on, check
all connections and repeat steps 1 through 6. If the lamp
still does not come on contact the MQ service
department.
Shutdown
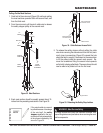
1. Place the power ON/OFF switch (Figure 16) in the OFF
position.
Figure 16. Power OFF/ON Switch (OFF Position)
CAUTION - LAMP COOL DOWN
Allow a sufficient amount of time (15-20 minutes) for the
lamp (Figure 17) to
cool down
before turning off
generator. The possibility exists of the balloon getting
burned (touching the lamp).
2. Disconnect the GloBug's AC power cable from the
generator. The balloon should begin to deflate.
3. Shutdown generator as referenced in the "Shutdown
Section" of the supplied generator manual.
3. Start the generator as referenced in the "Start-up
Section" of the supplied generator manual.
ON
OFF
ON
OFF
ON
OFF
SETUP/OPERATION