


English Operating Manual for Wood Splitter
2
Before detecting leaks, put on goggles
and protective gloves and then move
a piece of cardboard or wood over the
suspected area and ascertain whether
the cardboard or wood has changed
colour. If escaping liquid causes
injury, immediately cause a doctor.
Serious inflammation or reactions
may occur if medical treatment is not
implemented immediately. To ensure
a secure footing / safe working
environment, always keep the work
area and the area around the unit free
of objects. Ensure that all statutory
regulations are observed.
Before carrying out any work on
the unit
Protect yourself from injury. Before
carrying out any work on this unit:
– Switch off the engine,
– Wait until all moving parts have
come to a standstill; leave the
engine to cool down,
– Remove spark-plug terminal from
the engine to prevent the engine
from starting unintentionally,
– Before repairing, adjusting or
checking hoses, hose connections,
pipelines or other components,
depressurise the hydraulics.
After operating the unit
Before leaving the unit, switch off
the engine and remove the spark-
plug terminal. Leave the engine to
cool down before putting the unit
away or in storage.
Safety devices
Safety devices, e.g. controls and
protective devices and guards, are for
your protection and must always be
functional.
Never modify safety devices or bypass
their function.
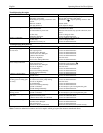
Symbols on the unit
Various symbols are stuck on the unit.
Below is an explanation of the
symbols:
Always keep these symbols on the
unit in a legible state.
Symbols in this manual
The following symbol is used in this
manual:
Caution Danger
These symbols refer to dangers
associated with the described activity
which may cause injury and/or
damage.
Graphical representations
The graphical representations may
deviate slightly in detail from the
purchased unit.
Assembling the unit
Attention!
When unpacking this unit, exercise
extreme caution. Some components
are very heavy and several persons or
a hoist are required.
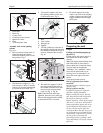
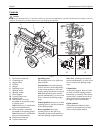
Attaching the wheels
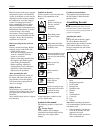
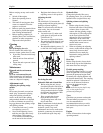
Fig. 1
Jack up the tank module by approx.
20–30 cm. Remove the plastic
transportation caps from the outsides
of the wheels. Remove cotter pin,
hexagon castellated nut and washer
from each axle.
1 Bolts
2 Mudguard (optional)
3 Lock washer
4 Hexagon nut
5 Hydraulic tank
6 Washer
7 Wheel
8 Castellated nut
9 Cotter pin
10 Cap
11 Washer
Note: Before attaching the wheels,
it is recommended to polish the axles
with emery cloth.
• Place the wheels, with the tyre
valve on the outside, onto the
respective axle ends.
Push on the washer and secure
with a castellated nut.
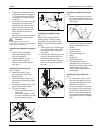
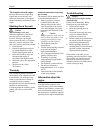
MAX. 16%
!
Attention!
Before switching on
the unit, read the
operating
instructions.
Keep third parties
out of the danger
area.
N
ever place hands or feet
between splitting wedge
and wood or near moving
parts.
Keep hands and other
body parts from leaking
hydraulic lines.
Wear eye and ear
protection.
Wear protective
gloves.
Working on steep
slopes may be
dangerous.
Before carrying out any
work on the unit: follow
instructions in the
operating manual.
2
11
10
9
8
1
6
5
4
3
Fig.1
7