


PRE-OPERATION
WARNING: BEFORE OPERATING, READ THIS OWNERS MANUAL COMPLETELY. PAY
PARTICULAR ATTENTION TO THE “SAFETY PRECAUTION” AND “SAFETY FIRST” PAGES. READ ALL
SAFETY MESSAGES HIGHLIGHTED BY “SAFETY ALERT SYMBOLS” THROUGHOUT THE MANUAL.
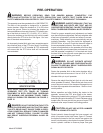
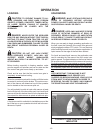
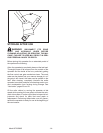
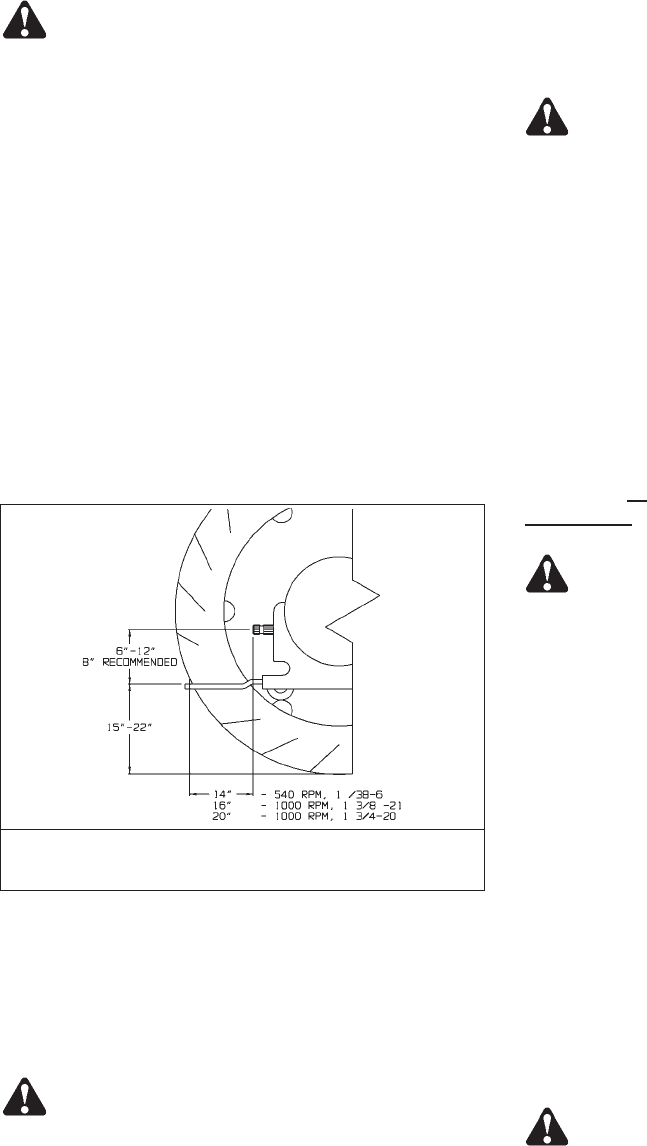
This spreader must be operated with a 1000 RPM PTO.
The hitch of the spreader is designed for a standard
tractor drawbar. Adjust the drawbar at 15 to 22 inches
above the ground. Extend or shorten the drawbar so
horizontal distance from end of tractor PTO shaft to cen
-
ter of the hitch pin hole is 20” (1 3/4-20), 16” (1 3/8-21).
Secure the drawbar so that the hitch pin hole is located
directly below the PTO drive line. See figure 1 for loca
-
tion of standard measurements.
An improperly located hitch point may cause damage to
the universal joints of the PTO drive shaft. Conforming
to the standard 16" or 20” drawbar & PTO relationship
will ensure that the PTO drive shaft will not become
over-extended.
WITH INITIAL HOOK-UP TO YOUR NEW MEYER
SPREADER TEST PTO TRAVEL BY TURNING
EQUIPMENT IN BOTH DIRECTIONS OBSERVING
THE MINIMUM AND MAXIMUM TRAVEL DIMEN
-
SIONS AS SHOWN PER DRAWING ON FIGURE 5,
PAGE 15.
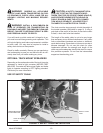
DANGER: DO NOT OPERATE WITHOUT PTO
GUARD ON SPREADER AND ON TRACTOR. MAIN
-
TAIN PTO DRIVE SHAFT GUARD TUBES IN OPER
-
ATING CONDITION. REPLACE THEM IF DAMAGED
AND NOT TURNING FREELY. FAILURE TO HEED
MAY RESULT IN SERIOUS PERSONAL INJURY OR
DEATH.
WARNING: INSPECT REGULARLY THAT ALL
CONNECTIONS AND BOLTS ARE TIGHT AND SE
-
CURE BEFORE OPERATING. FAILURE TO HEED MAY
RESULT IN SERIOUS PERSONALINJURY OR DEATH.
Check for proper assembly and adjustment and make
sure that all bolts are tightened. Securely retighten after
a few hours ofoperation, as bolts can loosen up onnew
machinery. Check wheel lug nuts upon delivery and pe
-
riodically thereafter. Lug nuts should be tightened at
250-265 ft./lbs. of torque. Check the tires and inflate to
the recommended pressure. See chart on page 60.
Inspect all adjustments on the spreader to be sure they
are proper and to provide maximum performance. Lubri
-
cate the spreader completely if it is required and check
the level of oil
in the right rear corner gear box, and the
gear grease
in the expeller gear boxes.
WARNING: DO NOT OPERATE WITHOUT
ALL SHIELDS, GUARDS AND COVERS INSTALLED.
FAILURE TO HEED MAY RESULT IN SERIOUS PER-
SONAL INJURY OR DEATH.
Fasten the spreader hitch to the tractor drawbar with a
hitch pin that cannot bounce out. Use a 1-5/16” to 1-3/8”
diameter hitch pin to pull spreader.
Remove the weight from the jack (jack is not to be used
when spreader is loaded). Remove the jack from round
mount tube and move to the transport storage tube on
the front of the spreader drive enclosure. Store in a hori
-
zontal position.
Before operation and after hitching the tractor to the
spreader, connect the PTO drive shaft to the tractor.
Slide spring loaded locking collar on PTO yoke rearward,
and slide yoke onto the tractor PTO shaft. Release spring
loaded collar. Be sure pins fall into groove of tractor PTO
shaft and collar snaps forward into locking position.
CAUTION: DO NOT USE A STEEL HAMMER
TO AID IN JOINING PTO PARTS.
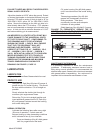
Route hydraulic hoses through the hose support rod
which is mounted to the hitch frame, figure 2. Connect
the hydraulic hoses for the flow control rear gate to the
tractor’s double acting valve hydraulic system. Move the
tractor hydraulic controls to observe proper flow gate
Model 8720/8865 -8-
FIGURE 1. TRACTOR DRAWBAR & PTO
SPECIFICATION