


6
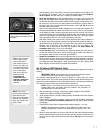
Telescope and Tripod Features
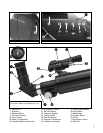
b Dust Cap (not shown): Pull to remove from the dew shield (17, Fig. 1).
NOTE: The dust cap should be replaced after each observing session and
the power turned off (NGC models only) to the telescope. Verify that any
dew that might have collected during the observing session has evaporat-
ed prior to replacing the dust cap.
C Optical Tube: The main optical component that gathers the light from distant
objects and brings this light to a focus for examination with the eyepiece.
D Optical Tube Attachment Bracket: Attach the optical tube to this bracket. See
HOW TO ASSEMBLE YOUR TELESCOPE, page 8, for more information.
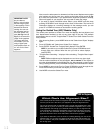
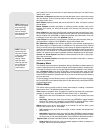
E Control Panel (Fig. 3, NGC Models Only):
A. 2-Line LCD Display: Displays menus and information concerning the com-
puter controller.
• Top line: Displays menu items.
• Bottom line: Displays menu options or information.
For example
,
information about an astronomical object, such as a planet, or
information about locating an object.
B. Enter Button: Accesses, in order, the next menu or option. When a menu
option you wish to choose displays, press ENTER to select it. This button is
similar to a computer's RETURN key.
C. Mode Button: Press this button when you wish to return to the previous
menu. The MODE key is similar to a computer's ESCAPE key.
If MODE is pressed and held for two seconds or more, the following informa-
tion displays:
• Astronomical coordinates of a selected object
• Local Time and Local Sidereal Time (LST)
• Timer and Alarm Status
Press MODE again to return to the previous menu.
D. Up/Down Button: Use UP/DOWN to scroll through the letters of the alphabet,
numerical digits, menus, menu options and other information.
E. On/Off: Press to turn the control panel on or off.
F. Vertical Slow Motion Control Knob: Use this control to make fine adjust-
ments in the vertical movement of the telescope.
G. Aux Port: Use this port, along with the optional #506 Astrofinder Software and
Cable Connector Kit, to connect to your PC, or to update celestial objects for
your control panel from the Meade website (www.meade.com). See
OPTIONAL ACCESSORIES, page 19, for more information.
F Optical Tube Attachment Knobs: Attach these knobs to the bolts on the optical
tube when you attach the optical tube to the bracket. See
HOW TO ASSEMBLE
YOUR TELESCOPE,
page 8, for more information.
G Red Dot Viewfinder: Before looking at an object in the eyepiece, locate the object
in the red dot viewfinder. The viewfinder provides a much easier way to locate
celestial objects than a telescope eyepiece, because it has a wider field of view.
H Eyepiece: Place the eyepiece into the 90° diagonal mirror (8, Fig. 1 or 28, Fig. 4)
and tighten the thumbscrew (25, Fig. 4) to a firm feel only.You may also place the
eyepiece directly into the focuser drawtube (9, Fig. 1). Use the focus knobs (10,
Fig. 1) to focus the eyepiece.
I 90° Diagonal Mirror: Holds the eyepiece at a convenient angle for easy viewing.
Slide the diagonal mirror into the focuser drawtube
(9, Fig. 1) and tighten the
thumbscrew (26, Fig. 4) to a firm feel only.
J Focuser Drawtube: Slide the diagonal mirror or an eyepiece into this tube.
Tighten the thumbscrew (26, Fig. 4) to a firm feel only.