


11
After displaying "Then Press Enter," the control panel displays two numbers, one
on each line. For example: "+35 -115." These two numbers are called "displace-
ment numbers" and will assist you in locating a celestial object.
4. Move the telescope: Move the telescope tube to the right or left and you will
notice the first displacement number getting larger or smaller. Move the tube in
the direction that makes the number smaller. Keep moving the tube until the num-
ber nears zero. As you near zero, bars appear on the display to make it easier to
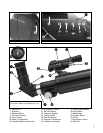
precisely reach zero. Use the horizontal slow motion control (20, Fig. 2) to move
the tube in small increments.
After the first displacement number displays zero, move the tube upwards until
the second displacement number also nears zero. As you near zero, bars appear
on the display to make it easier to precisely reach zero. As you near zero, use the
vertical slow motion control (F, Fig. 3) to move the tube.You probably will need to
make fine adjustments with both displacement numbers as moving the optical
tube may slightly shift one or the other displacement numbers.
After both number have reached zero, the first alignment star may not appear in
the field of view of the eyepiece. However, the alignment star should be easily rec-
ognized and be the brightest star in the area of the sky where the telescope is
pointing. Look for the star in the viewfinder to see if you can locate it. The
viewfinder has a wider field of view than the eyepiece. See
WHICH ONE'S THE
ALIGNMENT STAR, page 13, for more information.
5. Center the Star: Once you locate the star, adjust the optical tube using the hor-
izontal and vertical slow motion controls until the star is visible and centered in
the eyepiece. When the star is centered, press ENTER.
6. Repeat the procedure for the second alignment star. If you have have followed
the procedure correctly, "Align Successful" displays and the telescope is aligned.
You may now use the control panel to locate other stars and objects in the sky. If
your alignment was unsuccessful, "Align Unsuccessful" and then "Setup: Easy
Align" displays. Press ENTER and repeat the procedure.
Go To Saturn (NGC Models Only)
After performing the Easy Alignment procedure, the telescope is aligned for a night of
viewing.
IMPORTANT NOTE
:
Once aligned, do not move the telescope's tripod
and base from the level position or alignment will be lost.
This exercise demonstrates how to select an object for viewing from the control
panel's Object menu.The control panel provides an Object menu which displays a list
(sometimes called a database) of over 1400 objects you can view with your telescope.
This example demonstrates how to select Saturn from the list.
NOTE: Saturn is not visible the entire year and you may need to choose
another object from the Object menu list; however, the procedure, as
described below, remains the same.
1 After the telescope is aligned, "Select Item: Object" displays. Press ENTER.
2. "Object: Solar System" displays. Press ENTER.
3. "Solar System: Mercury" displays. Keep pressing UP/DOWN until "Solar System:
Saturn" displays.
4. Press ENTER. "Calculating" displays. "Saturn" and its R.A. and Dec. coordinates
display. See
APPENDIX A: ADVANCED FEATURES, for information about celestial
coordinates.
5. Press ENTER. Next, Saturn's displacement numbers display: "+14 -135."
NOTE: Your displacement numbers will be different than the ones in this
example. Displacement numbers are determined by location, time, and
date.
6. Move the telescope tube to the right or left until you notice the first displacement
number getting smaller. Keep moving the tube until the number reaches zero. As
you near zero, use the horizontal slow motion control (20, Fig. 2) to move the opti-
cal tube.
Note: If the horizontal
and/or vertical move-
ment of the optical
tube seems to be too
loose or too tight, you
can adjust the amount
of tension in the move-
ment of the optical
tube to suit your own
preference. See
ADJUSTING THE
HORIZONTAL AND
VERTICAL TENSION OF
THE OPTICAL TUBE
,
page 20.
NOTE: The control
panel locates alignment
stars based on the
date, time, and location
entered. The alignment
stars may change from
night to night.
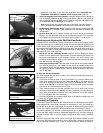
Fig. 13:
Move the optical tube
until the tube points North on the
compass.