


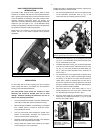

- 16 -
selects all objects from very poor through super — what could be
considered an “ALL” setting. The object quality symbols are:
Quality Symbol Symbol Description
SU Super
EX Excellent
VG Very Good
G Good
FR Fair
PR Poor
VP Very Poor
For example: to define the visual object quality range to very
good and better, press the ENTER key until the symbol VG is
displayed. From the VP setting to VG requires three ENTER key
presses. The CDS will now select objects that look Very Good
through Super.
c) HIGHER
The Higher option sets the horizon setting for the telescope. At
power up, the setting is 00 degrees, which assumes the CDS
system has an unobstructed, line-of-site view to the horizon in
every direction. If, however, there are things obstructing a level
horizon, or if the sky quality is poor due to haze or light pollution,
an artificial horizon level may be set to avoid the "undesirable"
area.
To roughly judge how many degrees of the sky is "undesirable"
for viewing, or is being obstructed, hold your fist at arm’s length
and attempt to cover the obstruction with your fist. Each fist
diameter is approximately 5 degrees. So, if a tree is three fists
high, enter a setting of 15 degrees in the HIGHER setting. Once
the setting has been entered using the keypad, press ENTER.
d) LARGER
The LARGER option allows an observer to set the lower
apparent size limit of the objects to be observed. At power up the
LARGER option is set to 000' (arc minutes). To decide what size
limits to impose, it helps to have a clear understanding of exactly
what an arc minute of sky is. A good example is the apparent
size of the Moon, which could be expressed as 1/2 of a degree,
30 arc minutes, or 1800 arc seconds. Each arc minute is 60 arc
seconds, and there are 60 arc minutes for each degree of sky.
Some beginning observers have a tough time discerning objects
less than about 1 arc minute in size unless it is a double star or
a planet. Astrophotographers and those involved with CCD
imaging may want to set a higher value based on desired image
scale coverage that would be most impressive with different films
or types of CCD cameras. Enter the new value in arc minutes
using the Keypad, then press ENTER.
e) SMALLER
The SMALLER option is the upper size object limit. At power up
the SMALLER setting is 200' arc minutes or 3.33 degrees. This
setting is high enough to cover the largest objects in the OBJECT
LIBRARY. You may want to lower the value because of true field-
of-view limitations of a particular eyepiece (see the RADIUS
parameter option for calculating true field).
Other reasons for limiting the SMALLER value is for
astrophotographic or CCD imaging requirements where a user
does not want an object to exceed the imaging area of the film or
the CCD chip.
f) BRIGHTER
The lower brightness limits based on stellar magnitude can be
limited in the BRIGHTER option. At power up, the magnitude
value is set to a very faint level of +20.0.
A user may wish to adjust the BRIGHTER (magnitude) level to a
brighter value, perhaps the limiting visual magnitude of the
telescope being used, (approximately 14.0 for an 7" and 12.0 for
a 4"). Sky conditions also greatly affect the limiting magnitude
due to atmospheric haze, high clouds, light pollution, or
combinations thereof.
g) FAINTER
The upper level of brightness may be adjusted with the FAINTER
option, although there are few applications for limiting the CDS to
a lower value.
h) RADIUS
The RADIUS value sets the boundaries of what and how many
objects the CDS recognizes within a given eyepiece while in the
FIELD menu selection. At power up the RADIUS option is set to
15 arc minutes, the radius of 1/2 a degree (30 arc minutes).
To calculate the true field of an eyepiece in the telescope, first
divide the focal length of the telescope (e.g. 1140mm for an 5"
127ED) by the focal length of the eyepiece (for example, a 26mm
Super Plössl eyepiece: 1140 divided by 26 equals 44X
magnification). Then, find the apparent field of the eyepiece
(which is 52 degrees for the 26mm Super Plössl) and divide it by
the magnification (52 divided by 44 equals .1.18 degrees. To
convert degrees to arc minutes, multiply the amount by 60,
which equals 70.8 arc minutes.
To get the radius of the true field of view, divide the true field
by 2. In the case of the above equation, 70.8 arc minutes divided
by 2 equals 35.4 arc minutes.
2. MODE TWO: COORDINATES/GO TO
Mode Two allows a user to see where the CDS is pointing in two
celestial coordinate formats, either Right Ascension and
Declination or Altazimuth. Also in this mode it is possible to enter
new Right Ascension and Declination coordinates for any sky
position, perhaps to locate objects not in the CDS library (e.g.,
comets or asteroids) and have the telescope slew to the new
coordinates.
A. Coordinates Menu Option
This option displays the R.A. and DEC coordinates of where the
telescope is pointing. If the CDS is moved using the "N", "S", "W"
or "E" keys, the coordinate display immediately updates the new
position in Right Ascension and Declination.
Pressing ENTER displays the Altazimuth coordinates (ALT = and
AZ =). This data is for general information only. With the ALT AZ
information displayed, pressing the GO TO key will not move the
telescope. Return to the R.A. and DEC coordinates by pressing
the ENTER key again.
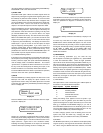
The R.A. coordinates are displayed in hours, minutes, and
seconds. The DEC coordinates are displayed in degrees,
minutes and seconds. The "+" represents North Declination and
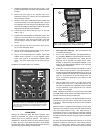
"-" represents South Declination. See Display 28:
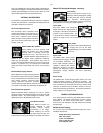
Display 28
B. GO TO Menu Option
The GO TO option allows a user to enter Right Ascension and
Declination coordinates of any object in the sky. With this ability,
RA = 02:45.54
DEC = +22°54:02