


- 15 -
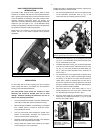
using the M, STAR, or CNGC keys, and pressing the ENTER key.
Press MODE to exit to the main menu file.
2) START FIND
The START FIND option utilizes the CNGC objects within the
Object Library and begins a logical search beginning where ever
the telescope is positioned when activated. To cover the entire
visible sky it will make 31 strip divisions about 12 degrees wide,
moving from West to East, from the North Pole to the South Pole,
then South to North. Once it has found all of the deep sky
objects, it will repeat its sequence until new objects are visible.
Press the ENTER key and the keypad display will show the first
object in its finding sequence. This first object is selected by the
CDS, based on where the instrument is pointing in the sky when
you entered START FIND. To point the CDS to the object
displayed, press the GO TO key. The CDS will slew to the object.
While in the START FIND option, you can either choose the next
object in line or skip it as you wish. In order to find the next object
in sequence, press the NEXT key. The display will read the new
CNGC object. If you do not wish to view this object, the object
may be skipped by pressing NEXT. If you wish to return to a
previously viewed object, press the PREV key until the desired
catalog number is displayed. Then, press the GO TO key. If any
parameters have been set within the PARAMETERS option, the
CDS will find only those objects within the chosen confines.
a) Coordinate Matching Feature
If the object is not well centered in the eyepiece after executing a
GO TO (due to poor leveling, improper time input, or errors in site
location), center the object; then press and hold the ENTER key
until the display reads “Coordinates Matched.” This feature
"synchronizes" or updates the CDS's information for an area of
the sky, so that the next object (if the leveling, time input, or site
location information is not corrected) will be better centered.
To exit the START FIND menu selection (and cease its operation)
and return to the main menu, press the MODE key.
3) FIELD
Press the ENTER key to identify objects in the field of view of the
telescope. The CDS will display the object centered in the
eyepiece field, and how many other NGC objects are in the field
at the same time (defined by the RADIUS parameter setting) as
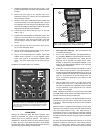
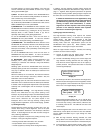
shown in Display 24:
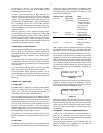
Display 26
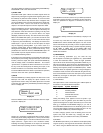
Press ENTER once more to see how far your telescope needs to
be moved to acquire the object. The display will show LED bars,
each bar represents ten degrees of movement as shown in
Display 27:
RA = 12:27.2*
DEC = +13'03
■ ■ ■ ■
■
Objects: 5
Center: CNGC 4438
CNGC 4438 VG GAL
MAG 10.1 SZ 9.3'
Display 24
Press the ENTER button to reveal information about the object
as shown in Display 25:
Display 25
Display 25 is interpreted; Computerized New General Catalog
#4438, Very Good, Galaxy, Magnitude 10.1, Size (in arc minutes)
9.3'. Press ENTER again to read the coordinate location of the
object (notice the * legend next to R.A. coordinate number,
indicating the catalog coordinates of the object, not necessarily
where the telescope is pointing) as shown in Display 26:
Display 27
If the object is already centered in the telescope, Display 27 will
be blank.
To review any of the data of an object, continue to press the
ENTER button until the desired field appears. You can use the
above commands at any time that you have an object entered in
the Keypad, while directly entering in specific objects by pressing
the M, STAR, or CNGC keys, in the START FIND menu
selection, the OBJECT INFORMATION menu selection, or the
FIELD menu selection.
4) PARAMETERS
To set observing parameters (e.g., the CDS will only
GO TO objects of a certain type, brightness, etc.), press ENTER
to enter the Parameters Menu. There are eight parameter
options which can be reviewed using the PREV or NEXT key. To
edit one of the options, move the arrow to the desired option and
press and hold the ENTER key until a double beep is heard. A
blinking cursor appears (except in the BETTER option). Where
numerical values are required, type them in using the Keypad. If
a mistake is made, move the cursor backward using the "W" key,
then re-enter the data. To exit to the main option menu, press the
ENTER key once again. A description of the eight options and
how to set them is below:
a) TYPE GPDCO
This option allows a user to select the type of CNGC objects to
be located. The symbols GPDCO represent:
Object Symbol Symbol Description
G Galaxies
P Planetary Nebulae
D Diffuse Nebulae
C Globular Star Clusters
O Open Star Clusters
Initially, the blinking cursor appears over the G symbol. If you
decide not to look for galaxies, press the NEXT key and the
symbol will change from an upper case letter (G) to a lower case
letter (g), to deselect the GALAXIES category. If you wish to
leave GALAXIES selected, then move the blinking cursor over to
one of the other category symbols by pressing the "W" or "E" key
on the Keypad. Deselect any undesired categories.
To recall a category symbol, move the blinking cursor over the
symbol and press the PREV key, changing the letter to
uppercase. After your selections are made, press ENTER.
b) BETTER
The BETTER option allows you to define the visual object quality
range. At power up, the range is set at the bottom of the scale on
VP. When using the START FIND menu selection, The CDS