- 10 -
THE CDS CONTROL PANEL
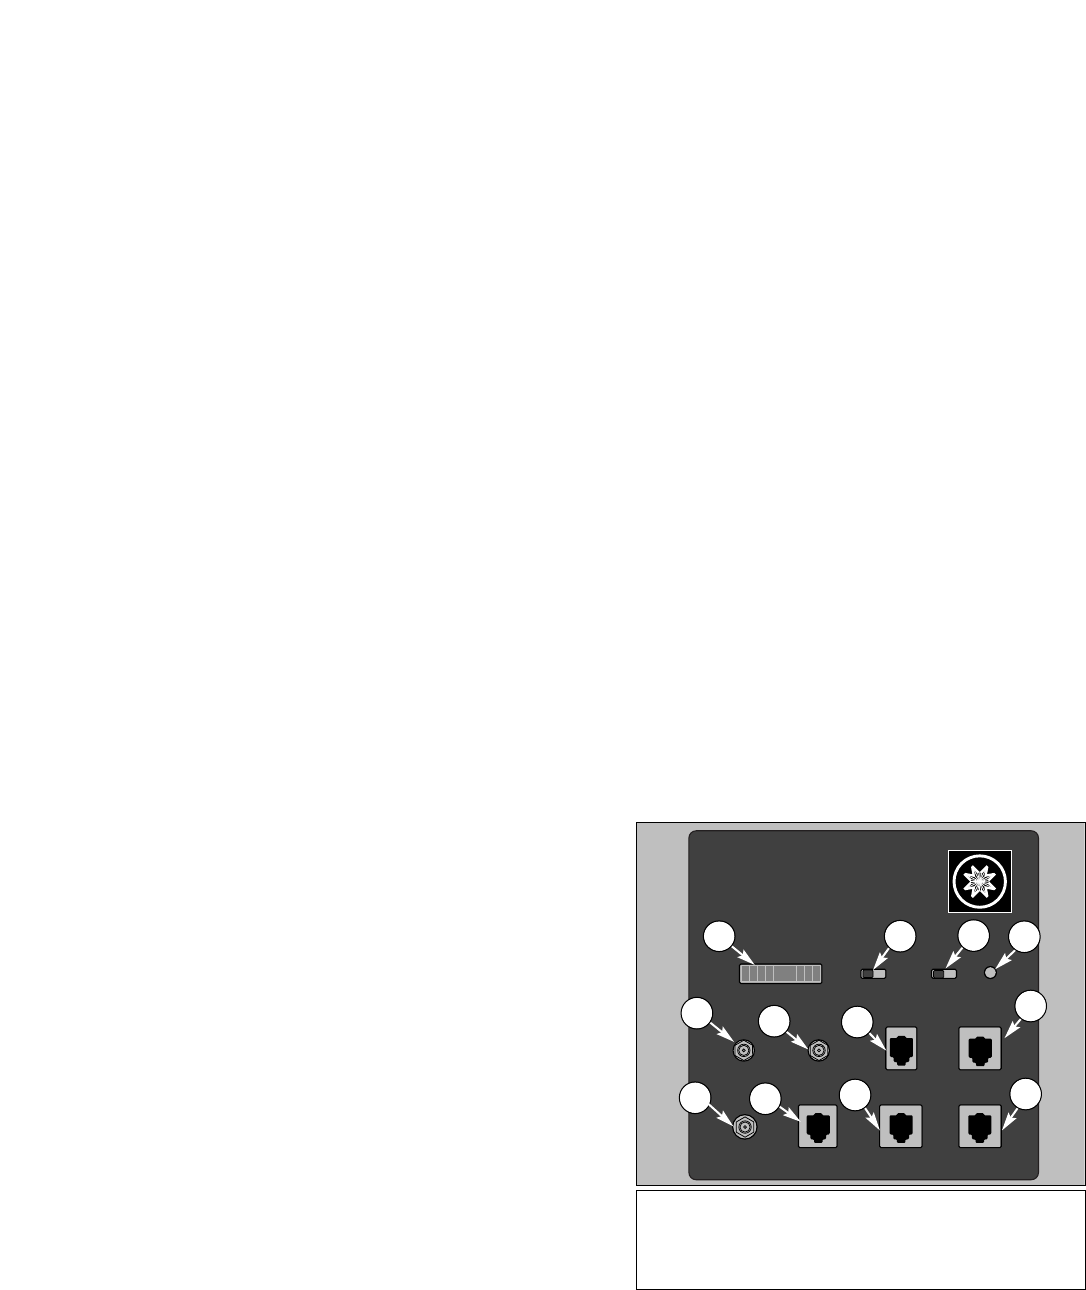
1. Current (mA x 100) (1), Fig. 9: The Current (Ammeter)
display is a series of vertical red LED bars. Each fully lit bar
represents 1/10 of an amp (or 100 milliamps) of current draw,
with the lowest value on the extreme left of the scale. During
normal tracking speeds, the Ammeter will show a few LED bars
lit up. However, when a slew is initiated, the current draw will
light up the entire LED display, momentarily showing the inertia
load. This effect is entirely normal. The current draw
3. GO TO Key
The GO TO key (3), Fig. 8, causes the telescope to
automatically slew to specific library entry coordinates. The GO
TO key also produces a blinking cursor in the GO TO menu file
of the COORDINATES/GO TO mode, to allow new Right
Ascension and Declination coordinates to be entered. Pressing
GO TO while the telescope is slewing to an object pauses the
slewing process, pressing GO TO again resumes the slew.
4. Direction Keys
Labeled "N", "S", "E", and "W", (4), Fig. 8, these four keys make
the #1697 Computer Drive System move, or slew, in a specific
direction, at any one of four different speeds (explained below).
During data entry, the E and W keys can be used to move the
blinking cursor back and forth across the LCD display, so that if
an error is made during entry, it can be erased and changed.
The remaining twelve keys have multiple functions; there are up
and down arrow keys and numbered keys from 0 through 9.
Each one of these keys also has alternate functions listed above
the arrow symbols and numbers. The ALT LED light (9), Fig. 8,
is only visible when entering numerical data. Adescription of the
individual keys follows:
5. RET Key
Typically used for guiding the telescope during an
astrophotograph, the RET key (5), Fig. 8, is used to change the
brightness and pulse rate of the optional corded, plug-in style
illuminated reticle eyepiece, such as the Meade Modified
Achromatic 12mm Illuminated Reticle Eyepiece, or the Meade
Series 4000 Plössl 9mm Illuminated Reticle Eyepiece. (See
Optional Accessories, page 18.) Pressing either the PREV and
NEXT (up and down arrow) keys (13), Fig. 8, while holding down
the RET key, alters the reticle brightness level up or down.
When guiding on very faint stars, it may be helpful to pulse the
light from the LED so that the reticle crosshairs blink on and off.
It is possible to adjust both the reticle brightness as well as the
pulse rates. There are three pulse rates that can be used, all with
a one second pulse interval. The continuous illumination control
and pulse rates are set by holding down the RET key and
pressing one of the following keys; GUIDE (100% on, no
pulsing), CNTR (50% on, 50% off), MAP (25% on, 75% off),
CNGC (10% on, 90% off).
6. Speed Keys (SLEW, FIND, CENTER, and GUIDE)
These keys (6), Fig. 8, allow an observer to set the rate of
movement or slew speed in the drives of the #1697 CDS, as
activated by the N, S, E, and W keys. The chosen rate is
indicated by the speed indicator illuminated LED beside the rate
key that you have pressed. The speed rates are SLEW (8
degrees per second), FIND (2 degrees per second), CNTR (32X
sidereal rate), and GUIDE (2X sidereal rate).
NOTE: All of the slew speeds will drive the telescope in all four
directions, except for GUIDE. The 2X sidereal speed in GUIDE
has one difference in that it will not interrupt the Right Ascension
tracking direction to make Easterly (for Northern hemisphere) or
Westerly (for Southern hemisphere) adjustments; it merely stops
the drive motor and allow Earth's natural rotation to make the
correction.
SLEW, FIND, CENTER, and GUIDE keys also have numbers
listed (7, 4, 1, and 0 respectively). When editing a value, the
multiple function of each of these keys is realized. SLEW and
FIND are also used to set the ‘fast’ focus speed for the electric
focuser accessory option, while CNTR and GUIDE set the slow
focus speed (see details below). There are other special
functions for the CNTR and GUIDE keys that are discussed in
the RET KEY (5), Fig. 8, operations.
Fig. 9: #1697 CDS Control Panel. (1) Current Indicator (Ammeter);
(2) North/South Switch; (3) On/Off Switch; (4) LED Indicator Light;
(5) Focuser Port; (6) Reticle Port; (7) Keypad Hand Controller Port;
(8) R.A. Motor Port; (9) Power Port; (10) RS-232 Port; (11) CCD
Port; (12) Auxiliary Port.
MEADE
Current (mA x 100)
N S On Off
Focuser Reticle
Keypad RA Motor
Power
12vDC
RS 232 CCD Aux
COMPUTER DRIVE SYSTEM
LX QUARTZ - DC SERVO MOTOR
SMART DRIVE
2
3
1 4
5
7
9
8
10
11
12
6
7. FOCUS Key
The FOCUS key (10), Fig. 8, allows 2 speed electric focus
control of the optional Meade #1207 Electric Focuser. (see
Optional Accessories, page 18.) To activate, press either the
SLEW or FIND key (for fast focusing), or the CNTR or GUIDE
key (for slow focusing), press and hold the FOCUS key, and then
press and hold the PREV or NEXT keys (13), Fig. 8, for near and
far focus.
8. MAP Key
The Map key (12), Fig. 8, is used to activate the red LED Map
Light (7), Fig. 8 on top of the Keypad. The deep red LED light
protects your night vision while you search for a particular
accessory or examine a star chart.
9. Object Keys (M, STAR, and CNGC)
These keys (11), Fig. 8, allow direct access to the #1697 CDS’s
Object Library any time that you are not editing a value, setting a
parameter, or selecting a file menu. After pressing one of these
keys, the Keypad displays a blinking cursor, allowing you to enter
the catalog number for objects listed in the library (see Appendix
C. 64,359-Object Library). After entry, press the ENTER key. To
observe the entered object, press the GO TO key. A brief
description of the catalog key symbols are; M (Messier objects),
STAR (stars and planets), and CNGC (deep sky objects).
10. PREV and NEXT Keys
The PREV and NEXT (up and down arrow) keys (13), Fig. 8,
move the display's LCD arrow up and down the menu files and
menu file options, so that you may choose an individual selection
to enter. These keys are also used when adjusting the RET
brightness range, or when activating the electric focuser. PREV
and NEXT are also used to select the objects from the Object
Library when using START FIND (explained on page 15).


