


- 7 -
LX200R: YOUR PERSONAL
WINDOW TO THE UNIVERSE
The Meade LX200R models are extremely versatile, high-resolution telescopes. With
pushbutton controls, precision GPS alignment, zero image-shift microfocusing, true-
level and North electronic sensors, automatic tracking of celestial objects, periodic
error correction for both axes, and a library of 145,000
+
objects in the AutoStar II data-
base, the
LX200R models offer unmatched state-of-the-art performance.
Observe the feather structure of an eagle from 50 yards or study the rings of the plan-
et Saturn from a distance of 800 million miles. Focus beyond the Solar System on
ancient star clusters, remote galaxies, and stars recently discovered to have planets
orbiting about them. Meade
LX200R telescopes are capable of growing with your inter-
est and can meet the requirements of the most demanding advanced observer.
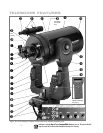
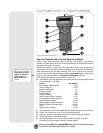
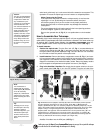
B Eyepiece: Place the Series 5000 26mm 5-element
Plössl
eyepiece into the 90°
diagonal prism (3, Fig. 1) and tighten in place with the eyepiece thumbscrew (2,
Fig. 1). The eyepiece magnifies the image collected in the optical tube.
C Eyepiece Thumbscrew: Tightens the eyepiece (1, Fig. 1) in place. Tighten to a
firm feel only.
D 1.25" Diagonal Prism (or 2" Mirror): Provides a more comfortable right angle view-
ing position. A 2" diagonal mirror with a 1.25" adapter is standard with the 12" model.
See page 14 for information about attaching the prism or mirror to the microfocuser.
E Diagonal Prism Thumbscrew: Tightens the diagonal prism in place. Tighten to
a firm feel only.
F Rear Cell Port: The microfocuser assembly threads onto this port.
G Coarse Manual Focus Knob:
Moves the telescope’s primary mirror in a finely-
controlled motion
to achieve coarse image focus. The LX200R telescopes can be
focused on objects from a distance of about 25 ft. to infinity. Rotate the focus
knob counterclockwise to focus on distant objects, and clockwise to focus on
nearby objects.
H Fork Arms: This heavy-duty mount holds the optical tube securely in place.
I Battery Compartments: Insert four user-supplied C-cell batteries into each com-
partment (one compartment on each fork arm; eight batteries total).
J Primary Mirror Lock: Rotate this knob towards the "Lock" position and adjust the
tension to a firm feel; this action serves to lock in the coarse focus and also to pre-
vent mirror flop. Use in conjunction with the Zero Image-Shift Microfocuser (see
2$).
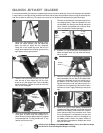
1) Right Ascension (R.A.) Slow-Motion Control: Make fine adjustments in the
Right Ascension,
i.e.
, the horizontal axis, by turning this control with the R.A. Lock
(see ¹ below) in the unlocked position. Set the R.A. Lock to a "partially locked"
position to create a comfortable drag for the R.A. Slow Motion Control.
Caution: Do not operate the R.A. Slow Motion Control with the R.A. Lock
in the fully locked position, as such operation may result in damage to the
internal gear system and also cause you to lose alignment.
1! Right Ascension (R.A.) Setting Circle: See APPENDIX A, page 55, for detailed
information.
1@ Right Ascension (R.A.) Lock: Controls the manual horizontal rotation of the tel-
escope. Turning the R.A. lock counterclockwise unlocks the telescope, enabling
it to be freely rotated by hand about the horizontal axis. Turning the R.A. lock
clockwise locks the telescope, prevents the telescope from being rotated manu-
ally, and engages the horizontal motor drive for AutoStar II operation.
1# Computer Control Panel (see Fig. 1 inset):
A. ON/OFF Switch: Turns the computer control panel and AutoStar II ON
or OFF. The red power indicator LED next to the switch illuminates
when power is supplied to the AutoStar II handbox, the microfocuser,
and to the telescope’s motor drives (the LED can be turned off in the
Panel Light menu; see page 27).
Caution:
Using products other than
standard Meade accessories
may cause damage to the
telescope’s internal electron-
ics and may void the Meade
warranty.
B
Want to learn more
about the eyepieces
available for your
LX200R
telescope?
See OPTIONAL
ACCESSORIES, pages
43, 44, and 45.
1!
Want to learn more
about the Right
Ascension and
Declination setting
circles? See page 55.
G
Want to learn more
about focusing your
telescope? See pages
17 and 31.
See page X.
j
Want to learn more
about the primary
mirror lock?
See
MIRROR MIRROR
,
page 37.
I
Want to learn how to
install the batteries?
See page 13.
F
Want to learn how to
attach the microfocuser
assembly to the rear
cell port of your
LX200R
telescope?
See
HOW TO ASSEM-
BLE YOUR TELESCOPE
,
pages 13 and 14.
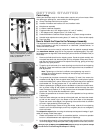
Looking at or near the Sun will cause irreversible damage to your eye. Do not point this tele-
scope at or near the Sun. Do not look through the telescope as it is moving.