


- 40 -
Looking at or near the Sun will cause irreversible damage to your eye. Do not point this telescope
at or near the Sun. Do not look through the telescope as it is moving.
2
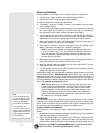
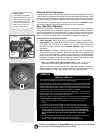
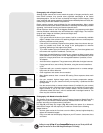
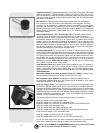
Fig. 21:
LX200R
with #62
T-Adapter: (1) camera adapter, (2) T-
mount, (3) camera body.
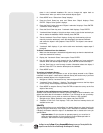
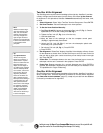
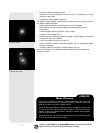
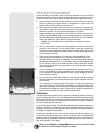
Fig. 22: Example of vignetting.
1
PHOTOGRAPHY
3
You may perform through-the-telescope photography with any 35mm camera body with
a removable lens. You may connect a camera to a #62 T-Adapter which is then con-
nected to the microfocuser assembly. See Fig. 21. Using this method, the telescope
effectively becomes the lens of the camera.
The #62 T-Adapter (1, Fig. 21) connects to the microfocuser assembly, followed by a
T-Mount (2, Fig. 21) for the particular brand of 35mm camera being used, followed by
the camera body (3, Fig. 21
).
To orient an object in the viewfinder of the 35mm camera body, use a small jeweler’s
screwdriver to slightly loosen three adjustment screws around the outer knurled ring
of the T-Mount. Rotate the camera body to achieve proper orientation of the object;
then re-tighten the adjustment screws.
The #62 T-Adapter permits close-coupling of a camera body to the telescope. In this
format vignetting occurs: The photographic image appears on film with a slight dark-
ening (vignetting) at the corners of the 35mm frame (Fig. 22
).
Photography through a long lens such as the LX200R requires special technique for
good results, and the photographer should probably expect to waste a roll or two of
film in acquiring this technique. Long-lens photography has its own rewards, howev-
er, rewards that short-focus lenses cannot duplicate.
A few tips on photography with the
LX200R telescopes:
1. Use the Field Tripod for the telescope. At an effective focal length of 2000mm,
even small external vibrations can easily ruin an otherwise good photo.
For best results in photographing celestial objects, a wedge and One-Star polar
alignment is recommended. See
APPENDIX A, pages 50 through 54.
Caution: With the #62 T-Adapter and a camera body mounted to the
LX200R
photo port, the telescope can only be rotated vertically about 45°.
Moving past this point may damage the telescope and camera.
2. Use a cable-operated shutter release. Touching the camera body to initiate
shutter operation almost certainly introduces undesirable vibrations.
3. Focus the image with extreme care. While observing the subject through
the camera’s reflex viewfinder, turn the telescope’s focus knob (6, Fig. 1) to
achieve the sharpest possible focus. Note that some 35mm cameras may have
an optional focusing screen (available from the manufacturer) for use with a long
telephoto lens. This screen provides a brighter and clearer image to focus, and
is highly recommended.
4. Correct shutter speeds vary widely, depending on lighting conditions and film
used. Trial-and-error is the best way to determine proper shutter speed in any
given application.
Note: The camera used with your telescope may have an exposure meter
that is still active when the standard lens is removed and the body is con-
nected to the telescope with the T-Mount. If used for terrestrial photogra-
phy, the camera meter should be acceptable. If used for astrophotography,
the meter probably will not provide good results since camera meters are
not made to compensate for a dark sky.
5. Terrestrial photography through the LX200R is sensitive to heat waves rising from
the Earth’s surface. Long distance photography is best accomplished in the early
morning hours before the Earth has had time to build up heat.
6. Photography of the Moon and planets through the LX200R can be especially grat-
ifying, but points 1 through 4 should be particularly noted in this case. If you wish
to take photographs using polar alignment, see
APPENDIX A, page 52.