


26
STORAGE
Immediately prepare your riding mower for
stor age at the end of the season or if the
riding mower will not be used for 30 days
or more.
WARNING: Never store the riding mower
with gas o line in the tank inside a building
where fumes may reach an open flame or
spark. Allow the engine to cool before stor-
ing in any en clo sure.
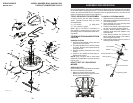
MOWER
Remove deck from mower for winter storage.
When mower is to be stored for a period of
time, clean it thor oughly, remove all dirt,
grease, leaves, etc. Store in a clean, dry area.
1. Clean entire riding mower (See “CLEAN-
ING” in the Maintenance section of this
manual).
2. Inspect and replace belt, if nec es sary
(See belt re place ment in struc tions in the
Service and Ad just ments section of this
manual).
3. Lubricate as shown in the Main te nance
section of this man ual.
4. Be sure that all nuts, bolts and screws
are securely fastened. In spect moving
parts for damage, break age and wear.
Replace if nec es sary.
5. Touch up all rusted or chipped paint
surfaces; sand lightly before paint ing.
BATTERY
• Fully charge the battery for storage.
• If battery is removed from riding mower
for storage, do not store battery directly
on concrete or damp surfaces.
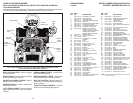
ENGINE
FUEL SYSTEM
IMPORTANT: It is important to prevent
gum deposits from forming in essential fuel
system parts such as carburetor, fuel hose,
or tank during storage. Also, alcohol blended
fuels (called gasohol or using ethanol or
methanol) can attract moisture which leads
to separation and formation of acids during
storage. Acidic gas can damage the fuel
system of an engine while in storage.
• Empty the fuel tank by starting the engine
and letting it run until the fuel lines and
carburetor are empty.
• Never use engine or carburetor clean er
products in the fuel tank or permanent
damage may occur.
• Use fresh fuel next season.
NOTE: Fuel stabilizer is an acceptable al-
ternative in min i miz ing the formation of fuel
gum deposits during stor age. Add stabilizer
to gasoline in fuel tank or stor age container.
Always follow the mix ratio found on stabilizer
container. Run engine at least 10 minutes
after adding stabilizer to allow the sta bi liz er to
reach the carburetor. Do not empty the gas
tank and carburetor if using fuel stabilizer.
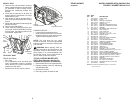
ENGINE OIL
Drain oil (with engine warm) and replace
with clean engine oil. (See “ENGINE” in the
Maintenance section of this man ual).
CYLINDER(S)
1. Remove spark plug(s).
2. Pour one ounce of oil through spark plug
hole(s) into cylinder(s).
3. Turn ignition key to “START” po si tion for
a few seconds to distribute oil.
4. Replace with new spark plug(s).
OTHER
• Do not store gasoline from one sea son to
another.
• Replace your gasoline can if your can starts
to rust. Rust and/or dirt in your gasoline
will cause problems.
• If possible, store your riding mower in doors
and cover it to give protection from dust
and dirt.
• Cover your riding mower with a suitable
protective cover that does not retain mois-
ture. Do not use plastic. Plas tic cannot
breathe which allows con den sa tion to form
and will cause your riding mower to rust.
IMPORTANT: Never cover riding mower
while en gine and exhaust areas are still
warm.
19
RIDING MOWER
Always observe safety rules when per form ing
any main te nance.
BRAKE OPERATION
If riding mower requires more than four (4)
feet to stop at highest speed in high est gear
on a level, dry concrete or paved surface,
then brake must be serviced at your nearest
authorized service center.
TIRES
• Maintain tire pressure at 12 PSI.
• Keep tires free of gasoline, oil, or insect
control chemi cals which can harm rubber.
• Avoid stumps, stones, deep ruts, sharp
objects and other hazards that may cause
tire damage.
NOTE: To seal tire punctures and pre vent
flat tires due to slow leaks, tire sealant may
be purchased from your local parts dealer.
Tire sealant also pre vents tire dry rot and
corrosion.
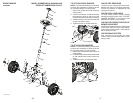
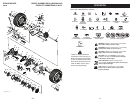
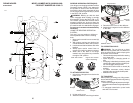
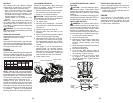
AXLE AND SPINDLES
• Front wheel axles and front spindles should
be properly lubricated.
• Wheel axles and spindles should be
lubricated with grease.
Wheel Axle
Spindle
OPERATOR PRESENCE SYS TEM AND
REVERSE OPERATION SYSTEM (ROS)
Be sure operator presence and reverse
operation sys tems are work ing properly.
If your riding mower does not function as
described, repair the problem immediately.
• The engine should not start unless the
brake pedal is fully de pressed, and the deck
clutch lever is in the dis en gaged position.
CHECK OPERATOR PRESENCE SYSTEM
• When the engine is running, any attempt
by the op er a tor to leave the seat without
first setting the parking brake should shut
off the engine.
• When the engine is running and the deck
clutch lever is engaged, any attempt by
the operator to leave the seat should shut
off the engine.
• Never operate the deck clutch lever unless
you are seated in the seat.
BLADE CARE
For best results mower blades must be sharp.
Re place worn, bent or damaged blades.
CAUTION: Use only a replacement blade
approved by the manufacturer of your riding
mower. Using a blade not approved by the
manufacturer of your riding mower is hazard-
ous, could damage your riding mower and
void your warranty.
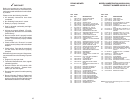
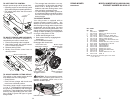
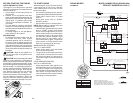
CHECK REVERSE OPERATION (ROS)
SYSTEM
• When the engine is running with the ignition
switch in the engine "ON" position and the
deck clutch lever engaged, any attempt by
the operator to shift into reverse should
shut off the engine.
• When the engine is running with the ignition
switch in the ROS "ON" position and the
deck clutch lever engaged, any attempt by
the operator to shift into reverse should
NOT shut off the engine.
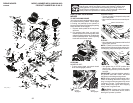
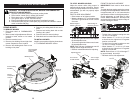
BLADE REMOVAL
1. Raise mower to highest position to allow
access to blade.
NOTE: Protect your hands with gloves and/
or wrap blade with heavy cloth.
2. Remove blade bolt by turning coun ter-
clock wise.
3. Install new blade with stamped "THIS
SIDE UP" facing deck and mandrel as-
sembly.
IMPORTANT: To ensure proper as sem bly,
center hole in blade must align with star on
mandrel assembly.
4. Install and tighten blade bolt securely
(45-55 Ft. Lbs.).
IMPORTANT: Special blade bolt is heat
treated.
0
2
5
4
5
Blade
Center Hole
Star
Mandrel
Assembly
Blade Bolt
(Special)
ROS "ON"
Position
Engine "ON" Position
(Normal Operating)