11
Notch
First cut
Second cut
Final cut here. 5cm above
center of notch.
5cm
5cm
S After removing the wood from the notch,
make the felling cut on the opposite side of
thenotch.Thisisdonebymakingacutabout
two inches higher than the center of the
notch.Thiswillleaveenoughuncut woodbe-
tween the felling cut and the notch to form a
hinge. This hinge will help prevent the tree
from falling in the wrong direction.
Opening
of felling
cut
Closing
of notch
Hinge holds tree on stump and helps
control fall
NOTE: Before felling cut is complete, use
wedges to open the cut when necessary to
controlthedirectionoffall. Toavoidkickback
or chain damage, use wood or plastic
wedges, butnever steel or iron wedges.
S Be alert to signs that the tree is ready to f all:
cracking sounds, widening of the felling cut,
or movement in the upper branches.
S As treestartsto fall,stop saw,put itdown,
and get away quickly on your planned re-
treat path.
S DO NOT cut down apartially fallen treewith
your saw . Be extremely cautious with par-
tially fallen trees that may be poorly sup-
ported. When a tree doesn’t fall completely ,
set t hesawasideandpulldownthetreewith
a cable winch, block and tackle, or tractor.
CUTTING A FALLEN TREE
(BUCKING)
Bucking is the t erm used for cutting a fallen
tree to the desired log length.
WARNING: Do not stand on the log
being cut. Any portion can rollcausing loss
of f ootingand control. D onot standdownhill
of the logbeing cut.
Important points
S Cut only one log ata time.
S Cut shattered wood very carefully; sharp
piecesofwoodcouldbeflungtowardoper-
ator.
S Use a sawhorse to cut small logs. Never
allow another person to holdthe log while
cuttingandneverholdthelogw ithyourleg
or foot.
S Do not cut in an area where logs, limbs,
and roots aretangled.Drag t helogs intoa
clear ar eabefore c uttingby pullingoutex-
posed and cleared logs first.
TYPES OF CUTTING USED FOR
BUCKING
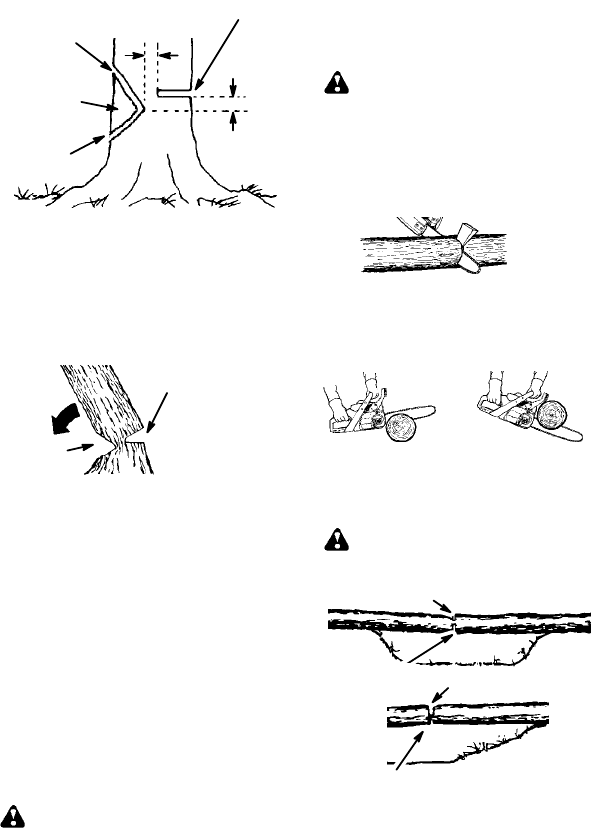
WARNING:Ifsawbecomespinched
or hungin alog,don’t try toforceit out. You
canlosecontrolofthesawresultingin injury
and/or damage to the saw. Stop th e saw,
drivea wedgeof plastic o rwoodinto thecut
untilthesawcanberemovedeasily. Restart
thesawandcarefully reenterthecut. Donot
attemptt orestartyoursawwhenitispinched
or hung ina log.
Turn saw OFF and use a plastic or
wooden wedge to force cut open.
Overcuttingbeginsonthetopsideofthelog
with thesawagainstthelog. When overcut-
ting use light do wnward pressure.
Overcutting Undercutting
Undercuttinginvolvescuttingontheunder-
sideofthelogwitht opofsawagainstthelog.
When undercutting use light upward pres-
sure. Hold saw firmly and maintain control.
The saw will tend to push back toward you.
WARNING: Never turn saw upside
down to undercut. The saw cannot be con-
trolled in this position.
First cut on p ressure side of log
Second cut
Firstcut on pressure side of log
Second cut
BUCKING WITHOUT A
SUPPORT
S Overcut through 1/3 of the diameter of the
log.
S Roll the log over and finish with a second
overcut.
S Give special attention tologs under strain
to prevent the saw from pinching. Make
the first cut onthe pr essure sidetorelieve
the stress on t he log.
BUCKING USING A LOG OR SUP-
PORT STAND
S Remember your first cut is always on the
pressure side of the log.
S Your first cut should extend
1/3 of the
diameter of the log.


