


How about a family-
size vegetable garden?
Nowadays many gardeners
prefer small gardens —
especially in the suburbs, where
space is at a premium. But, if
you’re fortunate enough to own a
large lot, you can create a bigger
garden — a half acre or more.
Your MANTIS XP
Tiller Makes Weeding
a Pleasure!
As a tiller, your MANTIS XP
Tiller works the soil down to 10”
(25.4 cm) deep. But, as a
cultivator, it gently cultivates the
surface, only 2" to 3" (5.09 cm to
7.62 cm) deep.
First, you must switch the tines
to the weeding position. This
takes less than a few minutes.
Then, your MANTIS XP
Tiller’s sharp “tine teeth” will
slice up those pesky weeds,
burying them as you go along.
And, since the tines in this
position won’t dig too deep, they
won’t hurt your plants’ precious
root systems.
The result? Your Tiller will cut
your weeding time in half, and turn
a tiresome chore into a pleasure.
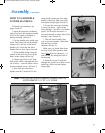
How to Switch From
Tilling to Cultivating
Position
To switch between tilling and
cultivating, you will simply move
the tines from one side of the
tiller to the other.
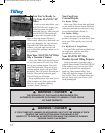
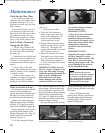
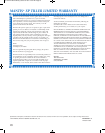
When the tines are in the
tilling position, they will appear
as shown in Picture 1. When
running, the tines rotate to the
front of the tiller and the points
of the tines will contact the
ground first, allowing it to
aggressively cut and break the
soil for tilling.
When the tines are in the
cultivating position, they will
appear as shown in Picture 2. In
this position, when the tines rotate,
the long flat part of the teeth will
contact the ground first for a less
aggressive cultivating action.
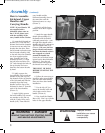
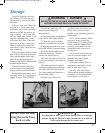
1. First, you will need to
understand that your Mantis XP
has an inner and an outer set of
tines on each side of the tiller as
shown in Picture 3
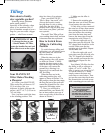
2. Make sure the tiller is
turned off.
3. Remove the retaining pins
from the outer set of tines (Picture
4) and remove the outer tines.
4. Only after you have removed
the outer set of tines, then remove
the retaining pins from the inner
tines and remove the retaining
pins from the inner tines and
remove the inner tines from the
transmission axle (Picture 5)
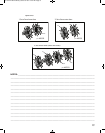
5. Place the right-side set of
inner tines onto the left-side. The
"D" shaped hole should be to the
outside. Make sure the tine
retaining pin is installed. Repeat
for the other side
6. Place the right side set of
outer tines onto the left-side axle.
The "D" shaped hole should be
to the outside and insert the tine
retaining pin. Repeat for the
other side.
Your Mantis XP tiller also has
the ability to till or cultivate at
either a 9" or 16" width. The
tiller is sent to you set up for 16".
To run the tiller at a 9" width,
simply remove the inner and
outer tines as noted above. Then
just put the outer tines back onto
the transmission axel and secure
with a retaining pin on each side.
13
Tilling
WARNING • DANGER
DO NOT REACH YOUR FINGERS
AND\OR HAND BETWEEN
THE TINE BLADES.
DO NOT ATTEMPT TO REMOVE
THE INNER SET OF TINES UNTIL
YOU HAVE FIRST REMOVED THE
OUTER SET OF TINES.
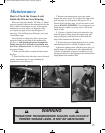
IMPORTANT
To change the tines on your
4 Stroke Mantis
®
XP Tiller,
rotate the handles forward and
allow tiller to rest on the engine.
! !
Picture 4
Picture 5
Picture 2 Picture 3
Picture 1
Inner Tines
Outer Tines
! !
401764 XP Tiller-Cultivator_manual 5/18/10 10:51 AM Page 13