


ASSEMBLY
Replacement
of
blades
CAUTION:
*Always be sure that the tool is switched off and unplugged before replacement
of
the
blades.
Never remove the blades with bare hands. Wear gloves. Otherwise it can cause injury.
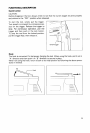
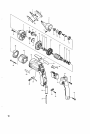
Removing cutting head
Use the hex wrench to loosen the three
screws which secure the cutting head. Pull
the cutting head straight out to remove
it
with turning it left and right alternately.
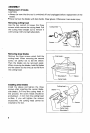
Removing shear blades
Remove the three screws which hold the
cutting head. When removing the second
screw, be careful not to fall the sleeve.
Then the blades can be removed easily.
When removing the blades, hold the blades
and the sleeve
so
that they do not fall from
the cutting head.
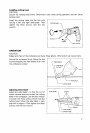
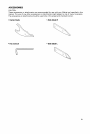
Installing shear blades
Install the sleeve and tighten th. three
screws after inserting the center blade,
side blade
L
&
R
into the cutting head. In
this process, the screw heads should be
protruding
2
-
3
mm from the cutting head
surface.
If
you will tighten the screws
excessively, the cutting head cannot be
installed to the tool.
t
Cutting head
Screws
'
Hex wrench
Screws
Side blade
L
Center blade
Side blade
R
6