


Simplex Classic Mat Cutter
Instruction Manual
Model 550-1/560-1
7
Logan Graphic Products Inc., 1100 Brown Street, Wauconda, IL 60084 847-526-5515
LoganGraphic.com
A
B
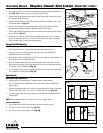
Changing Scales
Your Logan mat cutter is supplied with a separate set of either inch or metric
scales. If you prefer a different form of measurement than what is installed
on your mat cutter, use these simple steps to recalibrate your machine to the
alternate scale measurements.
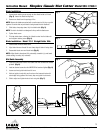
Switching inch scale to metric scale:
Step 1: Using a pencil, mark a small line on the machine next to the 2 3/4” mark of
the inch scale (Fig. 27). Mark the line on the machine itself, NOT the scale.
Step 2: Carefully peel up and remove the inch scale and clean off any adhesive or
glue residue left behind.
Step 3: Peel off the adhesive backing from the metric scale and apply it with the 7cm
mark exactly next to the pencil mark you drew. Conversion: 2 3/4” = 7cm (Fig. 28).
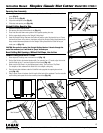
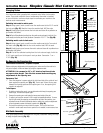
Switching metric scale to inch scale:
Step 1: Using a pencil, mark a small line on the machine next to the 7cm mark of
the metric scale (Fig. 29). Mark the line on the machine itself, NOT the scale.
Step 2: Carefully peel up and remove the metric scale and clean off any adhesive or
glue residue left behind.
Step 3: Peel off the adhesive backing from the inch scale and apply it with the
2 3/4” mark exactlly next to the pencil mark you drew. Conversion: 7 cm =
2 3/4” (Fig. 30).
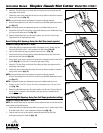
Re-Squaring the Squaring Arm
Tools needed: Screwdriver, Carpenter’s Square
Before making any adjustments to the squaring arm, make sure that the machine is
truly out of square, not the mat board, by using the squareness test.
ATTENTION: It is common for 32” x 40” sheets of mat board to be
un-square when bought. Take this into account before making any
adjustments to the squaring arm.
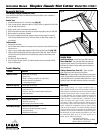
Squareness Test
1. Place the carpenter’s square against the right hand side of the guide rail and
down against the squaring arm (Fig. 31). Lock to see if there are any gaps
between the framing square and the squaring arm. If so, the squaring arm
needs to be adjusted.
To Re-Square
1. By looking at where the gap is, you can determine which way the squaring arm
needs to go, in order to be square again.
2. Remove the squaring arm and locate the two screws inside of the slot.
3. To adjust, you must turn screws A & B in equal but opposite directions. To move
the far right end of the squaring arm towards the top end of the machine, turn
adjustment screw B inward (clockwise) about a quarter turn, and turn adjustment
screw A outward (counter-clockwise) a quarter turn (Fig. 32)
4. Re-install the squaring arm and check for square. This is a trial and error
method. In some cases more than a quarter turn is needed, in some cases, less.
Mat Guide Assembly
If mat guide wedge becomes unscrewed from mat guide, reassemble making sure angle
of wedge is aligned correctly (Fig. 33).
metric scale
1
3
5
7
inch scale
0
1
2
3
4
2
4
6
8
10
12
9
11
13
Mark a pencil
line on the
machine here
at 2 3/4”
metric scale
1
3
5
7
inch scale
0
1
2
3
4
2
4
6
8
10
12
9
11
13
Apply the metric
scale so the 7cm
mark aligns with
the pencil mark
metric scale
1
3
5
7
inch scale
0
1
2
3
4
2
4
6
8
10
12
9
11
13
Mark a pencil
line on the
machine here
at 7cm
metric scale
1
3
5
7
inch scale
0
1
2
3
4
2
4
6
8
10
12
9
11
13
Apply the inch
scale so the
2 3/4” mark
aligns with the
pencil mark
Fig. 27
Fig. 28
Fig. 29
Fig. 30
Mat Guide
#602 Slide
#603 Wedge
#604 Mat Guide
Screws (2)
#112N Mat
Guide Knob
Fig. 32
Fig. 31
Fig. 33
Place Square Here