


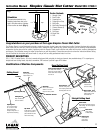

Simplex Classic Mat Cutter
Instruction Manual
Model 550-1/560-1
6
Logan Graphic Products Inc., 1100 Brown Street, Wauconda, IL 60084 847-526-5515
LoganGraphic.com
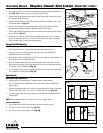
Fig. 24
3. Using a pencil, mark a line along the full length of the matboard using the Guide Rail as a
guide (Fig. 16). Turn the mat 1/4 turn to the right before cutting.
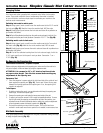
4. Install or slide the top Guide Rail Stop onto the Guide Rail and slide it past the far end of
the matboard but do not tighten it.
5. Install or slide the bottom Guide Rail Stop onto the Guide Rail and tighten at the 2” mark
on the Guide Rail scale (Fig. 19).
6. Hook the bevel cutting head onto the Guide Rail and slide up until the Start & Stop
indicator lines up with the marked line closest to the top of the machine.
7. Slide the top Guide Rail Stop towards you until it makes contact against the bevel cutting
head and tighten (Fig. 21).
8. Both Guide Rail Stops are now set to make repeated opposite side cuts on a multiple
number of mats of the same size. To then cut the other side of the mats, reset the top
stop as you did in step 6. and cut the remaining sides.
Straight Cut Mat Opening
EXAMPLE: Cutting a mat with a 2” border.
1. Set the Mat Guide to the 2” mark on the scale and retighten the black knobs.
2. Place the mat to be cut into the machine colored side down with the Slip Sheet
underneath and lower the Guide Rail.
3. Using a pencil, mark a line along the full length of the mat board using the Guide Rail as a
guide. Repeat this for remaining three sides.
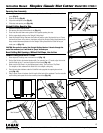
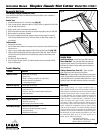
4. Using the Straight Cutting Head, align the top scribe line with the top border line and
press down on the handle until the cutting head sits flat on the mat board and the Nylon
Guides hook onto the Guide Rail lip (Fig. 22).
5. Pull the Straight Cutting Head until the bottom scribe line lines up with the bottom border
line. Repeat until all borders are cut (Fig. 23).
Adjustments
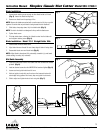
Bevel blade depth adjustment
• Increase depth to increase overcuts - Decrease depth to reduce overcuts
1. Hold the 702 Bevel Cutter upside down in your hand with the blade activated in the
cutting position.
2. Measure the exposed amount with a ruler at the same angle as the blade. For standard
thickness mat board (4 ply/1.4mm) only 1/8” of blade should be seen (Fig. 24).
3. Turn blade depth screw (clockwise) to decrease blade depth and (counterclockwise) to
increase depth.
NOTE: Always have blade depth set so that Slip Sheet is only slightly scored.
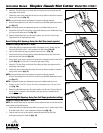
Overcut adjustment
1. Use the marks on the start & stop indicator to reduce or increase overcuts.
2. To reduce overcuts, start & stop like this (Fig. 25).
3. To increase overcuts, start & stop like this (Fig. 26).
Fig. 22
Fig. 23
Fig. 26
Start Stop
Fig. 25