


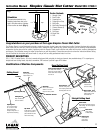

Simplex Classic Mat Cutter
Instruction Manual
Model 550-1/560-1
4
Logan Graphic Products Inc., 1100 Brown Street, Wauconda, IL 60084 847-526-5515
LoganGraphic.com
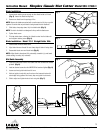
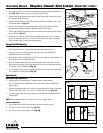
Squaring Arm Assembly
1. Line up squaring arm along side of slot, ensuring the bottom of the v-groove is underneath
screw (Fig. 8).
2. Slide into the slot (Fig. 8).
3. Align slots and tighten screw (Fig. 9).
4. Slide stop onto squaring arm (Fig. 10).
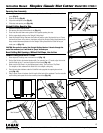
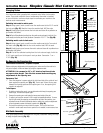
Straight Cutting Board to Size
1. Remove mat guide and slip sheet.
2. Set squaring arm stop to dimension of cut (Fig. 11).
3. Place mat color side down under guide rail and against squaring bar stop.
4. Set the proper depth setting on the Straight Cutting Head.
5. Hook the Straight Cutting Head onto the Guide rail past the end of the board to be cut. Grasp
the handle as shown in the picture, pivot down and pull the Straight Cutting Head towards you.
Keep constant downward pressure on the Straight Cutting Head and the Guide Rail as you
make your cut (Fig. 12).
CAUTION: Be careful to control the Straight Cutting Head as it breaks through the
end of the matboard, as it will tend to “jump” towards you.
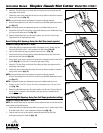
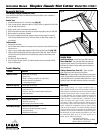
Bevel Cutting Mat Openings, Without Rail Stops, Line to Line
EXAMPLE: Cutting a mat with a 2” border.
1. Move stops out of cutting area or remove from rail (Fig. 13).
2. Set the Mat Guide to the desired border width. For example, for a 2” border, align the front of
the Mat Guide at the 2” mark and tighten the Black Knobs (Fig. 14).
3. Make sure the Slip Sheet is in place before bevel cutting. You must use a Slip Sheet.
The straight cut slot underneath the Guide Rail is for straight cutting only.
4. Place the mat color side down under the Guide Rail and up against the squaring bar and mat
guide (Fig. 15).
5. Using a pencil, draw a line down the full length of the back of the matboard. Turn the mat after
each marking and repeat this for the remaining three sides (Fig. 16).
Fig. 14
Fig. 12
Fig. 15
Fig. 16
Fig. 11
Fig. 10
Fig. 9
Fig. 8
Fig. 13
Mat Guide