


Simplex Classic Mat Cutter
Instruction Manual
Model 550-1/560-1
5
Logan Graphic Products Inc., 1100 Brown Street, Wauconda, IL 60084 847-526-5515
LoganGraphic.com
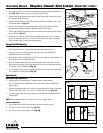
Fig. 18
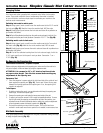
Fig. 19
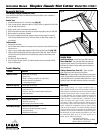
Fig. 21
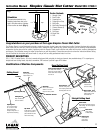
6. Attach the 702 Bevel Cutter to the Guide Rail by fitting the black nylon guides over the
raised edge of the channel.
7. Position the cutter so the middle start & stop line lines up with the marked line closest to
the top of the machine (Fig. 17).
NOTE: Extra start & stop lines are for reference to increase or decrease overcuts.
8. With left hand, depress the Anti-Crawl Pin and firmly pivot the Blade Holder down into the
mat (Fig. 17).
NOTE: It is essential to keep even downward pressure on the Blade Holder as you cut.
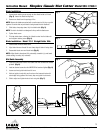
9. Release the Anti-Crawl Pin and pull the cutting head towards you until middle start & stop
line lines up with bottom pencil line (Fig. 18).
10. Rotate the blade holder back up to the neutral position, turn the mat 1/4 to the right.
Complete this for the remaining three sides.
Bevel Cutting Mat Openings Using One Rail Stop (most popular)
EXAMPLE: Cutting a mat with a 2” border.
1. Set the Mat Guide to the desired border width. For example, for a 2” border, align the
front of the Mat Guide at the 2” mark and tighten the Black Knobs (Fig. 14).
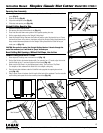
2. Install or slide bottom rail stop over guiderail scale and set at 2” (Fig. 19).
3. Place the mat to be cut into the machine colored side down with the Slip Sheet under-
neath and lower the Guide Rail (Fig. 15).
4. Using a pencil, mark one line along the full length of the matboard using the Guide Rail as
a guide (Fig. 16). Turn the mat 1/4 turn to the right before cutting.
5. Attach the 702 Bevel Cutter to the Guide Rail by fitting the black nylon guides over the
raised edge of the channel.
6. Position the cutter so the middle start & stop line lines up with the marked line closest to
the top of the machine (Fig. 17).
NOTE: Extra start & stop lines are for reference to increase or decrease overcuts.
7. With left hand, depress the Anti-Crawl Pin and firmly pivot the Blade Holder down into the
mat (Fig. 17).
NOTE: It is essential to keep even downward pressure on the Blade Holder as you cut.
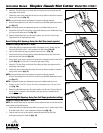
8. Release the Anti-Crawl Pin and pull the cutting head towards you until you hit the
stop
(Fig. 20)
.
9. Rotate the blade holder back up to the neutral position, turn the mat 1/4 to the right and
use the cut line in the back of the matboard to start your next cut. Complete this for
remaining three sides.
Bevel Cutting Mat Openings Using Two Rail Stops (production cutting)
EXAMPLE: Cutting a mat with a 2” border.
NOTE: This method should only be used when cutting multiple numbers of mats that have the
same outside and inside dimensions.
1. Set the Mat Guide to the desired border width. For example, for a 2” border, align the front
of the Mat Guide at the 2” mark and tighten the Black Knobs (Fig. 14).
2. Place the mat to be cut into the machine colored side down with the Slip Sheet
underneath and lower the Guide Rail (Fig. 15).
Fig. 17
Fig. 20